Menu costs
On this page
Menu Costs shows you what every dish on your menu really costs to make, and how much you keep when you sell it. You build each dish from its ingredients. Spensa then works out the cost from the prices on your invoices and keeps it up to date as prices change. You can also see a recommended sell price for each dish, based on the markup you expect for its category.
What this is for
- Keep one catalog of menu items and recipes for your whole business.
- Add dishes and recipes by hand, or import them from menu and recipe files.
- See each dish's cost, sell price, margin, and markup at a glance.
- Get a recommended sell price based on the dish's menu category.
- Build a dish from products you buy, from other recipes, and from quick estimated ingredients.
- Track trim and cooking loss per ingredient.
- Preview what optional extras would do to the cost.
- See how a dish's cost and margin changed over time.
- Record sell prices by hand or take them from your till.
- Copy dishes, delete dishes in bulk, and print a recipe book.
- Manage menu categories and their recommended markups.
Where to open it
On the web app, open Menu Costs in the left sidebar. It is available for your whole organization, so every location shares the same catalog. The app may say "establishment" in some places; that means a location.
Menu categories have their own page under your organization settings, on the Menu categories page.
Menu Costs is not available in the phone app. Staff at a location can see a read-only recipe view instead. That is described in the Recipes chapter.
Access and permissions
Owners, admins, and managers can view and change everything here: items, ingredients, prices, categories, and imports. Team members with the User or Viewer role can look at everything, including prices, costs, and margins, but cannot change anything. You can fine-tune this with custom roles.
Location staff never see the Menu Costs pages. They can only see the cost-free Recipes view, and only if you give them access.
Menu items and recipes: how the catalog works
Everything in Menu Costs is either a menu item or a recipe. A menu item is a dish you sell, so it has a sell price. A recipe is something you make but do not sell directly, like a sauce, a stock, or a spice mix. Both live in the same catalog, and a recipe can be used as an ingredient inside other dishes.
A few things to know before you start:
- Costs come from your invoice prices. If you have no products yet, the page tells you: "Menu costs use your invoice prices." Upload an invoice first, or add products with prices. See Invoices and Products.
- When invoice prices change, your dish costs and margins update automatically. You do not need to do anything.
- Names must be unique. If you try to create or rename an item to a name that already exists, Spensa tells you and asks for a different name.
- Setting a sell price on a recipe turns it into a menu item. Removing the price takes it off the menu again.
Each item can hold:
- A name, a subtitle, and two sets of notes: How to prepare and How to plate & serve.
- Up to 3 photos.
- Labels: free tags for your own grouping, up to 10 per item.
- A menu category (only for items on the menu).
- Allergens from the standard EU list of 14: gluten, crustaceans, eggs, fish, peanuts, soybeans, milk, nuts, celery, mustard, sesame, sulphites, lupin, and molluscs.
- Batch details: how much one batch makes (in grams, milliliters, or portions) and how big one serving is. If you leave the batch size empty, the item counts as made to order.
Add a menu item by hand
Use this when you want to build a dish yourself, one ingredient at a time.
- Open Menu Costs.
- Click Add menu item.
- Choose Add manually.
- Enter the name and confirm.
Spensa creates the item and opens its page, where you add ingredients and set the price. See "The menu item page" below.
Import menus, recipes, and recipe books from files
Instead of typing everything, you can upload files and let Spensa read them. Spensa saves what is on the page; no recipes are invented. This import is available on certain plans. If your plan does not include it, you will see an upgrade note when you try to upload. Adding items by hand always works.
- Click Add menu item.
- Pick what kind of file you have:
- Menu: a full menu with dishes and prices.
- Recipe: one recipe per file. This also works for cost sheets and ingredient exports.
- Recipe book: a cookbook chapter or a collection of several recipes in one file.
- Not sure? Open Help me choose for a short explanation of each option.
- Drop in your files. You can upload PNG, JPEG, or PDF files, up to 10 files at once, each up to 20 MB.
- Decide whether to turn on Skip review and import automatically. With this on, Spensa only asks you to review files where it is unsure about the type or the name. With it off, you review every import before it lands in your catalog.
- Start the upload.
While you pick files, Spensa checks whether you already imported the same file before ("Checking for duplicates..."). If a file was imported earlier, you are asked to confirm before it is processed again.
What happens after the upload
Processing runs in the background. Banners at the top of the Menu Costs page keep you posted:
- "Processing N file(s)..." with the note "You can leave this page; we'll keep working in the background." You can expand it to see each file move through Queued, Reading, Analyzing, and Saving.
- "N menu draft(s) are ready to review" with a Review button that takes you to the review page.
- "N file(s) couldn't be processed" with the advice "Try uploading again, or open each one to see what went wrong." You can dismiss each failed file.
If you stay on the page, a short "Menu setup complete" message appears when a job finishes.
While reading your files, Spensa also matches ingredient names to the products and recipes you already have, fills in units and quantities, records sell prices found on the menu, and adds allergens based on the ingredients.
If an imported item has the same name as an existing item, Spensa does not overwrite your work. It reuses the existing item and only fills in fields that were still empty, such as a missing description, batch size, or allergens. A sell price from the menu is only used when the item had none.
Review imports
When an import needs your check, or when you left automatic import off, the drafts wait on the Review imports page. You also get a notification. See Notifications.
- Open Menu Costs and click Review on the banner, or open the review page directly.
- Pick a draft from the list on the left. Each row shows the file, how many items were found, and how many are dishes or preparations.
- Check the details on the right and fix anything before importing:
- Remove items you do not want, or restore them if you change your mind.
- Rename items.
- Edit sell prices.
- Edit how much a recipe makes and its unit.
- Remove ingredients, or edit an ingredient's name, quantity, and unit.
- Click Save edits & import and confirm. The confirmation tells you how many items will be saved: "These items will be saved to your menu cost catalog. You can edit any of them later."
After confirming, you see "Importing - entries will appear in your menu shortly." The items then show up in your catalog.
Two banners may appear above a draft:
- A type mix-up, for example: "This looks like a recipe ingredient export." If you uploaded a menu but the file looks like a cost sheet, you can click Re-extract as recipe to re-read that file as a single recipe.
- A guessed name: "We guessed this name from the ingredients." with the note "Please double-check before importing."
If a draft is wrong, click Discard. Spensa confirms: "The extracted items will be removed from review. The original file stays in Uploads. This cannot be undone." For an upload with several files, Discard all removes the whole batch at once. You can also import a whole batch in one go without opening each draft, up to 50 drafts at a time.
When there is nothing waiting, the page shows "Nothing to review" with "Uploads waiting for review will appear here."
Find your way around the list
The Menu Costs page shows your catalog as cards. Each card shows the name, the menu category (with its color), labels, the sell price, the margin, and the markup. More cards load as you scroll.
You can change three things right on a card, without opening the item:
- The sell price: click it and type a new one.
- The menu category: pick another one from the list.
- The labels: add or remove tags.
If a card shows a warning icon, the item is not fully costed yet. The icon's tooltip tells you why, for example "No ingredients" or how many ingredients are incomplete. Figures that start with ~ are estimates.

Search, filters, and sort
- Type in the search box to find items by name. Close matches are found too, so small typos are fine.
- Switch the view between Menu Items, Recipes, and All.
- Filter by labels or by menu category.
- Filter by status: all, complete, or incomplete. Complete means the item is fully costed.
- The filter "Missing price, category, or cost" shows only menu items that cannot get a price recommendation yet, so you can fix them one by one.
- Sort by Name, Price, Cost, Margin, or Date Added, in either direction (A-Z or Z-A, Low-High or High-Low).
Active filters show as chips above the list. Clear all removes them in one click. Your filters stay in the page address, so you can share a filtered view with a colleague.
Margin or food cost: pick your view
Some people think in margin, others in food cost. Click the margin figure area to switch the whole list between "X% margin" and "X% food cost". Food cost is simply 100 minus the margin percent. The choice is saved on your device, per organization, so each person on your team can use their preferred view.
Spensa treats a margin of 65% or more (food cost of 35% or less) as good, and a margin below 50% (food cost above 50%) as low.
The markup warning
Each card also shows the markup: how much the price sits above the cost, as a percent of the cost. If the markup is below the recommended markup of the item's menu category, it turns red. The tooltip explains it, for example: "Food recommends 350% markup. This item is at 210%, so it is below the recommendation."
The menu item page
Click any card to open the item. The top of the page shows a breadcrumb back to Menu Costs, plus previous and next arrows that walk through the list in your current filter and sort order.
The money strip
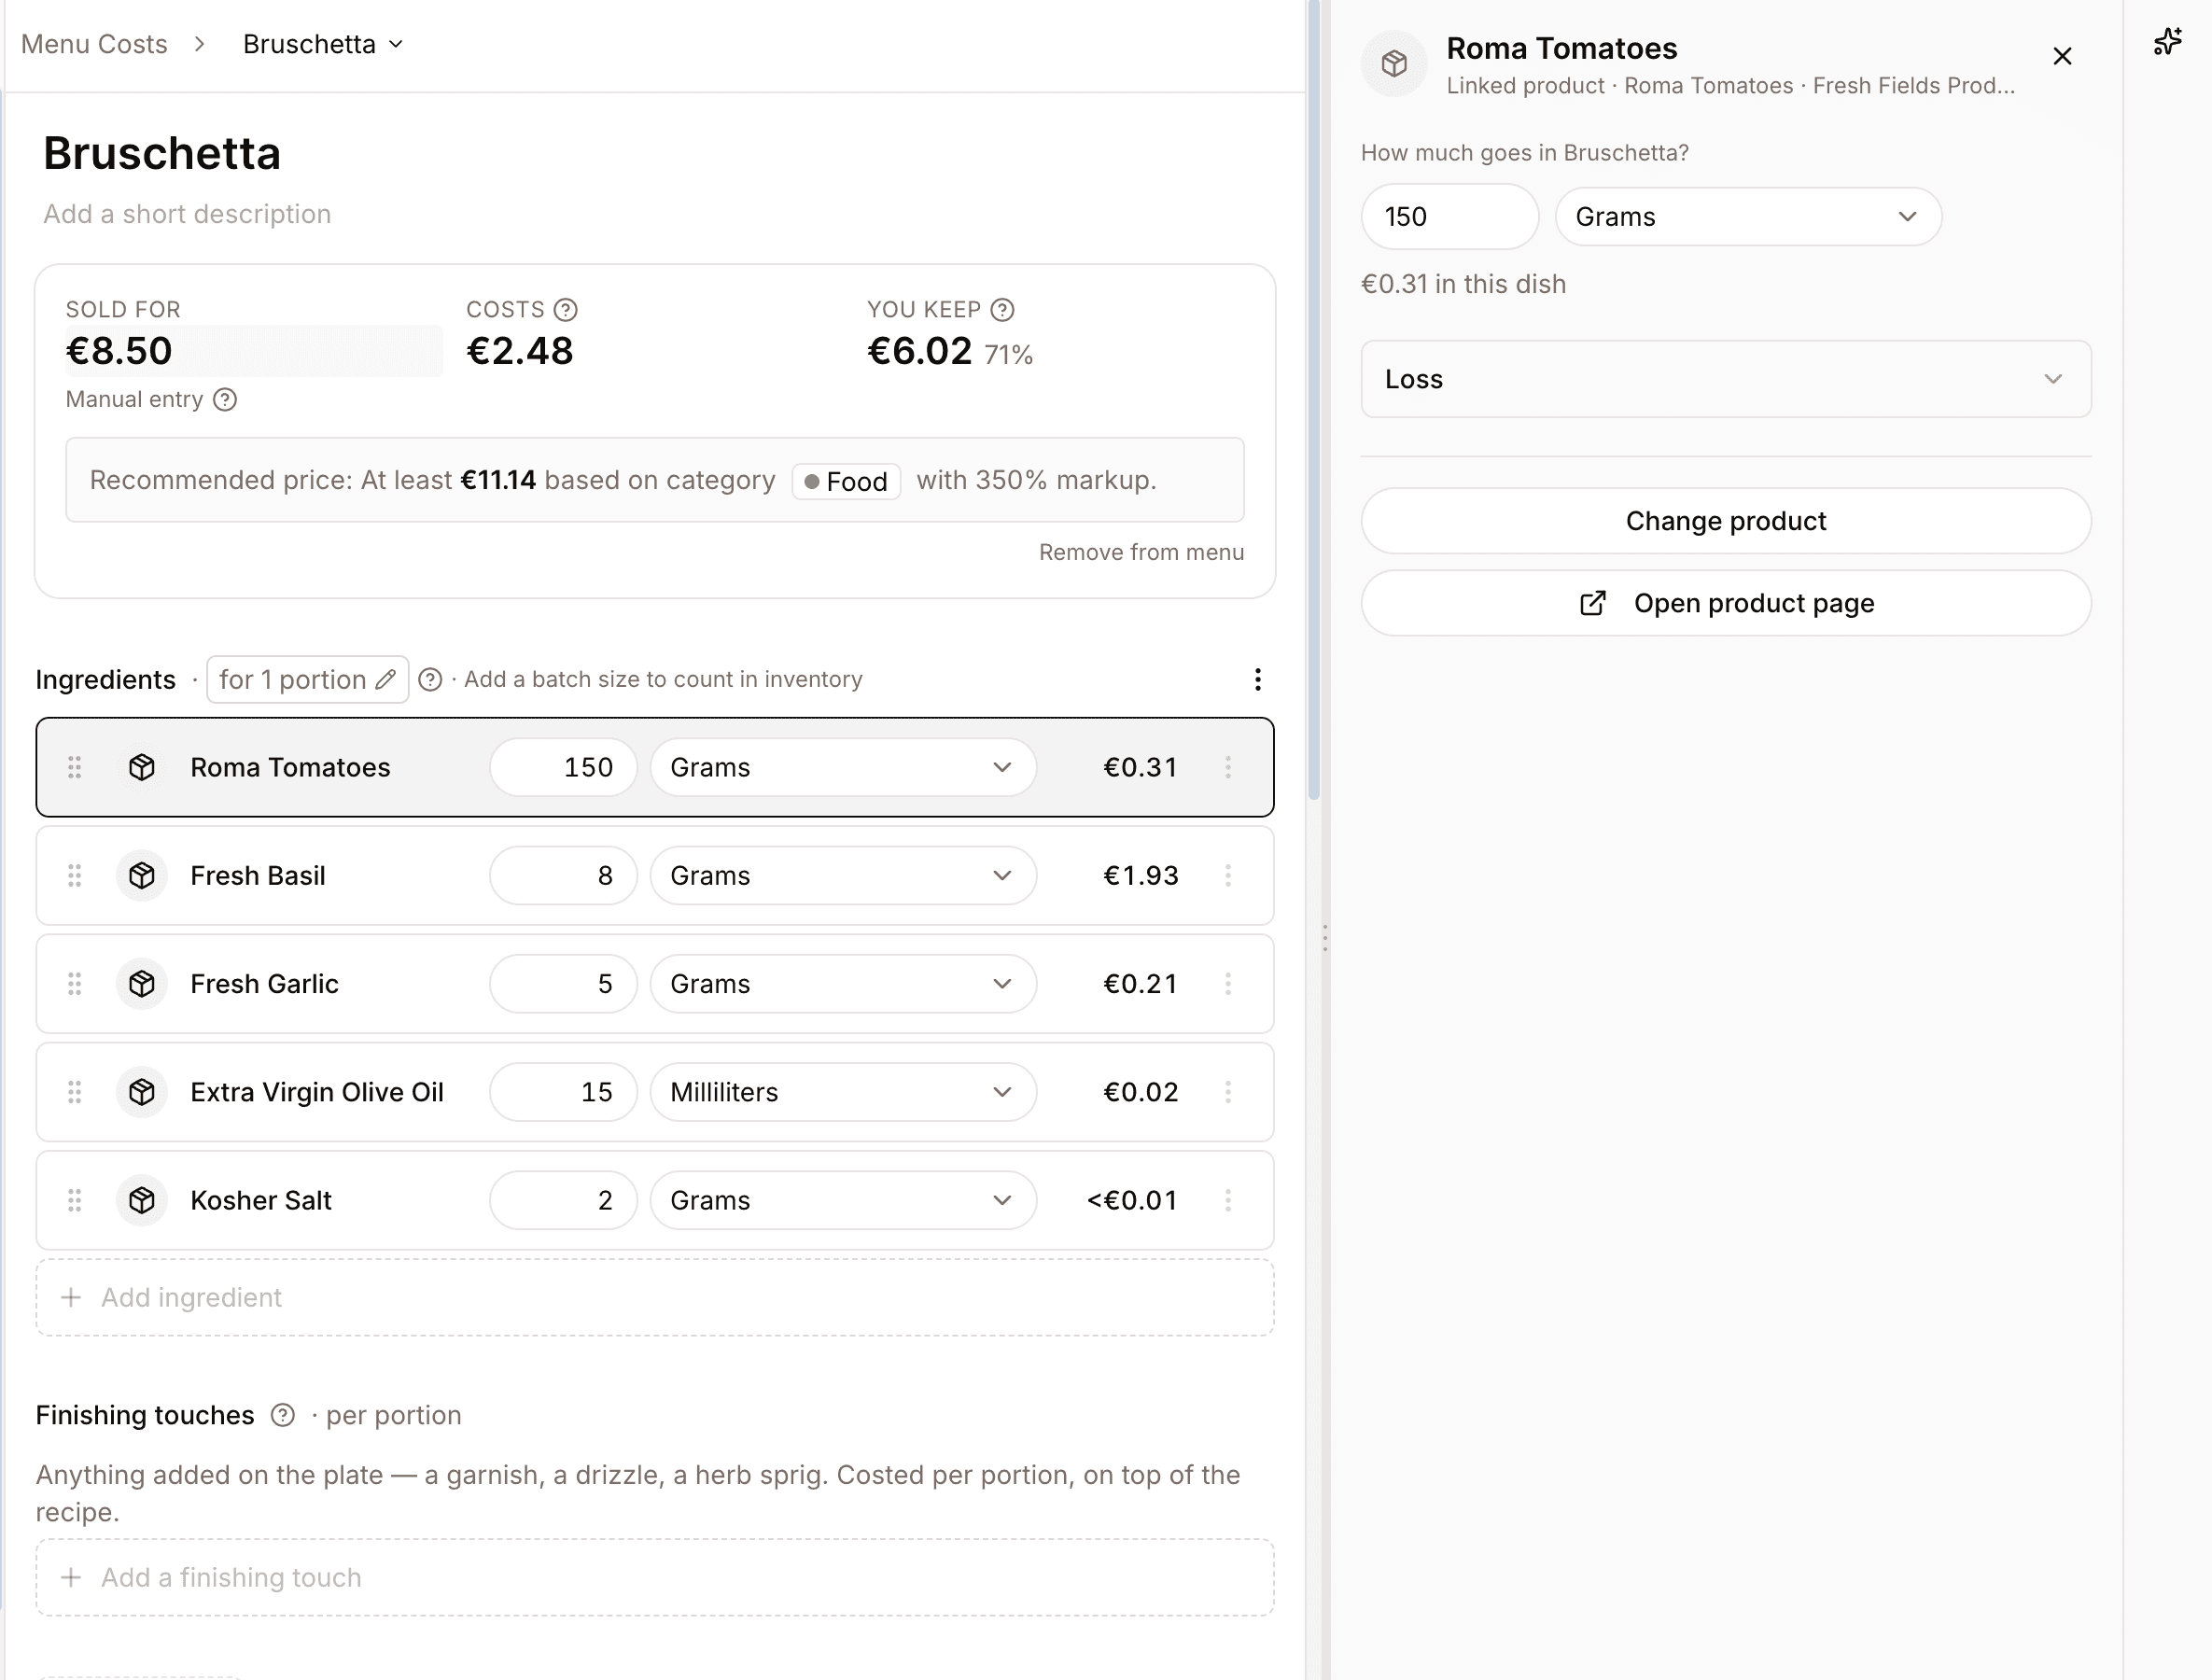
For an item on the menu, three figures sit at the top:
- Sold for: the sell price. Click it to change it. If no price is set yet, you see Set price.
- Costs: what one serving costs to make. A
~in front means some figures are estimates. A small hint explains the batch math in plain words. - You keep: your margin, in money and percent. It turns red when negative. The hint reads: "Your sell price minus what the dish costs to make."
Under the price, a small label shows where the price comes from:
- "Manual entry": "This price was entered manually for this item."
- "Point of Sale": "This price comes from the latest approved Point of Sale data linked to this item."
If some prices or amounts are missing, the strip notes: "Costs marked ~ are estimates - some prices or amounts are missing."
For a batch recipe that is sold by the portion, the strip also shows the portion size, for example "per 350 g portion", and a line like "Ingredients make 2.5 kg - 14.80 total". If the portion size is missing, you see "Set the portion size" highlighted in yellow, because the margin cannot be right without it.

A Remove from menu link takes the item off the menu. This clears the price and the menu category.
For a recipe that is not on the menu, the strip shows the cost instead: "Cost to make", "Cost for 1 portion", "Cost for N portions", or the cost for the batch amount, sometimes with a per-gram or per-milliliter line. An Add a price button lets you type a price right there; saving it puts the item on the menu.
The recommended price
Next to the price, Spensa shows a recommendation, for example: "Recommended price: At least 14.50 based on category Food with 350% markup." The recommendation is the cost of one serving plus the category's markup, rounded to cents.
If the recommendation cannot be shown yet, the box tells you what is missing: "Choose a menu category to see a price recommendation." or "Add ingredient costs to see a price recommendation." When the cost is partly estimated, the recommended price carries a ~ too.
Ingredients and finishing touches
The heart of the page is two lists:
- Ingredients: everything that goes into the batch. An inline field ("Makes ...") records how much the batch yields.
- Finishing touches: "Garnishes added per plate, on top of the recipe." Anything added on the plate, like a garnish, a drizzle, or a herb sprig. These are costed per portion, on top of the batch.
Each line shows a display name, a quantity with a unit, and the line cost. The display name is what appears in this recipe; you can rename it without renaming the product itself. The unit choices come from how the linked product is packaged and measured, or plain grams, milliliters, and pieces. Drag lines to reorder them.
Those unit choices come from the Product Catalogue. If a product has a crate, bottle, weight, or volume set up there, the recipe can use those units and Spensa converts the ingredient cost from the latest invoice price. If a line says it needs a measure, open the product side panel and add the missing weight or volume.
If a line cannot be costed, a tooltip tells you what to do, for example: "Add a price for this product", "Add how much is used", "Choose the unit used in this recipe", "Tell us how it's measured so this can be costed.", or "Add ingredients to this recipe first" when a linked sub-recipe is still empty. Each list shows a small badge with how many lines are incomplete. Optional extras never count as incomplete.
Each line has a menu with more actions:
- Move the line between ingredients and finishing touches.
- Mark it as an optional extra.
- Change the link: connect the line to a different product or recipe.
- Set the loss (see "Trim and loss" below).
- Delete the line.
You can also select several lines at once, with Select all and Deselect all, and delete them together.
Adding ingredients
The empty row at the bottom of the list is where you add ingredients. Press N anywhere on the page to jump to it.
- Type a name. Spensa searches your products and your recipes at the same time.
- Pick a product or a recipe from the results, or create a brand-new sub-recipe on the spot. A new sub-recipe is created, linked, and opened in the side panel so you can fill it in right away.
- Enter the quantity and the unit.
You can also add a line without linking it to anything. This is a quick ingredient: you name it and give it a flat estimated cost yourself. Quick ingredients make the dish cost an estimate (shown with ~) but do not block it from being complete. They are handy for small things you do not track as products.
The same product or recipe can appear twice on one dish only if the lines play different roles, for example once as a normal ingredient and once as an optional extra. Otherwise Spensa tells you it is already on the list.
Sub-recipes, and why a dish cannot contain itself
Any recipe can be an ingredient of another dish. That way you cost a sauce once and reuse it everywhere.
A recipe can never contain itself, directly or through a chain of other recipes. The dish would then be an ingredient of its own ingredient, and the cost could never be calculated. Because of this, the ingredient search never offers the recipe you are currently editing, and Spensa refuses any indirect loop with a clear message.
One thing to watch: if you change how a recipe is measured, for example from portions to grams, the dishes that use it keep their old quantity numbers. Those numbers now mean something different. Spensa warns you and tells you how many dishes use the recipe, so you can check them.
Optional extras and the what-if preview
Optional extras are lines that are not part of the standard plate, like an extra portion of fries. Their cost is excluded from the normal figures.
Each optional extra has a checkbox. Tick it to preview the dish with that extra: the money strip updates live and shows the standard cost next to it, with a Reset link. Nothing is saved; it is only a preview on your screen. The page hints: "Tick an optional extra to preview its cost."
Trim and loss
Some ingredients lose part of their weight in prep or cooking. Use the Loss action on a line to record it. The dialog asks "How much of this ingredient is lost in prep or cooking." and offers a cheat sheet:
- 5% - a little is lost (peeling, light trim).
- 20% - typical beef trim.
- 50% - half is lost (whole-fish filleting).
The maximum is 95%; above that the cost cannot be calculated. Spensa then costs the amount you actually need to buy, and shows a live preview, for example: "To get 30 g you need 33.3 g". Loss works on product lines, sub-recipe lines, and quick ingredients alike, and it stays in place when you re-link a line.
The side panel
Clicking a line opens a panel on the right (on small screens it opens as a dialog):
- A sub-recipe line opens the sub-recipe itself. You can edit it there, add its ingredients, and even step deeper into its own sub-recipes. A breadcrumb at the top leads back up.
- A product line opens the product details.
- A quick ingredient opens a panel where you set its estimated cost, or link it to a real product or recipe.
You can drag the panel wider on desktop. Press Escape to step back or close it.
Photos and preparation notes
Below the ingredients you can add up to 3 photos and write two kinds of notes:
- How to prepare: how the batch is made, with steps and tips.
- How to plate & serve: how one portion is plated and served.
Both support formatting and are saved automatically when you click away. These notes and photos are exactly what your staff see in the Recipes view.
Where the item is used
The "Used in" section lists every dish and recipe that uses this item as an ingredient, with links. Check it before you change a recipe that many dishes depend on.
Menu category, labels, and allergens
In this section you set:
- The menu category (only available while the item is on the menu).
- Labels: your own free tags.
- Allergens: toggle any of the 14 EU allergens.
Allergens also roll up automatically. When you add an ingredient, the allergens of its product or sub-recipe are added to this dish and to every dish above it. Only additions happen automatically; Spensa never removes an allergen for you. If you switched an allergen on by hand and none of the linked ingredients carries it, a hint tells you it was not detected, so you can double-check.
Cost over time
The chart shows how the item's cost developed. Pick a range: last 30 days, 90 days, 6 months, a year, or all time. You can break the cost down by the item's direct ingredients or by the underlying products. Optional extras can be ticked into the timeline too. Click a line in the chart to open that ingredient's side panel.
The history is rebuilt from your invoice price history, including discounts, together with the sell price history. For items on the menu, you also see the margin over time.
Linked Point of Sale items
If your till data is connected, this section lists the till items linked to this dish, per location, with their item codes. Linking is managed from the POS pages; this section is the view from the dish's side. Seeing it also requires permission to view invoices. When nothing is linked yet, it says "No linked Point of Sale items yet."
How Spensa calculates costs
You never have to do this math yourself, but it helps to know where the numbers come from:
- Every product line is costed from the latest price you paid for that product, taken from your invoices and including discounts. If you set a manual price on the product, that is used instead. See Products.
- The quantity in your recipe is converted into the product's units automatically. Converting between weight and volume works only when the product has both a unit weight and a unit volume; otherwise Spensa asks you to tell it how the product is measured.
- A sub-recipe line is costed from that recipe's own cost.
- All ingredient lines together make the batch cost. Dividing by the batch size and multiplying by the serving size gives the cost per serving. Finishing touches are added per plate on top. For made-to-order items, the whole recipe is one serving.
- Margin is the sell price minus the cost per serving. It is only shown when there is a price and the cost is known.
- An item counts as complete when every line that is not an optional extra has a price. Estimated quick ingredients make the figure a
~estimate but do not make the item incomplete.
Sell prices and price history
Every price change is recorded, so you can always see what a dish sold for and when. This includes setting a price, changing it, clearing it, and removing an item from the menu.
Prices can come from two places:
- Manual entry: you type the price in Menu Costs.
- Point of Sale: approved till data linked to the dish supplies real sold prices. See POS.
The current price is the most recent one from either source. If both change at the same moment, your manual entry wins. The money strip always shows which source the current price comes from.
Menu categories and recommended markups
Menu categories group your menu items and carry a recommended markup, which powers the recommended prices and the red markup warnings. You manage them on the Menu categories page in your organization settings.
Spensa starts you off with default categories and typical markups: Food (350%), Non-alcoholic drinks (400%), Beer (400%), Wine (300%), Spirits (700%), Ice cream (350%), Coffee (1000%), and Tea (1000%). You can change or delete all of them.
To add a category:
- Open the Menu categories page.
- Click the add button and fill in the name, a color, and the Recommended markup in percent. The markup must be between 0 and 5000; the dialog suggests 350.
- Save.
Each row on the page shows the color, the name, how many menu items use the category, and its markup. Editing works the same way as adding.
Deleting a category does not delete any dishes. Spensa confirms first: "This removes "{name}" from {n} menu items. Their labels and prices stay unchanged." The affected items simply end up without a menu category.
Copy a menu item
Use a copy when a new dish is a variation of an existing one.
- Open the item's menu on its card (the three dots).
- Click Copy.
- Confirm the dialog "Copy this recipe?": "This makes a copy of "{name}" with all its ingredients. You can edit the copy afterward."
The copy gets all ingredient lines, keeps the menu status and the current sell price, and is named "{name} (copy)". If that name is taken, a number is added. Photos and till links are not copied, so the new dish starts with its own.
Delete menu items
You can delete one item or up to 100 at once.
- Switch the list into select mode and tick the items.
- Choose delete.
- Read the confirmation carefully. For each item it shows where it is still used: the recipes and dishes that use it as an ingredient, or "Not in use". It also shows the effect on your inventory, such as removal from storages and how many count entries are affected.
- Confirm. Deleting cannot be undone.
Items that are still used elsewhere can be deleted too; the dialog is your confirmation that you really want that. The dishes that used them lose that ingredient line.
Print the recipe book
You can print a clean recipe book for the kitchen, without any prices or costs.
- Switch the list into select mode and tick up to 100 items. If you pick more, Spensa tells you: "You can print up to 100 recipes at a time."
- Click Print recipe book.
- A print page opens and prepares the book ("Preparing your recipe book…", then "Ready to print").
- Adjust the toggles if you like: Include sub-recipes (shown only when your selection has any) and Include photos.
- Click Print / Save as PDF. The print window also opens by itself once the book is ready.
Sub-recipes used by your selection are pulled in automatically so the book is self-contained, down to three levels deep and up to 150 recipes in total. Included sub-recipes are marked in the book. The suggested file name is the recipe name for a single recipe, or "Recipe book", together with your business name.
Staff can print from their Recipes view too, and their printout follows their access level.
How this connects to other parts of Spensa
- Products: ingredient lines link to your purchasing catalog. Each line's cost comes from the product's latest price and its packaging details. Product allergens flow into your dishes.
- Invoices: invoice prices, including discounts, drive all costs here. When an invoice changes a price, your dish costs and margins update automatically.
- POS: till items can be linked to menu items. Approved till data supplies sold prices and powers the margin chart for actually sold items.
- Inventory: recipes with a batch size and a measure can be counted as stock. Deleting an item warns you about its inventory footprint.
- Analytics: the analytics hub compares your menu prices against the recommendations and shows margins on sold items.
- Recipes: the staff view of this same catalog, with steps and photos but never any prices.
- Assistant: the assistant can create dishes, add or change ingredients, and update menu categories for you.
- Notifications: you get a notification when an import needs your review.
- Settings and billing: importing menus from files is a plan feature.
Good to know
- One catalog serves your whole business. All locations share the same menu items and recipes.
- Names, subtitles, and notes have generous limits: names up to 256 characters, subtitles up to 500, and each notes field up to 10,000.
- Up to 3 photos per item, and up to 10 labels of up to 100 characters each.
- You can have up to 250 menu categories, with names up to 120 characters.
- Imports: up to 10 files per upload, each up to 20 MB, as PNG, JPEG, or PDF. The review list shows up to 100 drafts per batch, and batch import handles up to 50 drafts in one go.
- Automatic file reading uses a monthly allowance. If it is used up, a file fails with the message "Monthly AI usage is full" and you can upload it again later.
- Printing: up to 100 selected recipes, up to 150 in total including sub-recipes, three levels deep.
- Loss can be set between 0% and 95%.
- Keyboard shortcuts on the item page: press
Nto jump to the add-ingredient row, andEscapeto close or step back in the side panel. - The margin versus food cost choice is saved per device, so it never changes the view for your colleagues.
- Quick ingredients are just lines in a dish. They do not appear in your product catalog.
- If a dish page shows "Dish not found", the item was removed or the link is outdated.
- Empty list and no products yet? Start with an invoice. The page links straight to the invoice upload and shows a short "See how it works" explainer.