Products
On this page
The Product Catalogue is the list of everything you buy for your restaurant. Every item from every supplier lives here, with its packaging, its category, and its full price history. You rarely have to build this list by hand. Spensa fills it as you approve invoices, and it keeps every price you ever paid so you can see how costs change over time.
What this is for
- See every product you buy, with its latest price per unit.
- Search, filter, and sort your products.
- Create products by hand, or let Spensa create them from your invoices.
- Describe how a product is packaged, for example a crate of 20 bottles of 0.5 l.
- Follow a product's price history and how much of it you buy.
- Add prices by hand for products you do not buy through invoices.
- Fix invoice lines that were matched to the wrong product.
- Merge duplicate products and delete products you no longer need.
- Hide product categories you do not use.
- Browse product groups, where Spensa collects similar products from different suppliers.
- Link the exact same article from different suppliers and see where it is cheapest today.
Where to open it
On the web, click Products in the left sidebar. The Products pill at the top holds the catalogue. If you also see a Product groups pill, click it to compare interchangeable products.
You can also find any product or product group through the search that opens from the top of the app.
The phone app has no product catalogue. Products show up inside other flows there: when you place orders, count inventory, or record stock outflows. While recording a stock outflow on the phone, you can also create a new product on the spot.
Access and permissions
Admins and managers can do everything described here. Other company members do not see the Product Catalogue unless you give them a custom role with permission to manage products. Hiding or unhiding product categories needs permission to manage product categories. Read more in Team and permissions.
What a product is
A product is something you buy, not something you sell. Your menu lives elsewhere; the catalogue is your purchasing side.
A few things are good to know from the start:
- Every product belongs to exactly one supplier. This cannot change later. If you start buying the same item from a different supplier, that is a second product.
- Products are shared across all your locations (the app sometimes calls a location an "establishment").
- A product can have one category, which helps with filtering and sorting.
- You do not type a price on the product itself. Prices come from your approved invoices, plus any prices you add by hand. Spensa collects them into the product's price history.
Where products come from
Products get into your catalogue in four ways:
- From invoices. This is the main way. When you approve an invoice, Spensa first tries to match each line to a product you already have, using the supplier item code, the exact name, or smart matching. Lines that match nothing become new products. Spensa fills in the name, supplier, item code, packaging, and a suggested category, and adds allergens automatically when it can. See Invoices.
- By hand. Click New Product in the catalogue. On the phone, you can create a product while recording a stock outflow.
- From order templates. Creating a new item inside a template adds it to your catalogue immediately, and confirming an imported template turns rows that match no existing product into new products. See Order templates.
- Through the assistant. Ask the assistant to add products for you, one or many at once. See The assistant.
If your catalogue is still empty, the page explains this flow and offers two buttons: Upload invoice and Add manually, plus a "See how it works" link.
Creating a product by hand
Use this when you want a product in the catalogue before its first invoice arrives, for example to put it on an order template.
- Open Products and click New Product.
- Enter the product name.
- Optionally enter the Supplier Product ID. This is the number or code the supplier uses for the item. It helps Spensa match invoice lines to this product later.
- Choose the supplier. This is required and cannot be changed afterwards. If the supplier does not exist yet and you have permission to manage suppliers, typing its name offers a shortcut to create it, with the name already filled in.
- Optionally choose a category. As you type the product name, Spensa suggests the best-matching category. You can only pick from the existing list; you cannot create new categories.
- Describe the packaging. See the next section.
- Optionally set the ordering defaults: Order quantity and Order unit. This is the amount Spensa pre-fills when you add the product to an order or template. Choose No default order unit to clear both. If you set one, you must set the other.
- Optionally enter a Unit price. Spensa saves it as a manual price dated today, so the product starts with a price instead of "No price data". This field only exists when creating; later prices come from invoices or from the Add Price button on the product page.
- Optionally mark allergens. You can toggle each of the 14 EU allergens: gluten, crustaceans, eggs, fish, peanuts, soybeans, milk, nuts, celery, mustard, sesame, sulphites, lupin, and molluscs.
- Save the product.
One rule about duplicates: if you set a supplier item code, you cannot create a second product with the same supplier, the same code, and the same name. Products without a code may share names freely.
Product units and unit structure
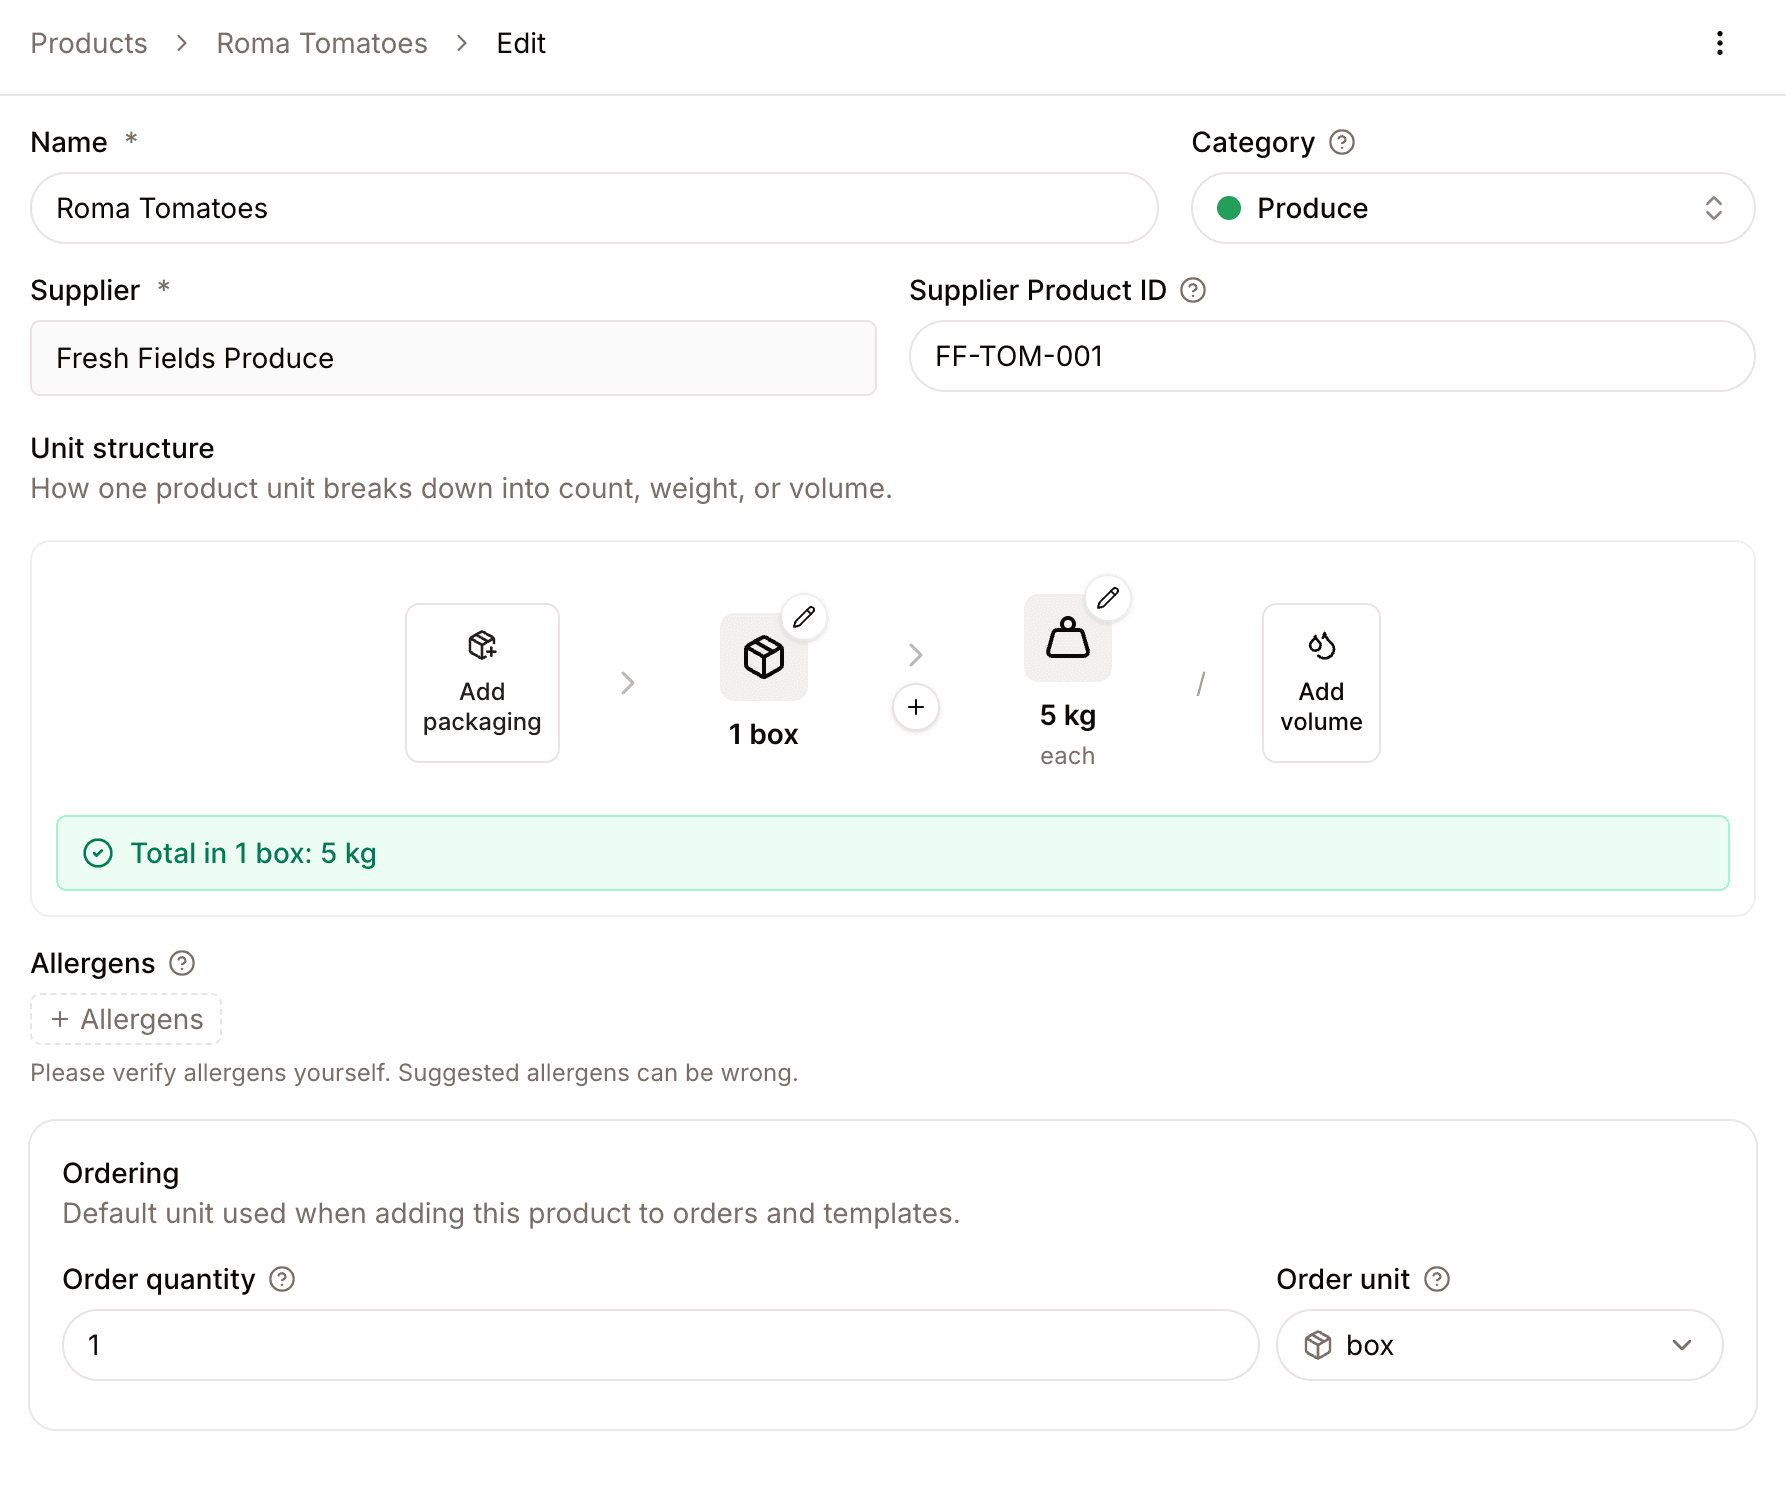
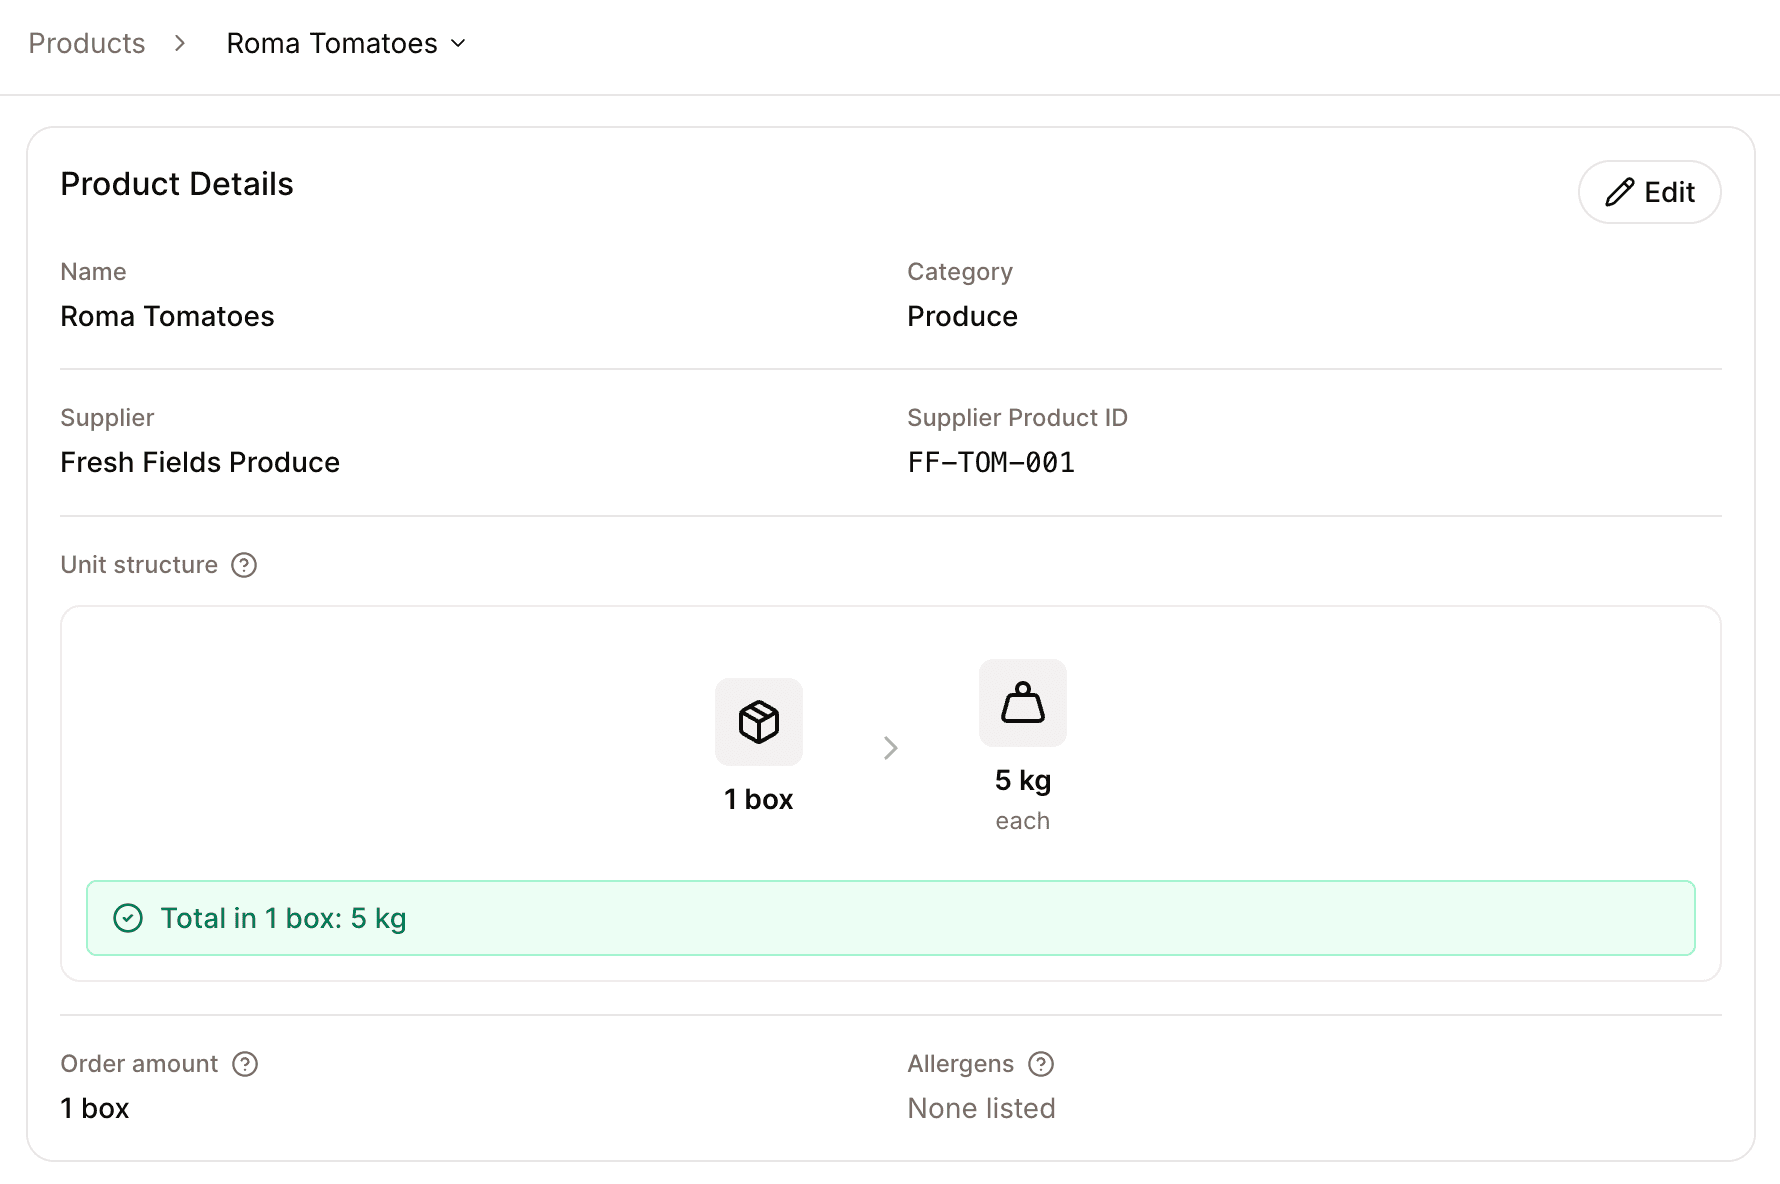
The product unit structure, shown as Unit structure on the product page, tells Spensa how one purchased unit breaks down. It is worth getting right, because invoices, orders, manual prices, recipes, and inventory counts all use these units, and Spensa converts between them for you.
Think of it in two parts:
- Packaging layers are the countable units you buy or count, like crate, bottle, case, box, bag, tray, or piece.
- Measures are the weight or volume inside the smallest layer, like 500 ml per bottle or 2 kg per bag.
An example: you buy mineral water as a crate of 20 bottles, and each bottle holds 0.5 l. You would set up:
- Click Add packaging and choose Crate as the Packaging unit.
- Click Add packaging again for the inner layer: choose Bottle and enter 20 as the quantity. This means one crate contains 20 bottles.
- Click Add volume and enter 0.5 l. A weight or volume always describes the smallest packaging layer, so this says one bottle holds 0.5 l.
Now Spensa can show and compare this product's price per crate, per bottle, or per litre. This setup is also what menu costs, inventory counts, order templates, and invoice price history use when they convert between units.
That means one product setup can answer several everyday questions:
- Invoices can compare supplier prices even when one invoice says crate and another says bottle.
- Orders can show the default order unit your team uses.
- Inventory can count in the units people see on the shelf.
- Menu can cost a recipe in grams, milliliters, pieces, bottles, or packs when those units exist on the product.
The details:
- You can stack up to 6 packaging layers. Available packaging units are Piece, Pack, Case, Crate, Bag, Box, Bottle, Can, Jar, Tray, Bunch, Barrel, and Bucket.
- Quantities count across the whole chain. "2 boxes, 8 trays, 64 pieces" means one purchased unit contains 2 boxes, 8 trays in total, and 64 pieces in total.
- You can add up to 2 measures: one weight and one volume, with Add weight and Add volume. Weight units are kg, g, lb, and oz. Volume units are l, ml, cl, gal, qt, pt, and fl oz.
- Each layer can have an optional Packaging name. If two layers use the same unit, for example a box inside a box, names become required so they can be told apart. Spensa reminds you: "Repeated packaging units need a name so they can be told apart."
- Use Edit packaging, Remove packaging, Edit measure, and Remove measure to adjust the setup.
The price unit
Each product has a preferred unit for showing prices. It is used for the price on the list page, the charts, and the tables. You choose it as Price unit when creating the product, and you can change it any time with the Unit selector on the product page's Price History card.
Changing the packaging later
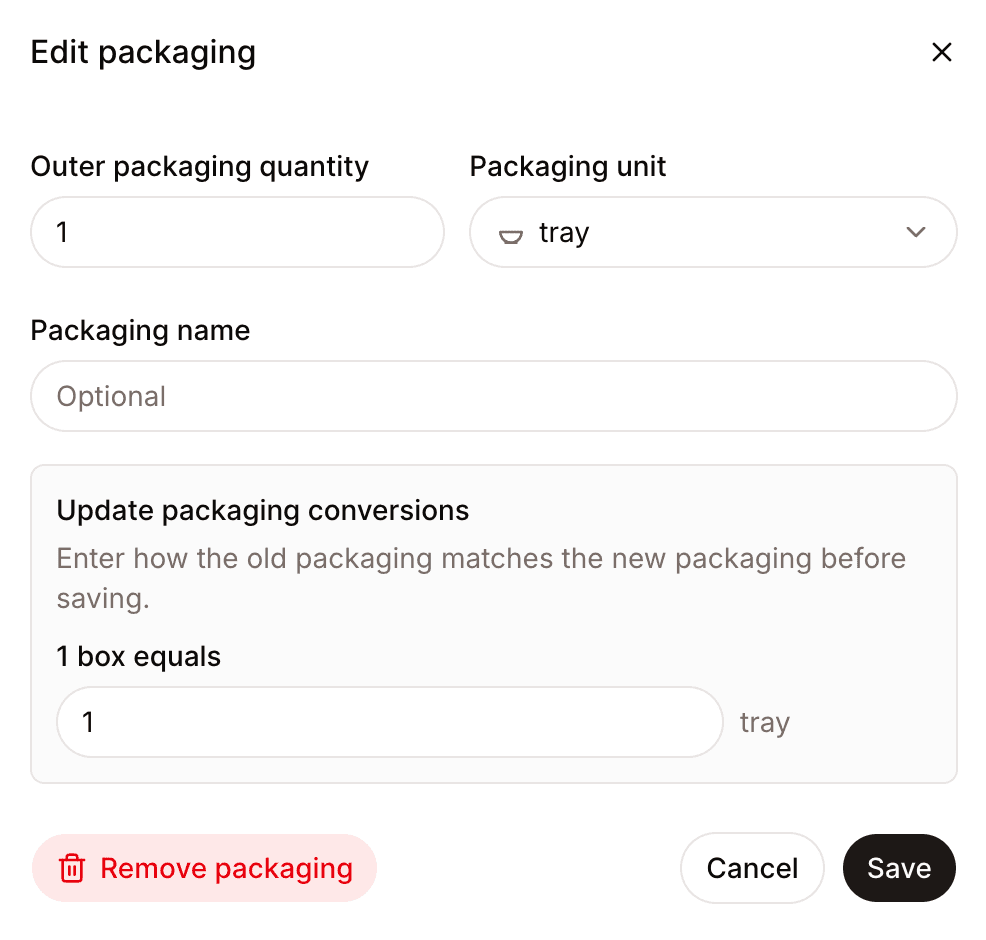
If a product already has history, such as invoice lines or counts, and you change its packaging, Spensa may need your help to carry the history over. A dialog called Update packaging conversions appears and asks you to fill in rows like "1 old unit equals ... new unit". You can enter up to 16 such conversions. Spensa then rewrites the history so old invoice lines and order lines stay correct in the new packaging. You cannot save the change without answering.
Finding products in the list
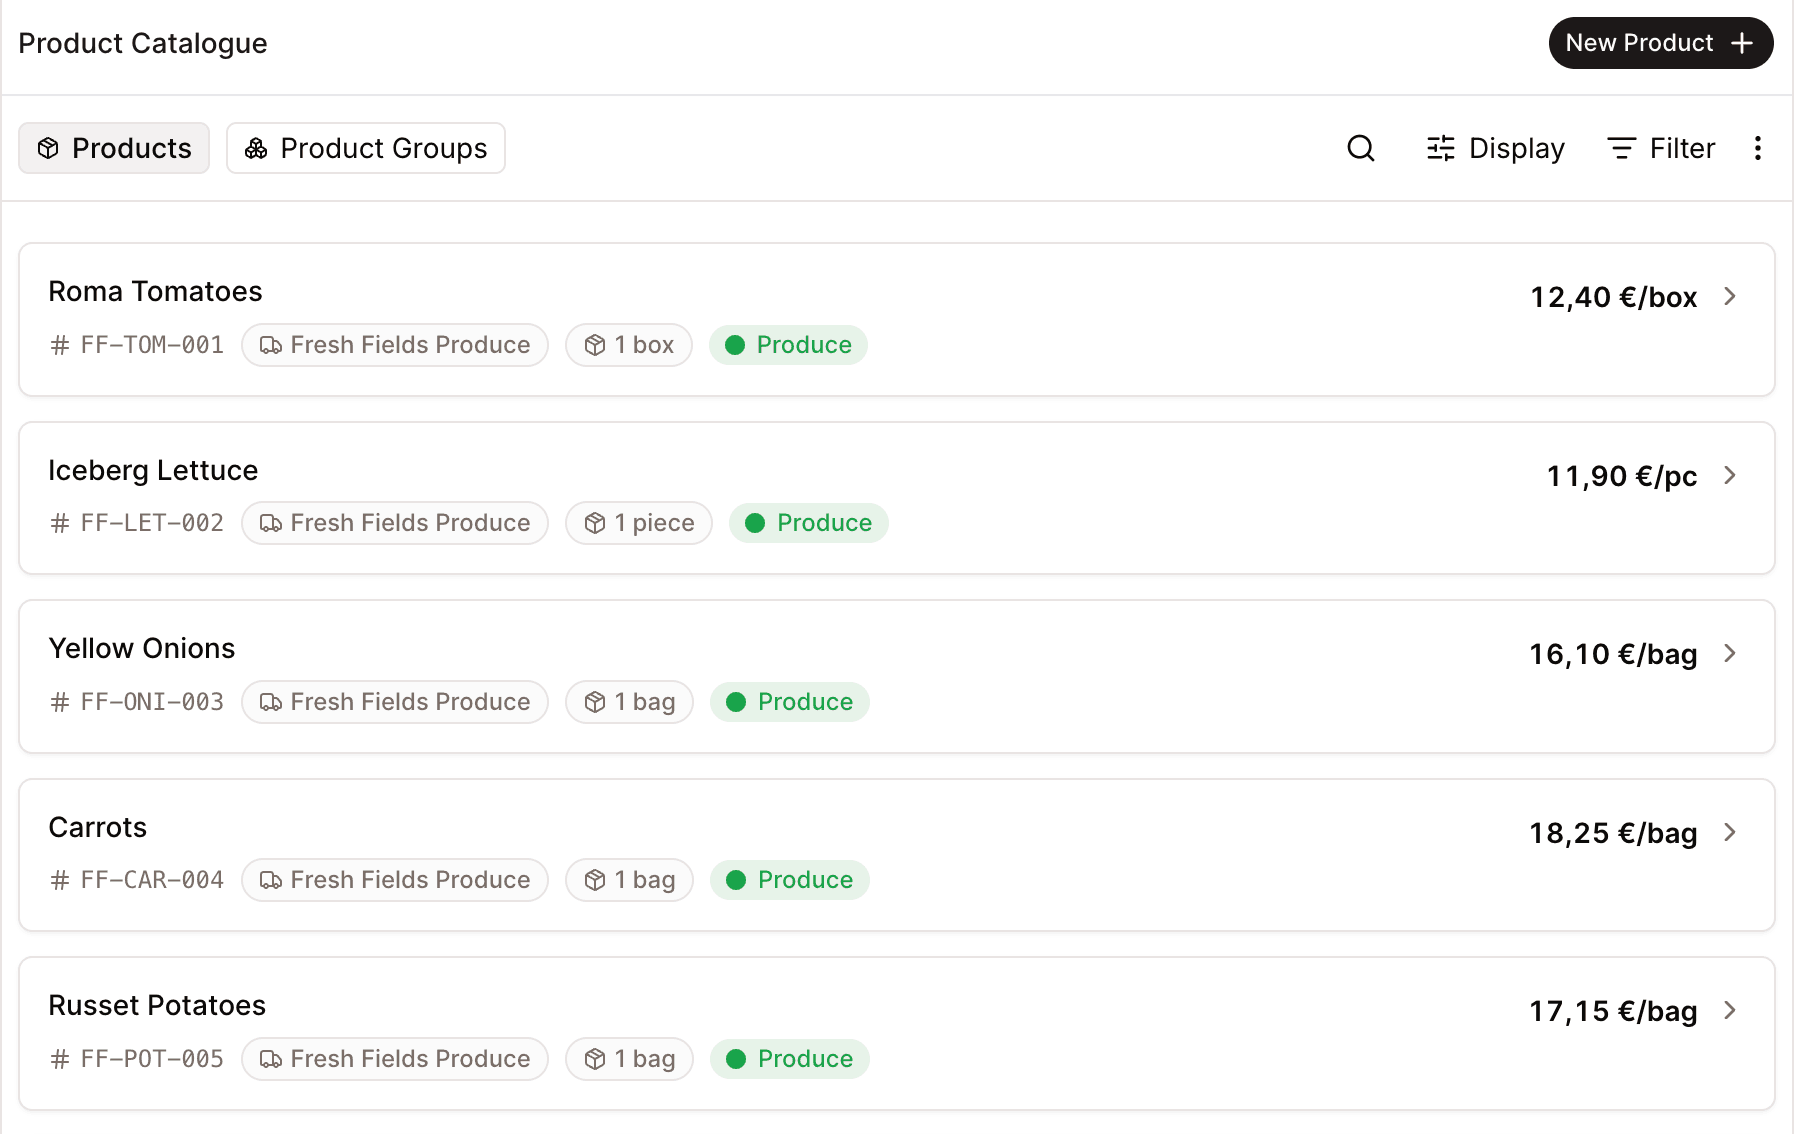
The list shows one card per product: the name, the supplier item code, the supplier, the default order amount, the category badge, and the latest price per unit on the right, for example €1.2345/kg. Hover over the price to see it converted into every unit of the product's packaging, with your preferred unit highlighted. Products that have no approved invoice line and no manual price show No price data instead.
- Search. Type in the Search products box. Spensa searches product names, and small typos are fine. It also matches supplier item codes.
- Filter. Open the filter menu to filter by Supplier or Category (you can pick several of each), or tick No price data to see only products without any price yet. Active filters appear as small chips you can remove one by one, or clear all at once with Clear all filters.
- Sort. Open the display menu to sort by Name, Supplier, Supplier Product ID, Category, or Created At, each ascending (A-Z) or descending (Z-A). The default is Created At with the newest products first. Category sorting follows your language: in German, for example, "Bakery" sorts under its German name "Backwaren".
The list loads more products as you scroll. When you open a product and step to the previous or next one from its page, Spensa keeps your filters and sorting, so you can walk through a filtered list product by product.
The product page
On the web, open Products and click a product. The page has three tabs:
- Details opens by default and contains the product information, identical products, and order templates.
- Invoices/Prices contains price history, purchase quantities, invoice entries, and manual prices.
- Inventory contains completed inventory counts. This tab is available when you have permission to view inventory.
Tab links can be bookmarked and shared with other users who have access. Browser Back and Forward restore the selected tab.
Product Details
The summary in Details: Name, Category (or "Uncategorized"), Supplier, Supplier Product ID, Unit structure, Order amount, and Allergens. Click the pencil to edit.
Price History
In Invoices/Prices, this card shows how the product's price develops. Two controls apply to the whole card:
- Unit - choose which unit prices are shown in. The choices come from the product's own packaging and measures, grouped into Count units, Weight units, and Volume units. Your choice is saved on the product and used everywhere prices are displayed.
- Period - 1M, 3M, 6M, 1Y, or All. The page remembers the period in its address, so it stays selected when you reload or come back from an invoice.
Above the chart, the latest price is shown together with the total change over the selected period, as an amount and a percentage, measured from the first price in the period (for example "+12.00 € (+120.0%) since Jul 10, 2026"). Increases are red and decreases are green. The change needs at least two confirmed prices in the period.
Two chart tabs:
- Cost Trend - a line chart of the price per unit over time. It combines prices from approved invoices (with line discounts already applied) and manual prices. If both exist on the same day, the manual price wins. Each purchase or manual price is marked with a point, and between purchases the line stays flat at the last known confirmed price until the next change, continuing up to today. Hover over the chart to see the nearest purchase with its date, price, item cost, supplier, and establishment, so you can tell what caused a jump. Click a point to open that price's details. Linked unfinalized invoice lines with a date and a comparable price appear as separate hollow amber markers labeled Not finalized. These markers do not change the confirmed line, current product price, menu costs, or purchase quantities.
- Purchase Quantity - a chart comparing how much you ordered, how much was delivered, and how much was invoiced, in the selected unit. The totals for the selected period appear above the chart; when deliveries differ from orders, or invoices differ from deliveries, the difference is shown below the total. The chart shows one bar each for orders, deliveries, and invoices per period. Orders counts sent orders on their requested delivery day, or on the day they were sent when you asked for delivery as soon as possible. Deliveries come from delivery notes, or from orders marked as arrived when no delivery note covers the product. Invoices come from approved invoices. This makes it easy to spot gaps, such as goods that were ordered but never delivered, and to compare monthly invoices that bundle several deliveries. Choose the Interval (Daily, Weekly, or Monthly) and use the Establishment filter to show a single location.
Latest Invoices
A table of the entries feeding the price history, newest first, with columns Establishment, Date, Quantity, Total price, Unit price, and Change vs. previous (the change compared to the previous entry only, unlike the period change above the chart). Changes of 25% or more are marked with a warning sign so you can check them against the invoice. Prices you entered by hand appear in the same table with a Manual tag. Unfinalized lines have a Not finalized badge and a subtle amber background. Their Change vs. previous compares the draft price with the preceding confirmed invoice or manual price, skipping other drafts. Increases are red and decreases are green. A comparison stays blank when the price, date, or a nonzero confirmed baseline is unavailable; loading older entries can provide the baseline. Missing prices or conversions appear as a dash; undated drafts show Date missing and do not appear in the chart. Click Load more to see older entries. Click a row to open its details.
Checking a price against its invoice
Use this when a price jump looks suspicious, for example a price that almost doubled within a few weeks.
- On the web, open Products, select the product, and select Invoices/Prices.
- Click the price in question, either its point in the Cost Trend chart or its row in Latest Invoices. A panel opens on the right without leaving the product.
- The panel shows the price per unit, the change compared to the previous price with that price and its date, and the name, quantity, and total price as they appear on the invoice. Large changes show a Large price change note. For an approved invoice line you can view the invoice document, with the line highlighted when Spensa knows where it is on the page.
- Use the up and down arrows at the top of the panel to step to the Newer price or Older price and compare the invoices one after another.
- If the quantity, unit, or price was read incorrectly, click Edit item and correct it. The price history updates after saving.
- To see the full invoice, click Open invoice. On the invoice page, click Back to price history to return to the same product, period, and price.
- Close the panel to return to the list where you left it.
Fixing wrongly assigned invoice lines
For an unfinalized line, click View Invoice and correct it during invoice review. Finalized lines retain the following actions in the row's menu:
- Edit item - correct the quantity, unit price, or packaging of an approved invoice line. You can also apply the corrected reading to all matching lines of this product in one go, which is handy when the same mistake repeated across invoices.
- Change product - move the line to a different product. If the two products use units that do not fit together, a Set conversion rate dialog asks how many units of the new product equal one unit of the old, so the price stays correct. The line's product ID moves to the new product's previous supplier product IDs, so later invoices are matched there.
- Remove link - detach the line from this product. The invoice itself is untouched; the line just no longer counts towards this product's history.
- View Invoice - jump to the invoice the line came from. This needs permission to view invoices.
Adding a price by hand
Manual prices are useful for products you do not buy through invoices, or to record a quoted price.
- On the web, open Products, select the product, and select Invoices/Prices. You need permission to manage products.
- Click Add Price on the Latest Invoices table.
- Enter the unit price. You can enter it against any of the product's units.
- Pick the date. It cannot be in the future.
- Save. The price appears in the table with a Manual tag.
There can only be one manual price per product per day. Adding another price for the same day replaces the first. Use Edit price and Delete price on a manual row to change or remove it.
Inventory History
If your organization uses inventory and this product has been counted, the Inventory tab shows the counted quantities from finished counts over time, one line per location, for ranges of 30 days, 90 days, 1 year, or all time, plus the 20 most recent entries. Seeing this card needs permission to view inventory. See Inventory. For a drink product in a company that has live inventory turned on, a LIVE inventory card above it shows the current stock, a chart of the stock over time, and, on request, every count, delivery, sale, and loss behind it. If more than one location carries the product, the card starts on All locations with the total and one line per location, and you can choose a single location at the top right of the card or by clicking its row. See See live inventory for drinks.
Identical products
The Identical products card in Details shows the same article at your other suppliers and their shop prices. See Identical products and price comparison.
Order Templates
Use Add to order template to choose a template, then Review in template. On the proposed row, choose Review changes to add the product or replace an existing item. Confirmed changes save immediately. See Replace a product while adding another for web and mobile instructions.
In Details, a list of all order templates that contain this product, with their name, Published or Draft status, location, and supplier. You can search the list, filter by location, and sort it. If the product is not on any template, the card says so.
Editing a product
- Open the product and click the pencil on the Product Details card.
- Change what you need. The fields are the same as when creating, with two differences: the supplier is shown but cannot be changed, and there is no price field.
- Changes save automatically when you leave a field. A saving indicator in the header shows the status. While you have unsaved changes, a Cancel button lets you revert them, and leaving the page asks you whether to discard them.
Adding an allergen to a product automatically carries it into every recipe and menu item that uses the product. See Recipes.
Previous supplier product IDs
Suppliers sometimes renumber an item or print a different product ID on some invoices. Below Supplier Product ID, the edit page lists Previous supplier product IDs: the IDs this product was invoiced under before. An invoice line with one of these IDs is matched to this product as long as its name and size fit. A product ID that differs from the product's never stops a match on its own.
Spensa fills this list for you:
- When an invoice is approved, each line's product ID is added to the product it is linked to.
- When you change a product's Supplier Product ID, the old ID moves to the list.
- When you move an approved invoice line with Change product, its ID is added to the new product. With Change product or Remove link, the ID leaves the old product unless other approved lines of that product still carry it. Editing an approved invoice's lines works the same way.
- When you merge two products, the recipient keeps the IDs of the merged-away product.
To correct the list:
- Open the product and click the pencil on the Product Details card.
- To remove an ID that belongs to another product, click the x next to it.
- To add an ID, type it into Add a previous product ID and press Enter.
- The change saves automatically, like every other field on the page.
Merging two products
Use merging when the same item ended up in your catalogue twice, for example under slightly different names from different invoices.
- Open the product you want to get rid of and go to its edit page.
- Open the three-dot menu and choose Merge.
- Under Merge into, pick the product that stays. The current product is dissolved into it.
- Click Merge product.
- If the two products are packed differently, Match the packaging opens. Pick a unit of the removed product on the left and the unit of the product that stays it equals on the right, for example 1 piece = 1 bottle. Spensa suggests a match when the invoice prices or contents of both products fit, works out the other units (for example 1 case becomes 6 bottles) and shows whether the invoice prices still fit. If they do not, check that you picked the right units. Then click Merge.
Everything moves to the product that stays: invoice lines, previous supplier product IDs, order lines, recipe ingredients, manual prices, inventory entries, stock outflows, and order template items. If the packaging differed, their quantities and prices are converted to its units, so totals stay the same. The product that stays keeps its packaging. Allergens from both products are combined. The merged-away product is deleted. If both products have a manual price on the same date, the recipient's price is kept.
When the packaging makes it obvious which units are the same, Spensa merges without asking, for example when both have the same contents and only the unit name differs (a 0.75 L piece and a 0.75 L bottle), or when one has extra inner units under the same outer pack.
You can also ask the assistant to merge two products, for example "Merge Butter unsalted 250g into Unsalted Butter." The same rules apply, and the merge cannot be undone. See Merge duplicates with different packaging.
Both products must belong to the same supplier.
Deleting products
To delete one product, open its edit page, open the three-dot menu, and choose Delete Product. Spensa asks you to confirm: "This action cannot be undone."
To delete several at once, open the three-dot menu on the list page and choose Edit. Checkboxes appear on the cards. Select the products and delete them; a confirmation dialog appears here too.
Deleting a product does not delete any invoices. Invoice lines simply lose their link to the product. Recipes that used the product lose that ingredient link, and the product disappears from every order template that used it.
Product categories
Categories organize your catalogue. Spensa comes with a ready-made list of 23: Bakery, Beer, Cleaning Supplies, Coffee, Condiments & Sauces, Cutlery, Dairy & Eggs, Dinnerware, Dry Goods & Pantry, Equipment, Frozen Foods, Glassware, Herbs & Spices, Meat & Poultry, Non-alcoholic Beverages, Paper & Disposables, Produce, Red Wine, Seafood, Sparkling Wine, Spirits & Liquors, Tea, and White Wine. Each has a fixed color, and all names are shown in your language.
You cannot add your own categories, but you can hide the ones you do not use:
- Open your organization settings and go to the Product Categories page.
- Each category shows its color, its name, and how many products use it.
- Click Hide on a category to remove it from category pickers and suggestions. Products that already have the category keep it. Click Unhide to bring it back.
Hiding and unhiding needs permission to manage product categories.
When you type a product name, in the product form or while reviewing an invoice, Spensa suggests the best-matching visible category automatically.
Product Groups
If the Products page shows a Product groups pill, click it to work with interchangeable products. A product group collects food and drink products that a cook can swap one for one in a recipe: the same ingredient from different suppliers, brands, or pack sizes. For example, apricot jam from two suppliers ends up in one group with a plain kitchen name like "Apricot jam", so you can see your alternatives across suppliers side by side.
Products that change the dish stay in separate groups, even when they are related: white and green asparagus, asparagus tips and spears, peeled and unpeeled carrots, fresh and frozen spinach, or two different cuts of beef. For drinks, products of the same style or grape variety share a group across producers, such as two London Dry gins or two Grüner Veltliner wines, while flavoured, aged, or distinctive drinks stay separate.
Spensa builds and maintains these groups fully automatically. Whenever a food or drink product is added to your catalogue, Spensa sorts it into a fitting group or starts a new one. Cleaning supplies, packaging, dinnerware, equipment, services, and fees are not grouped. You cannot create, rename, or rearrange groups yourself; for now, this tab is for browsing and comparing.
Group names are plain ingredient names without brands or pack sizes, and they are shown in the language you use Spensa in.
- The tab lists your groups with the group name, the number of products, and a preview of up to 3 products with their suppliers. Use Search product groups to find one by its name or by the name of a product in it. Before any groups exist, the tab says "No product groups yet".
- Click a group to see its detail page: the name, the product count, when the group was created and last updated, and the full list of its products with category, supplier, supplier code, and the date each product was grouped. Each product links to its own page.
Identical products and price comparison
When you buy the exact same article from more than one supplier, link those products as identical products. Spensa then compares their shop prices and shows which supplier is cheapest right now. Shop prices are the current prices from your suppliers' online shops that Spensa receives for your company. Only prices received in the last 24 hours count; prices from your invoices are not used for this comparison.
Only link products that really are the same: same brand, same variety, and same size. A 0.7 l bottle of a whisky and a 1 l bottle of the same whisky are not identical, and neither are two different whiskies. Product groups (above) are a separate, automatic feature for interchangeable products.
Linking and comparing works on the web and needs permission to manage products. Once products are linked, everyone who orders sees on the web and on the phone when an item on an order is cheaper at another supplier, and can switch it. See Cheaper at another supplier.
Review suggested identical products
When Spensa receives shop prices for your company, it looks through your product groups for the same article at several suppliers. What it finds appears at the top of Price comparison under Suggested identical products, with each supplier's current shop price.
- In the left sidebar, open Orders and click Price comparison.
- Check each suggestion: same brand, same variety, and same size of the single bottle or piece.
- Click Link as identical to link the products, or Not the same to dismiss the suggestion. Dismissed products are not suggested together again.
- To link every suggestion at once, click Link all at the top of the section.
Linked suggestions move into the comparison list below.
Create a price comparison
- In the left sidebar, open Orders and click Price comparison.
- Click New comparison at the top right.
- In New price comparison, choose the article from the first supplier under Product 1 and the same article from another supplier under Product 2. The product picker shows each product's supplier.
- To compare more suppliers, click Add product and choose another product. Click the X next to a product to remove it again.
- Click Create comparison. The button becomes available once at least two different products are chosen.
The new comparison appears in the list. If a product you chose was already linked to others, they all become one comparison. Up to 20 products can be in one comparison.
Link identical products from a product
- Open Products and click the product.
- On the Details tab, find the Identical products card and click Link product.
- In Link identical product, open the product picker, search for the same article from another supplier, and select it. The list shows each product's supplier.
- Click Link.
The card now lists both products. If the product you picked was already linked to others, all of them become one set of identical products. Up to 20 products can be linked as identical; Spensa tells you when a link would go over that limit.
Read the comparison
Each row shows the product, its supplier, and its supplier item number, and on the right:
- The comparable price, for example €26.29 / l or €0.90 / bottle. Spensa compares per litre or kilogram when every priced product has a volume or weight, and otherwise per bottle (or other piece) when they all use the same piece. Set the volume or weight on a product to make this comparison work across pack sizes.
- Below it, the shop price for one article as the supplier sells it, for example €21.60 per crate.
- Cheapest on the row with the lowest comparable price, when at least two linked products have a price. Products from archived suppliers are never marked as cheapest.
- No current shop price when Spensa has not received a shop price for the product in the last 24 hours, for example because the supplier's online shop prices are not received or the supplier item number does not match. Older shop prices are never used.
Compare all linked products
In the left sidebar, open Orders and click Price comparison. It lists every comparison, newest first. Use Search products to find a set by any of its product names. Click a product name to open that product.
Remove a product
On the product's Identical products card, click the X on the row you want to remove. The other products stay linked as long as at least two remain. Deleting a product also removes it. When you merge two products, the remaining product keeps the identical products of both.
How this connects to other parts of Spensa
- Invoices - approving invoices creates products and feeds their price history; you can fix line assignments from the product page.
- Suppliers - every product belongs to exactly one supplier; archiving a supplier keeps its products and marks the supplier as archived.
- Orders - the default order amount and the packaging units are used when you order the product, and orders point out when an identical product is cheaper at another supplier.
- Order templates - templates are built from products, and importing a template can create products.
- Menu - dish costs are calculated from product prices and packaging.
- Recipes - recipe ingredients link to products, and product allergens carry into recipes and menu items.
- Inventory - counts use the product's packaging units, and counted history shows on the product page. On the phone, the "how to count" setup can adjust a product's packaging.
- The assistant - ask the assistant to create or edit products, link or unlink identical products, compare shop prices, or answer questions about your catalogue.
Good to know
- You can have up to 5,000 products in your organization.
- A product's packaging can have up to 6 layers plus one weight and one volume measure.
- When changing packaging on a product with history, you can enter up to 16 conversion rows.
- There is one manual price per product per day; adding another replaces it.
- There is no archive for products. A product is either in your catalogue or deleted.
- Duplicate protection only applies when a supplier item code is set. Two products without codes may share the same name.
- Unit prices below one euro are shown with four decimals, so small differences stay visible.
- Company members who manage the menu can add a missing weight or volume to a product from the recipe side, even without access to the Product Catalogue. This makes an ingredient costable without switching roles.
- The app-wide search also finds products and product groups, so you can jump to them from anywhere.