Invoices
On this page
Invoices are how Spensa learns what you buy and what it costs. You upload a PDF or a photo of a supplier invoice, and Spensa reads it and fills in the supplier, the items, and the prices for you. Every approved invoice keeps your product prices current. Those prices feed your menu costs and your spend analytics. So the more invoices you bring in, the better Spensa knows your numbers.
What this is for
- Upload invoice PDFs and photos, and let Spensa fill them in for you.
- Review each invoice next to the original document and correct anything.
- Link every invoice line to a product, or create new products from invoice lines.
- Approve invoices to update your products, prices, menu costs, and analytics.
- Search, filter, and approve or delete many invoices at once.
- Give suppliers an email address so invoices arrive in Spensa on their own.
- Connect your own mailbox so Spensa picks up invoice emails for you.
- Attach delivery notes to supplier orders.
Where to open it
On the web app, open Invoices in the left sidebar. Invoices belong to your whole organization, so all locations share one list. The app may say "establishment" in some places; that means a location.
The email settings live in your organization settings, on the Inbound Emails page.
On the phone, open More > Scan > Scan Invoice to capture and upload invoices. Check upload progress under Saved scans and Uploaded. Detailed invoice correction happens on the web. You can also attach invoices to the assistant, or ask it to approve invoices. See the mobile scanning walkthrough.
Access and permissions
Admins and managers can upload, review, approve, and delete invoices and manage invoice email settings. Company members with the User or Viewer role can view invoices but cannot manage them. You can fine-tune this with custom roles: there is a permission for viewing invoices and a separate one for managing them.
Location staff do not see the invoice pages. They can still be allowed to attach delivery notes to orders. See Team and permissions.
Set up suppliers as you review
You can upload invoices before creating all your suppliers. Spensa matches existing suppliers during import and leaves unclear assignments for review. It never creates a supplier without your instruction.
On the web, users with permission to manage invoices can resolve a supplier once and let Spensa assign it to other clearly matching, unassigned invoices across uploads. Creating suppliers also requires permission to manage suppliers.
- Open Invoices, then open an invoice that needs a supplier.
- Choose an existing supplier, or create the supplier from the invoice. Save your selection.
- Spensa checks other unassigned invoices in the background. It also checks when a supplier is created or its identifying details change, and when an import finishes. Spensa compares the extracted supplier details with your suppliers' names, legal company names, and names you previously assigned, including abbreviations, spelling differences, and legal suffixes. A matching VAT ID identifies the supplier even when the names differ, and a different VAT ID rules a supplier out. Customer numbers are checked for the invoice's own location. Only a clear match to one supplier is assigned; conflicting or uncertain evidence stays for review.
- Review the updated suppliers in the invoice list or open individual invoices. Each invoice retains its own location, and assigning suppliers does not approve the backlog. You can change or clear a supplier during invoice review; clearing it prevents further automatic assignment until you select a supplier yourself.
You can also ask the assistant to inspect extracted supplier names, email addresses, customer numbers, VAT IDs, and location suggestions. These are unconfirmed clues, not verified supplier details or ordering addresses. Location suggestions are available for newly processed invoices; older invoices may not have retained them. An invoice still needs a supplier before approval.
Upload invoices
This is the everyday way to bring invoices in.
- Open Invoices.
- Click Add Invoice.
- Drag your files into the dialog, or click to choose them. You can add PDFs and photos (PNG, JPG, BMP).
- Check the two switches described below.
- Click Upload 1 File (the button shows your selected file count). Wait for upload confirmation before closing the upload dialog.
If a selected file is empty, Spensa names it in a message and skips it while uploading the other files. If all selected files are empty, nothing is uploaded. Click Remove beside each empty file, then choose a copy that contains the invoice and upload again.
You can upload up to 500 files at once. Each file can be up to 50 MB. Spensa starts reading right away and tells you when the files are uploaded. You can leave the page; the reading continues in the background. When an invoice is ready, it appears in the list under To Review, and Spensa tells you.
The very first time, the Invoices page shows a drop zone with a short explanation. You can drag files straight onto it. You can also hand an invoice file to the assistant in chat, and it will upload it for you.
If you select more than 10 files, Spensa reminds you that big uploads use a lot of your monthly allowance. Every PDF page and every photo counts.
One PDF with several invoices
One file does not have to be one invoice. If a PDF contains several invoices, Spensa splits it automatically. Each invoice shows up on its own, and they stay grouped under the same upload in the list.
If a complete priced invoice is followed by unpriced delivery notes for those same purchases, Spensa keeps the billed items together under the invoice number and date. The delivery notes support the invoice rather than creating additional invoices. Collective invoices whose priced items are divided into delivery-note sections can still produce separate records.
Photos of a multi-page invoice
When you upload two or more photos, the dialog shows the switch Process all images as one document. It is on by default. With it on, Spensa puts the photos in the right order and reads them as one document. Use this when you photographed a long invoice page by page. Spensa may still split the result into several invoices if the photos contain more than one.
Turn the switch off when each photo is a separate invoice.
Automatic approval
Spensa tries to approve every uploaded invoice automatically. It approves an invoice only when the required details and lines are complete and no review checks need attention. Spensa checks new products against the document and approves an invoice with new products when every new line reads clearly. Product matches, units, order defaults, unclear new products, and significant price changes can still require review, so check To Review after uploading.
Duplicate warning
Before uploading, Spensa checks whether you already processed the same file. If it finds matches, a dialog called Possible duplicate invoices found lists them, with the earlier invoice and its upload date. You then choose:
- Review files to cancel and check your selection.
- Upload non-duplicates only to skip the duplicates and upload the rest.
- Upload anyway to upload everything, including the duplicates.
What Spensa fills in automatically
For every invoice, Spensa reads the document and fills in:
- The supplier, matched against your existing suppliers.
- The location the delivery went to, matched by name and address.
- The invoice date and the supplier's invoice number.
- Every line item: name, supplier item code, quantity, unit and packaging, and price.
- Discounts, both on single lines and on the whole invoice.
- Other cost lines, like deposits or delivery charges.
Spensa also remembers where on the document each value came from, so you can check any number against the original later. For each line, it suggests a matching product from that supplier's catalogue, or a category if the line would create a new product. A product ID on the line counts towards a product when it is the product's current or a previous supplier product ID. A different product ID never rules a product out; the name and size decide.
If a value is missing or unclear, the invoice simply waits in To Review so you can fill in the gap.
Review an invoice
Open an invoice from the list and you land on the review page. The invoice sits on the left, the original document on the right, side by side. If the upload contains several invoices, you see them all on one page, and you can move between uploads with the previous and next arrows. When Items to review is shown, all invoices start collapsed so you can work through the review panel first. Click an invoice header to expand it. If there are no items to review, the selected invoice, or the first invoice awaiting review, starts expanded.
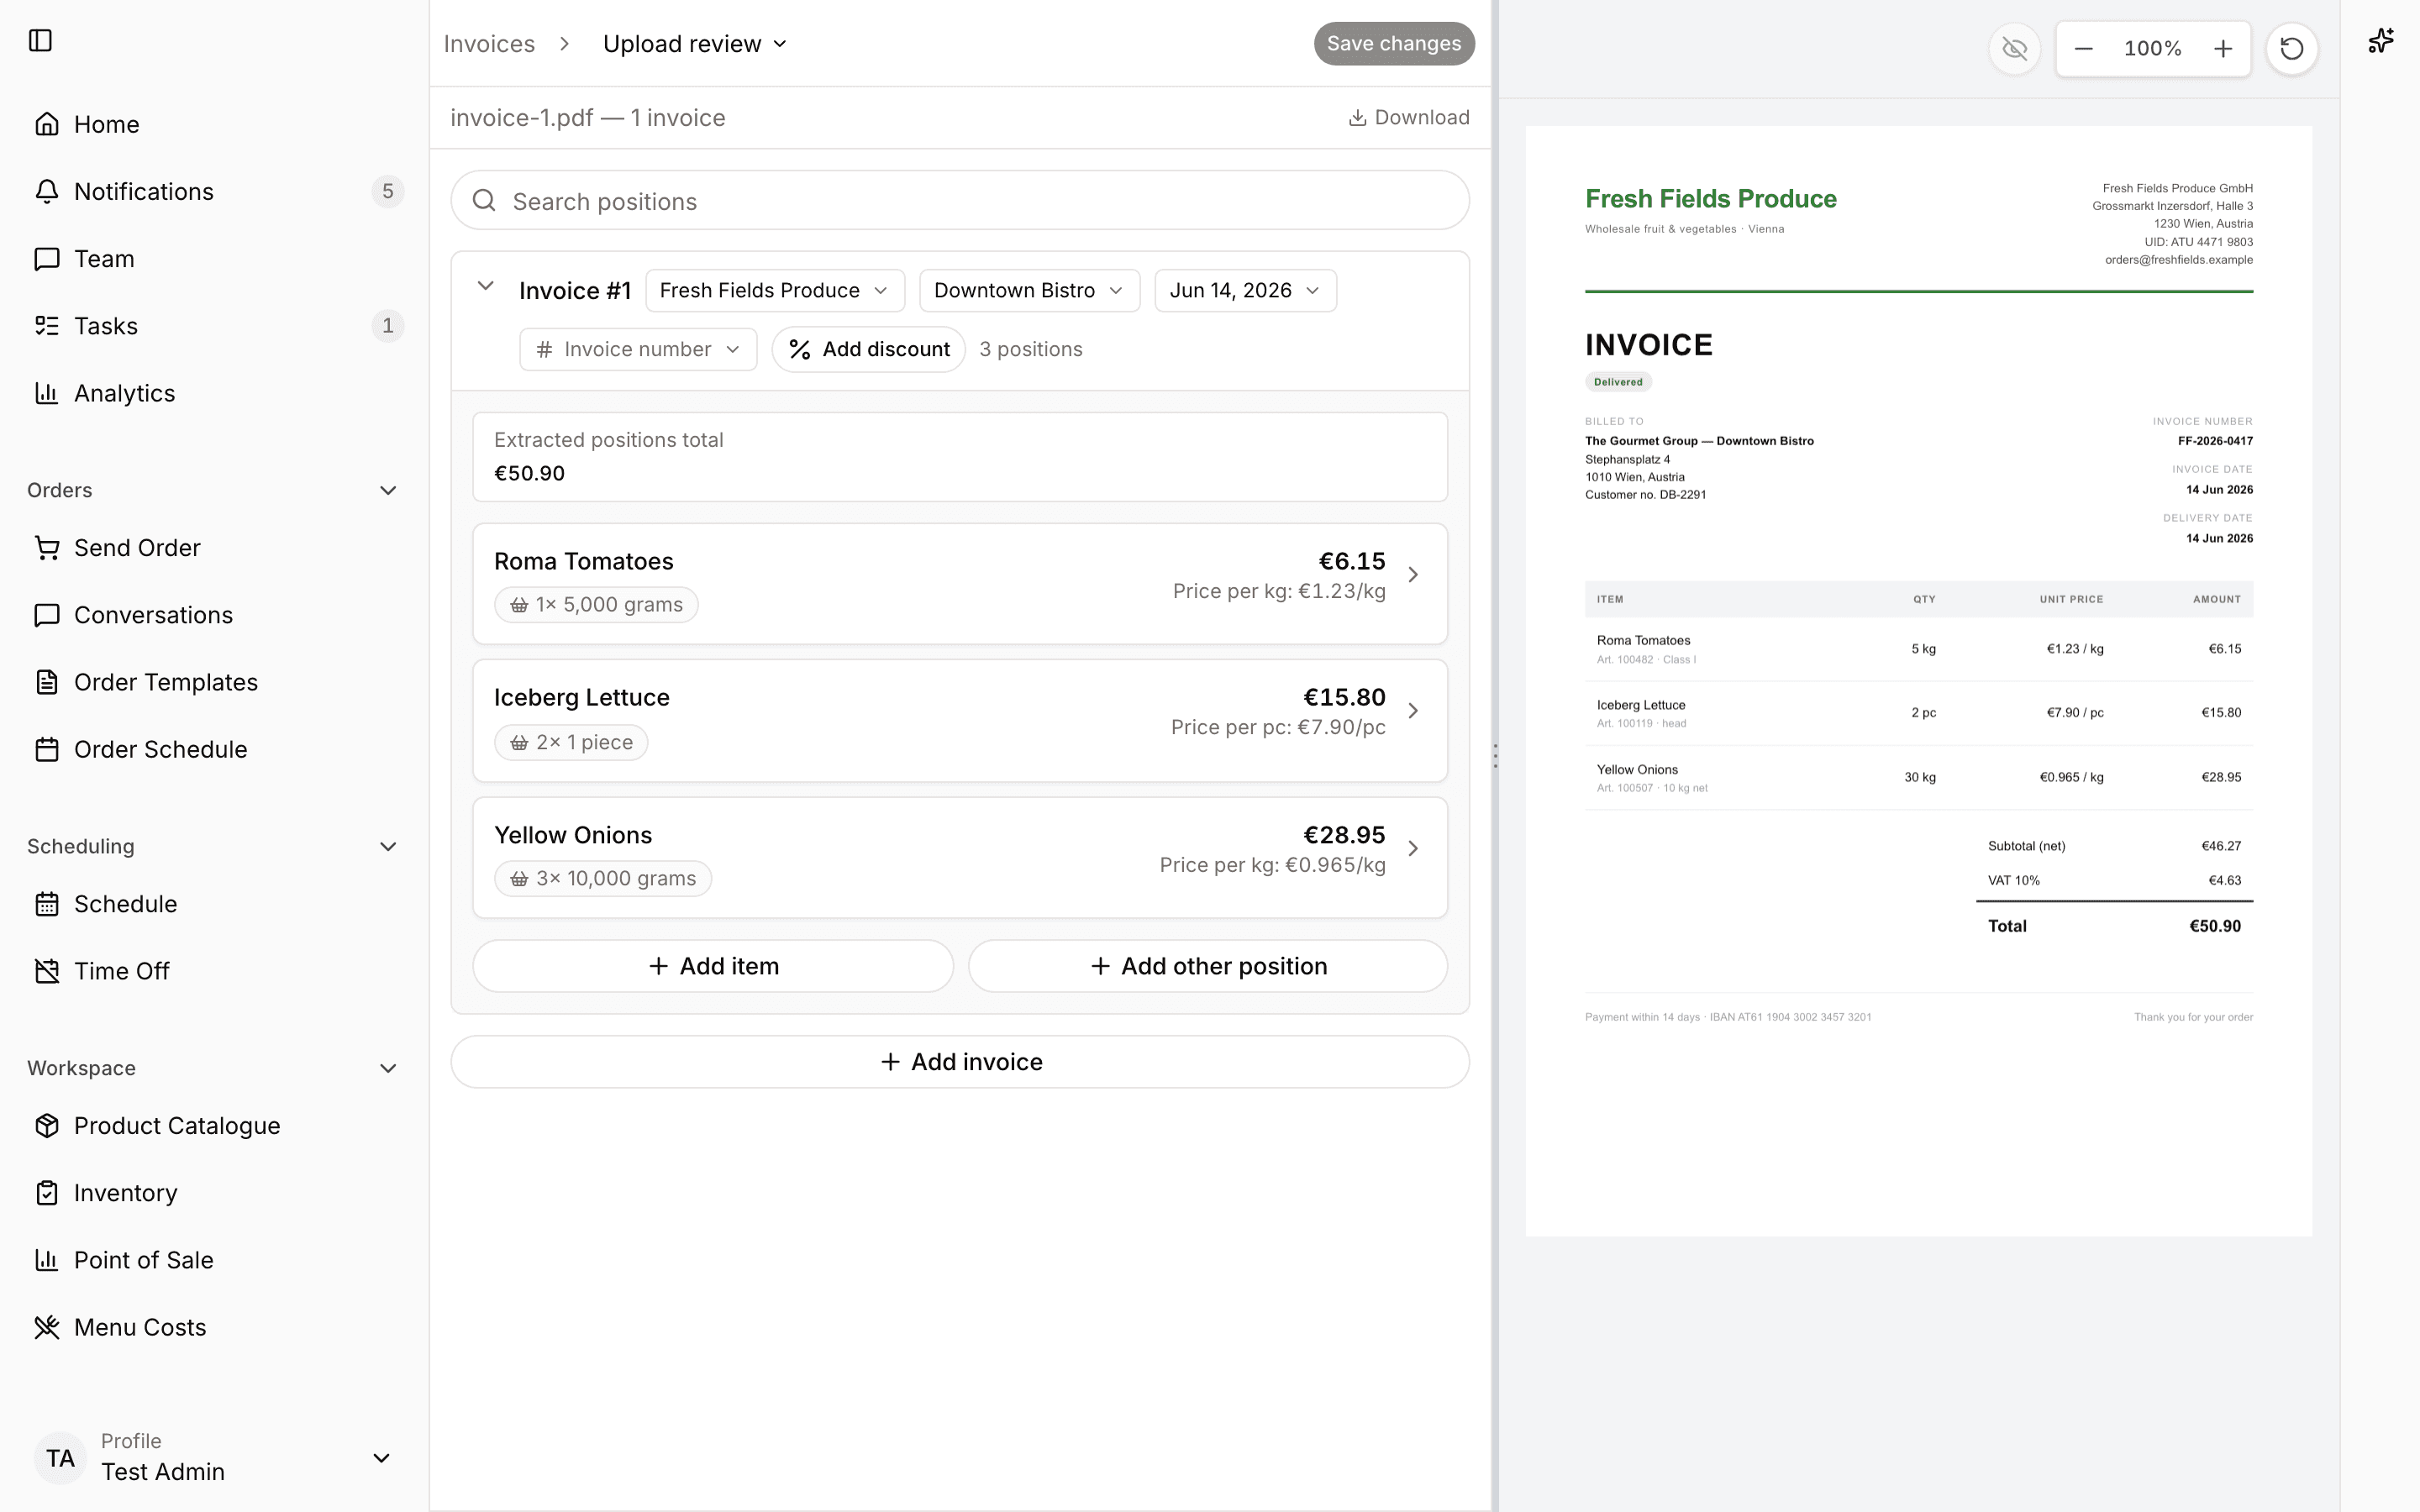
Check numbers against the original
- Click Show boxes to highlight on the document where each value was read from. Click Hide boxes to turn it off.
- Each line has a small location icon. Click it and the document scrolls to that exact spot.
- Use the Download button above the document to save the original file.
For an invoice with supporting delivery notes, check the invoice number and date against the billing page, then compare the quantities and prices with its billed rows. Check the whole-invoice discount and the total after discounts before approving. A delivery note's quantities cover only that delivery, so they can differ from the invoice's combined quantities.
Correct the basics
At the top of each invoice you can change:
- The supplier, from a searchable list of your suppliers.
- The location.
- The invoice date, with a Clear date option.
- The supplier's Invoice number: type it and click Apply.
Edit line items
Click into any line to change it. You can edit:
- The item name.
- Supplier Product ID (optional): the supplier's item code.
- Item count: how many units were delivered.
- Unit Price, or Unit price before discounts when the line has discounts.
- Line discounts: up to 20 per line, each a percentage or a fixed amount.
- Contents per Item: what one unit contains, as a count, weight, or volume. This matters for correct price tracking.
These values feed your price history and cost tracking, so it is worth getting them right.
You can also open a single line on its own page when you want to review it without distraction.
Link each line to a product
Every line ends up as a product in the supplier's catalogue. For each line you choose:
- Link to Existing Product: pick a product that is already in this supplier's catalogue. You need to set the supplier first.
- Create New Product: make a new product from this line. You can edit the product name, pick a category, set how one unit breaks down into count, weight, or volume, and set a default order quantity for later ordering.
Lines set to create a new product have a switch called Try to match an existing product. It is on by default. With it on, Spensa links the line to an existing product at approval time when it finds a confident match, instead of creating a duplicate.
For Contents per Item, select a packaging level or a weight or volume from the line’s unit structure. A unit name alone is not enough when the contents are missing. If you unlink a product from an approved invoice, the line keeps its packaging and contents so you can still review and edit it.
When an automatic match uses different packaging, Contents per Item can retain the known weight or volume. For example, a tray of 24 cans of 330 ml can show 7.92 litres per tray. The item count and price stay unchanged. Check the product link and contents against the document; missing or conflicting sizes still need review.
Add a new invoice product to order templates
On the web, users with permission to manage both invoices and order templates can schedule new products for their regular order lists during invoice review. The invoice needs a supplier. The Items to review panel appears when the upload's draft invoices contain a mix of new and existing products; it stays hidden when every product is new. There is no limit on how many new items can offer this action.
- Open Invoices and select an upload awaiting review.
- In Items to review, find a row marked New item, open its Actions menu, and click Add to order template.
- Click Select order templates.... Search for matching templates or locations and select up to 50 templates from the invoice's supplier. Close the selection list.
- Optional: if the new product takes the place of an item already on a template, for example a new vintage of a wine you will order from now on, click Choose an item to replace... under Replace an existing item for that template. Search the template's items and select the old one. Its Suggested quantity and Internal note are copied; change them if needed. To keep the old item after all, click the cross next to Replaces:.
- Click Add.
- If you need a new template, choose Create order template in the selection list instead. Enter the Template name, select the location under Establishment, and click Create and add. Creating a template requires an available template allowance on your plan.
- Finish checking the invoice and click Finalize. Selecting templates saves the intended additions; the products are added when the invoice is finalized. A replaced item is removed at the same time, and the new product takes its section and position. The new-item review reminder disappears after the selection is saved.
- Open Order templates, open the selected template, and verify that the product appears. If invoice review reports skipped template additions, open the listed templates, free a slot for each missing product, and add those products manually.
If a selected template is full, remove an item from it or choose an item to replace before trying again. Replacing an item does not change existing orders or delete the old catalogue product. New products that Spensa has already checked against the document are not listed in Items to review. For those, or if the upload contains only new products, finalize the invoice first, then open the product in Products and click Add to order template.
Watch for price changes
Lines linked to a product show a small arrow with a percentage when the price differs from that product's last invoice price. Red means the price went up, green means it went down. It only appears when the change is at least 1 percent, and it accounts for discounts and pack sizes, so it compares like with like.
On the web, you can inspect the change without leaving the invoice. You need invoice-view access and a line linked to a product with a previous comparable invoice price.
- Open Invoices and select the invoice.
- Hover over the arrow and percentage to open Price history. You can also click it, tap it on a touch screen, or focus it and press Enter.
- Inspect the chart. Current invoice marks this line's date and price. The range shows the lead-up to the invoice: normally three months, expanding for sparse history and always including the invoice used for the percentage comparison. Later invoices are excluded.
- Hollow amber points labeled Not finalized are provisional prices. They do not change confirmed prices or purchase totals. If the invoice has no date, the preview explicitly uses its creation date.
- If you have product-catalogue access, click View invoice history to open that product's Invoices/Prices tab. Otherwise, continue reviewing the invoice. Press Escape to close the preview.
If history cannot load, click Retry. If you edit invoice discounts, the percentage stays hidden until the saved comparison is refreshed.
Discounts on the whole invoice
Some suppliers give a discount on the entire invoice.
- Click Add discount (or Edit discounts if there already are some).
- Enter a label, choose Percent or Amount, and enter the value.
- The dialog shows a running preview of the total after the discount.
You can add up to 20 discounts per invoice. The totals panel shows the product rows subtotal and the total after discounts.
Other cost lines
Not everything on an invoice is a product. For deposits, returns, delivery charges, and similar lines:
- Click Add other position.
- Enter a label and the Net amount. The amount can be negative, for example for a returned crate.
- Pick a type: Deposit, Empty-container return, Return, Packaging, Delivery and handling, Service fee, Surcharge, Rounding, Credit adjustment, or Other position.
You can add up to 100 of these per invoice. They appear between the product lines in the same order as on the document.
Add, remove, and move things
- Add item adds a new empty line to a draft invoice. You can also delete lines.
- Add invoice adds a new empty invoice to the upload. Useful when Spensa read two invoices as one: add an invoice, then move the lines that belong there.
- Remove invoice deletes one invoice from the upload, after a confirmation.
- You can move line items from one invoice to another within the same upload, up to 500 at a time. Both invoices must still be drafts. Totals are recalculated for you.
Find a line quickly
On long invoices, use the Search positions box above the lines. It filters the rows as you type and shows how many of the total lines match.
Your edits are saved as you go. The invoice stays in To Review until you approve it.
Approve an invoice
Approving is what makes an invoice count towards confirmed product prices and purchasing analytics. Before approval, linked prices can be previewed in product history as Not finalized.
- Open Invoices > To Review, then click the upload you want to approve.
- Check the original document against the supplier, location, invoice date, and invoice number.
- Check each line's quantity, unit, price, discounts, and product link. Correct missing or mismatched information before continuing.
- Click Finalize.
- If warned about incomplete items, return to correct them, or deliberately choose Finalize and remove incomplete items. Removed lines will not contribute to the approved invoice.
- Wait for Finalizing... to finish, then confirm the invoice appears under Approved. Open a linked product to check its price history when verifying a correction.
The invoice needs a supplier, a location, and a date. If one is missing, Spensa tells you which invoice needs it. If some lines are incomplete, for example missing a price or a quantity, a dialog warns you: Incomplete invoice items will be removed. Click Finalize and remove incomplete items to continue without them, or go back and complete the lines first.
Approval runs in the background. The invoice shows "Finalizing..." and is locked while it runs. When it finishes, the invoice moves to Approved, and this happens:
- New products are created in the supplier's catalogue from lines you marked as new, complete with name, item code, category, packaging, and a default order quantity. Spensa also suggests allergens for new products.
- Lines set to match are linked to existing products when Spensa finds a confident match.
- Each linked product's latest price is refreshed. That updates your menu costs and your analytics right away.
When you click Finalize on an upload containing several draft invoices, Spensa saves those drafts together before approval starts. If Spensa rejects that save, it keeps the previously saved drafts and does not start approving part of the submitted upload. Check the quantities and units, correct any problems, then click Finalize again. If your connection drops, reopen the upload and check its status before retrying.
If approval fails, return to To Review, open the invoice, and check its product links and units before trying Finalize again. Wait for Approved before treating it as finished.
Edit an approved invoice
You can still correct an approved invoice. Open it, make your changes, and click Save changes. The prices and products update accordingly. If you change the supplier, product links that do not belong to the new supplier are detached, and those lines become standalone lines again.
The invoice list
The Invoices page is your overview.
- At the top, switch between All, To Review, and Approved. The number on To Review shows how many invoices are waiting for your review. The same number appears next to Invoices in the sidebar.
- Search invoices finds invoices by supplier name, by the supplier's invoice number, or by the Spensa number. Every invoice gets its own running Spensa number, shown as #12, so you can refer to it even before the supplier's number is filled in.
- The Filter menu narrows the list by location and supplier. Choose Missing details to find invoices that still need a supplier, location, or invoice date before they can be approved. Active filters show as chips you can clear one by one, or all at once with Clear all filters.
- The Display menu switches the sort order by upload date.
Invoices are grouped by upload, under the file name. An upload with many invoices collapses into a summary row showing the suppliers, the invoice count, and the dates. Very large groups show the first 20 invoices with a link to view all. Each invoice card shows the supplier, the location, the status, the item count, the dates, and an amber pill when lines still have problems.
Uploads that are still being read appear in a section at the top. Click one to watch its progress. You can safely navigate away; processing continues in the background.
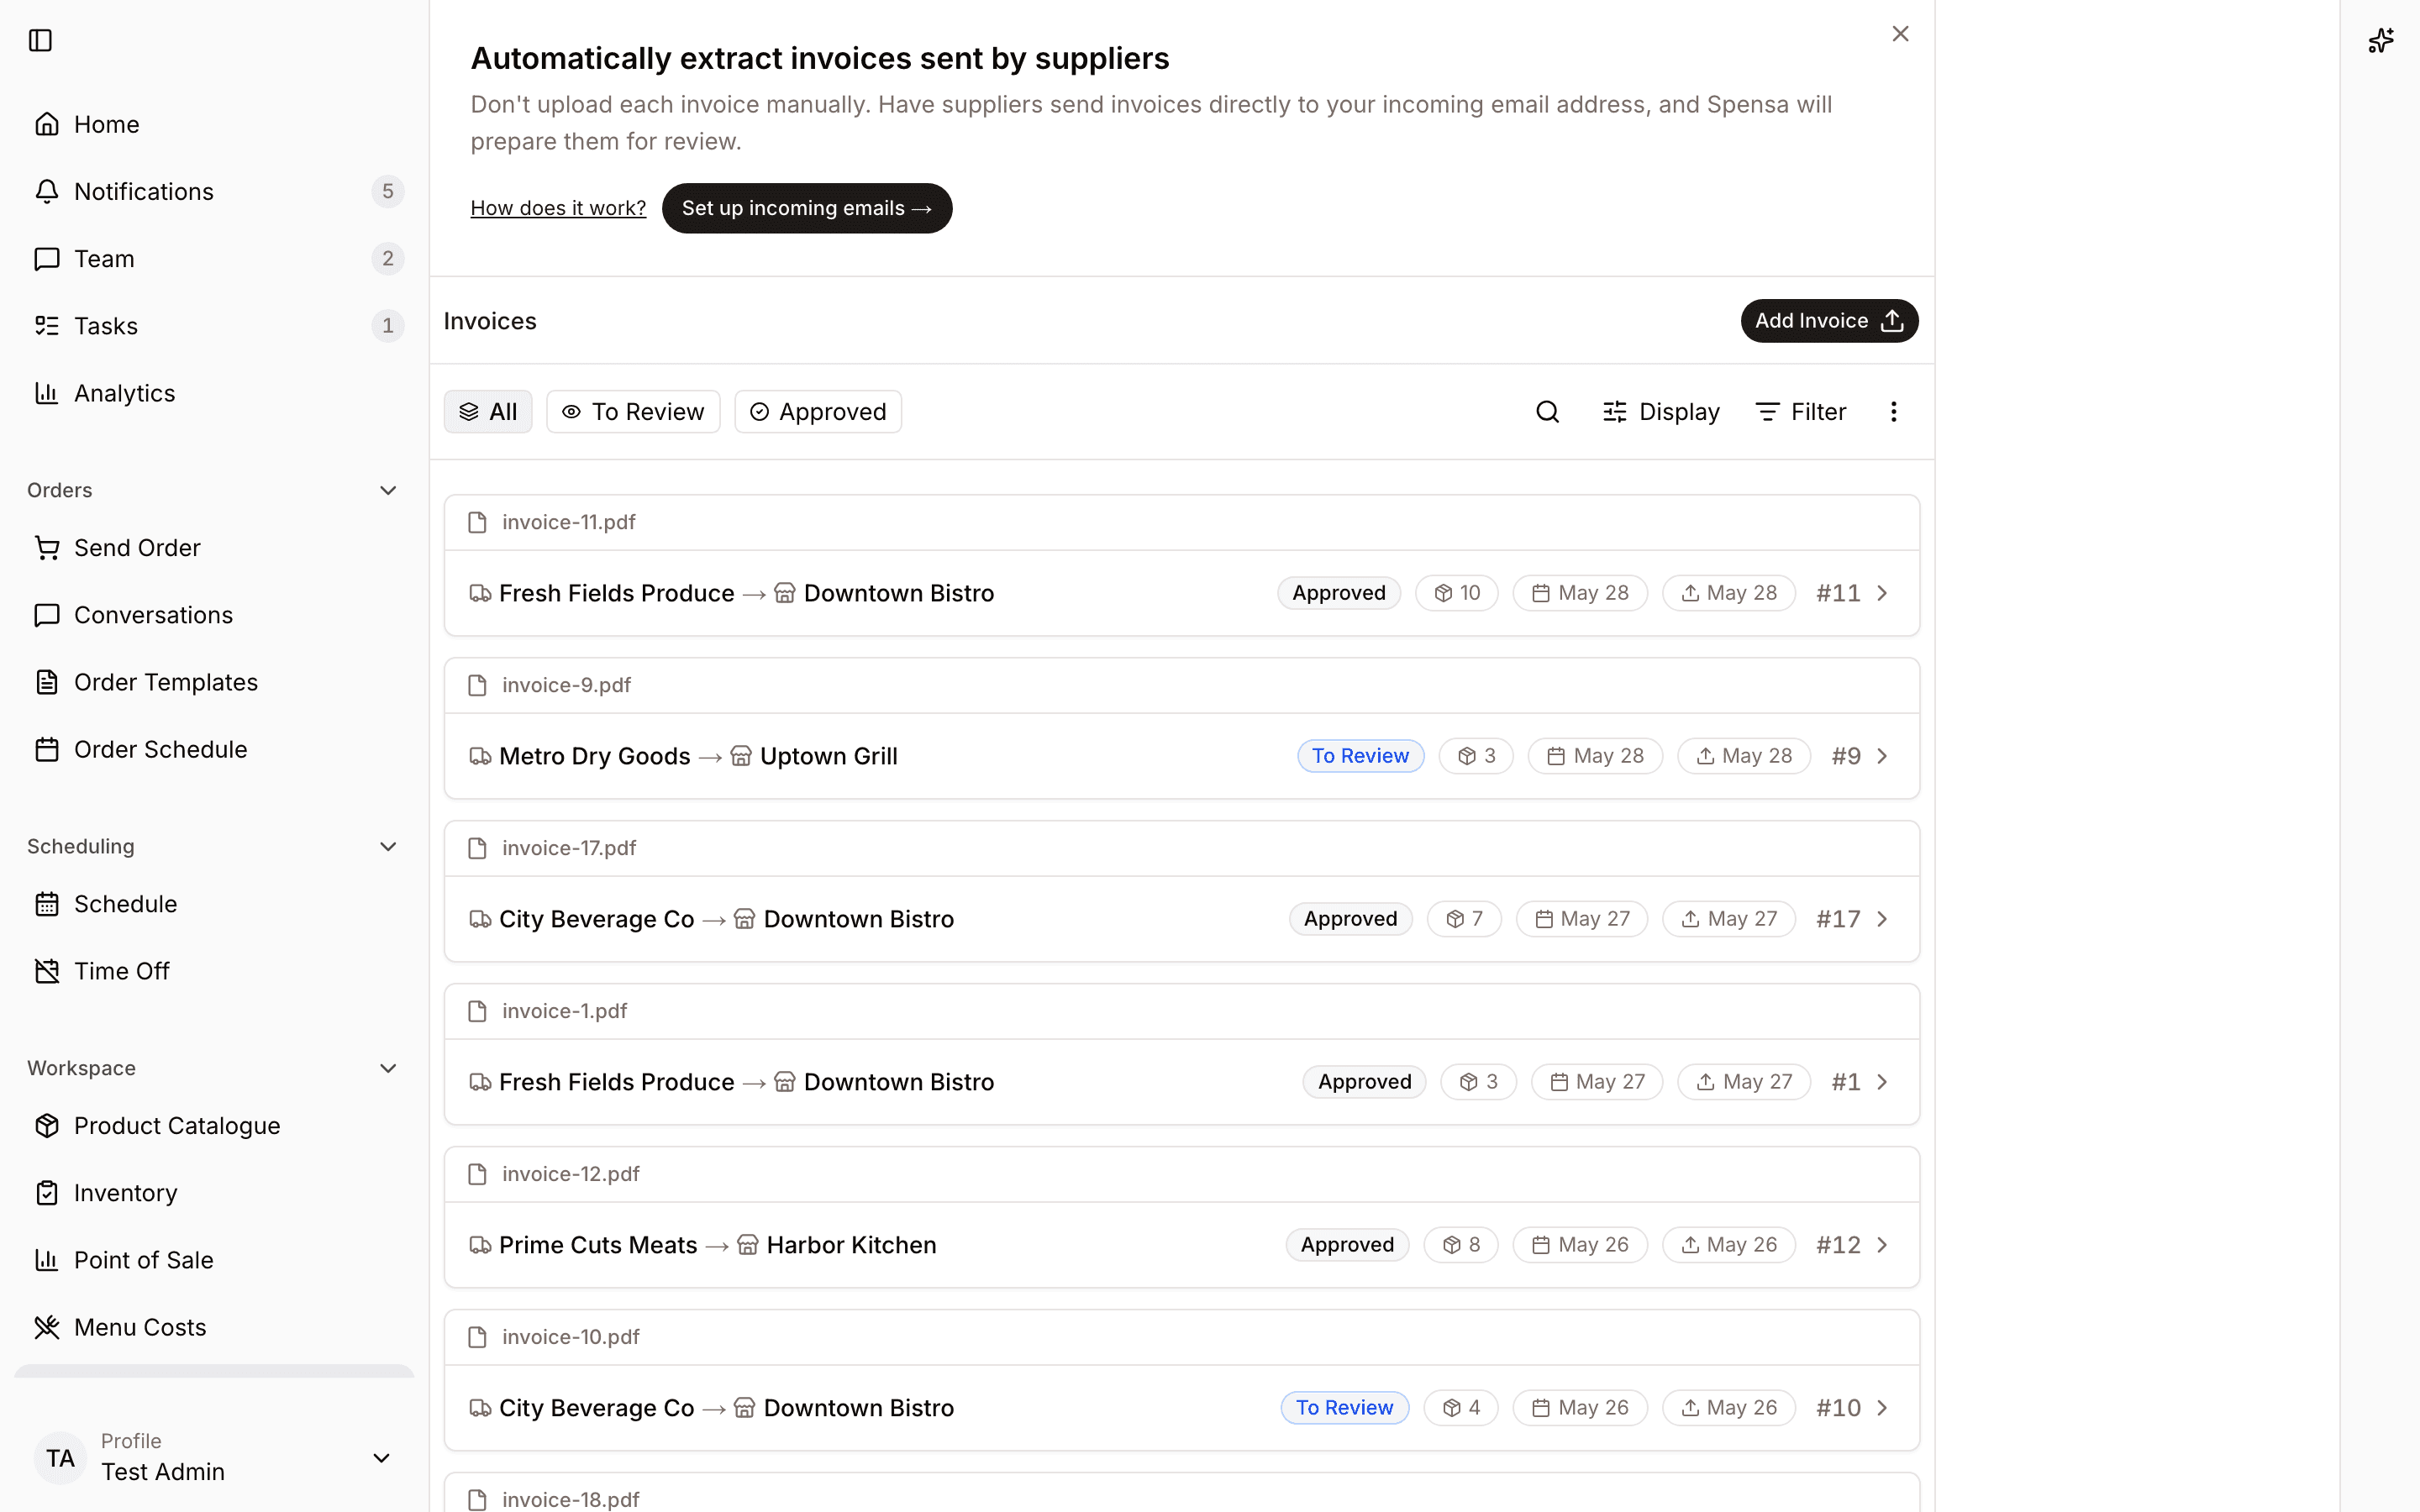
Approve or delete many at once
- Open the three-dot menu on the Invoices page and choose Select Items.
- Tick the invoices you want, or select a whole upload group at once.
- Click Approve or Delete.
Bulk approval checks your selection first. Invoices missing a supplier, location, or date are skipped, already approved ones are ignored, and you are warned about incomplete lines. You then choose Approve, Approve ready invoices, or Approve and remove incomplete items. Bulk delete asks for confirmation; deleting cannot be undone. Both work on up to 100 invoices at a time.
Export invoice files
Use the web app with invoice access to download original documents for a date range.
- Open Invoices and click Export.
- Set From and To, and select Suppliers or Locations if you want to narrow the export.
- Choose Group files by supplier and/or Group files by month if helpful.
- Check the file preview. If it exceeds 300 files, narrow the date range or filters.
- Click Download ZIP and open the downloaded archive to confirm the required documents are present.
This exports source documents, not an accounting ledger. If no files match, adjust the filters.
When an upload fails
Sometimes a file cannot be read, for example when it is damaged or unreadable. Failed uploads appear in the section at the top of the invoice list. Click Dismiss to clear one from the list. To try again, upload the file again; nothing from the failed attempt counts, and the duplicate check only warns about invoices that actually went through.
Monthly allowance
Reading invoices automatically uses a monthly allowance. Every PDF page and every photo counts toward it. When the allowance is used up, new uploads pause until the next month starts, and the upload dialog shows an upgrade note. Upgrading your plan raises the allowance. See Settings and billing.
Receive invoices by email
You can give your suppliers an email address that delivers invoices straight into Spensa. No forwarding, no downloading, no uploading.
This is available on the Business plan. If your plan does not include it, you will see an upgrade note. The banner on the Invoices page takes you to the setup, or you can go there directly:
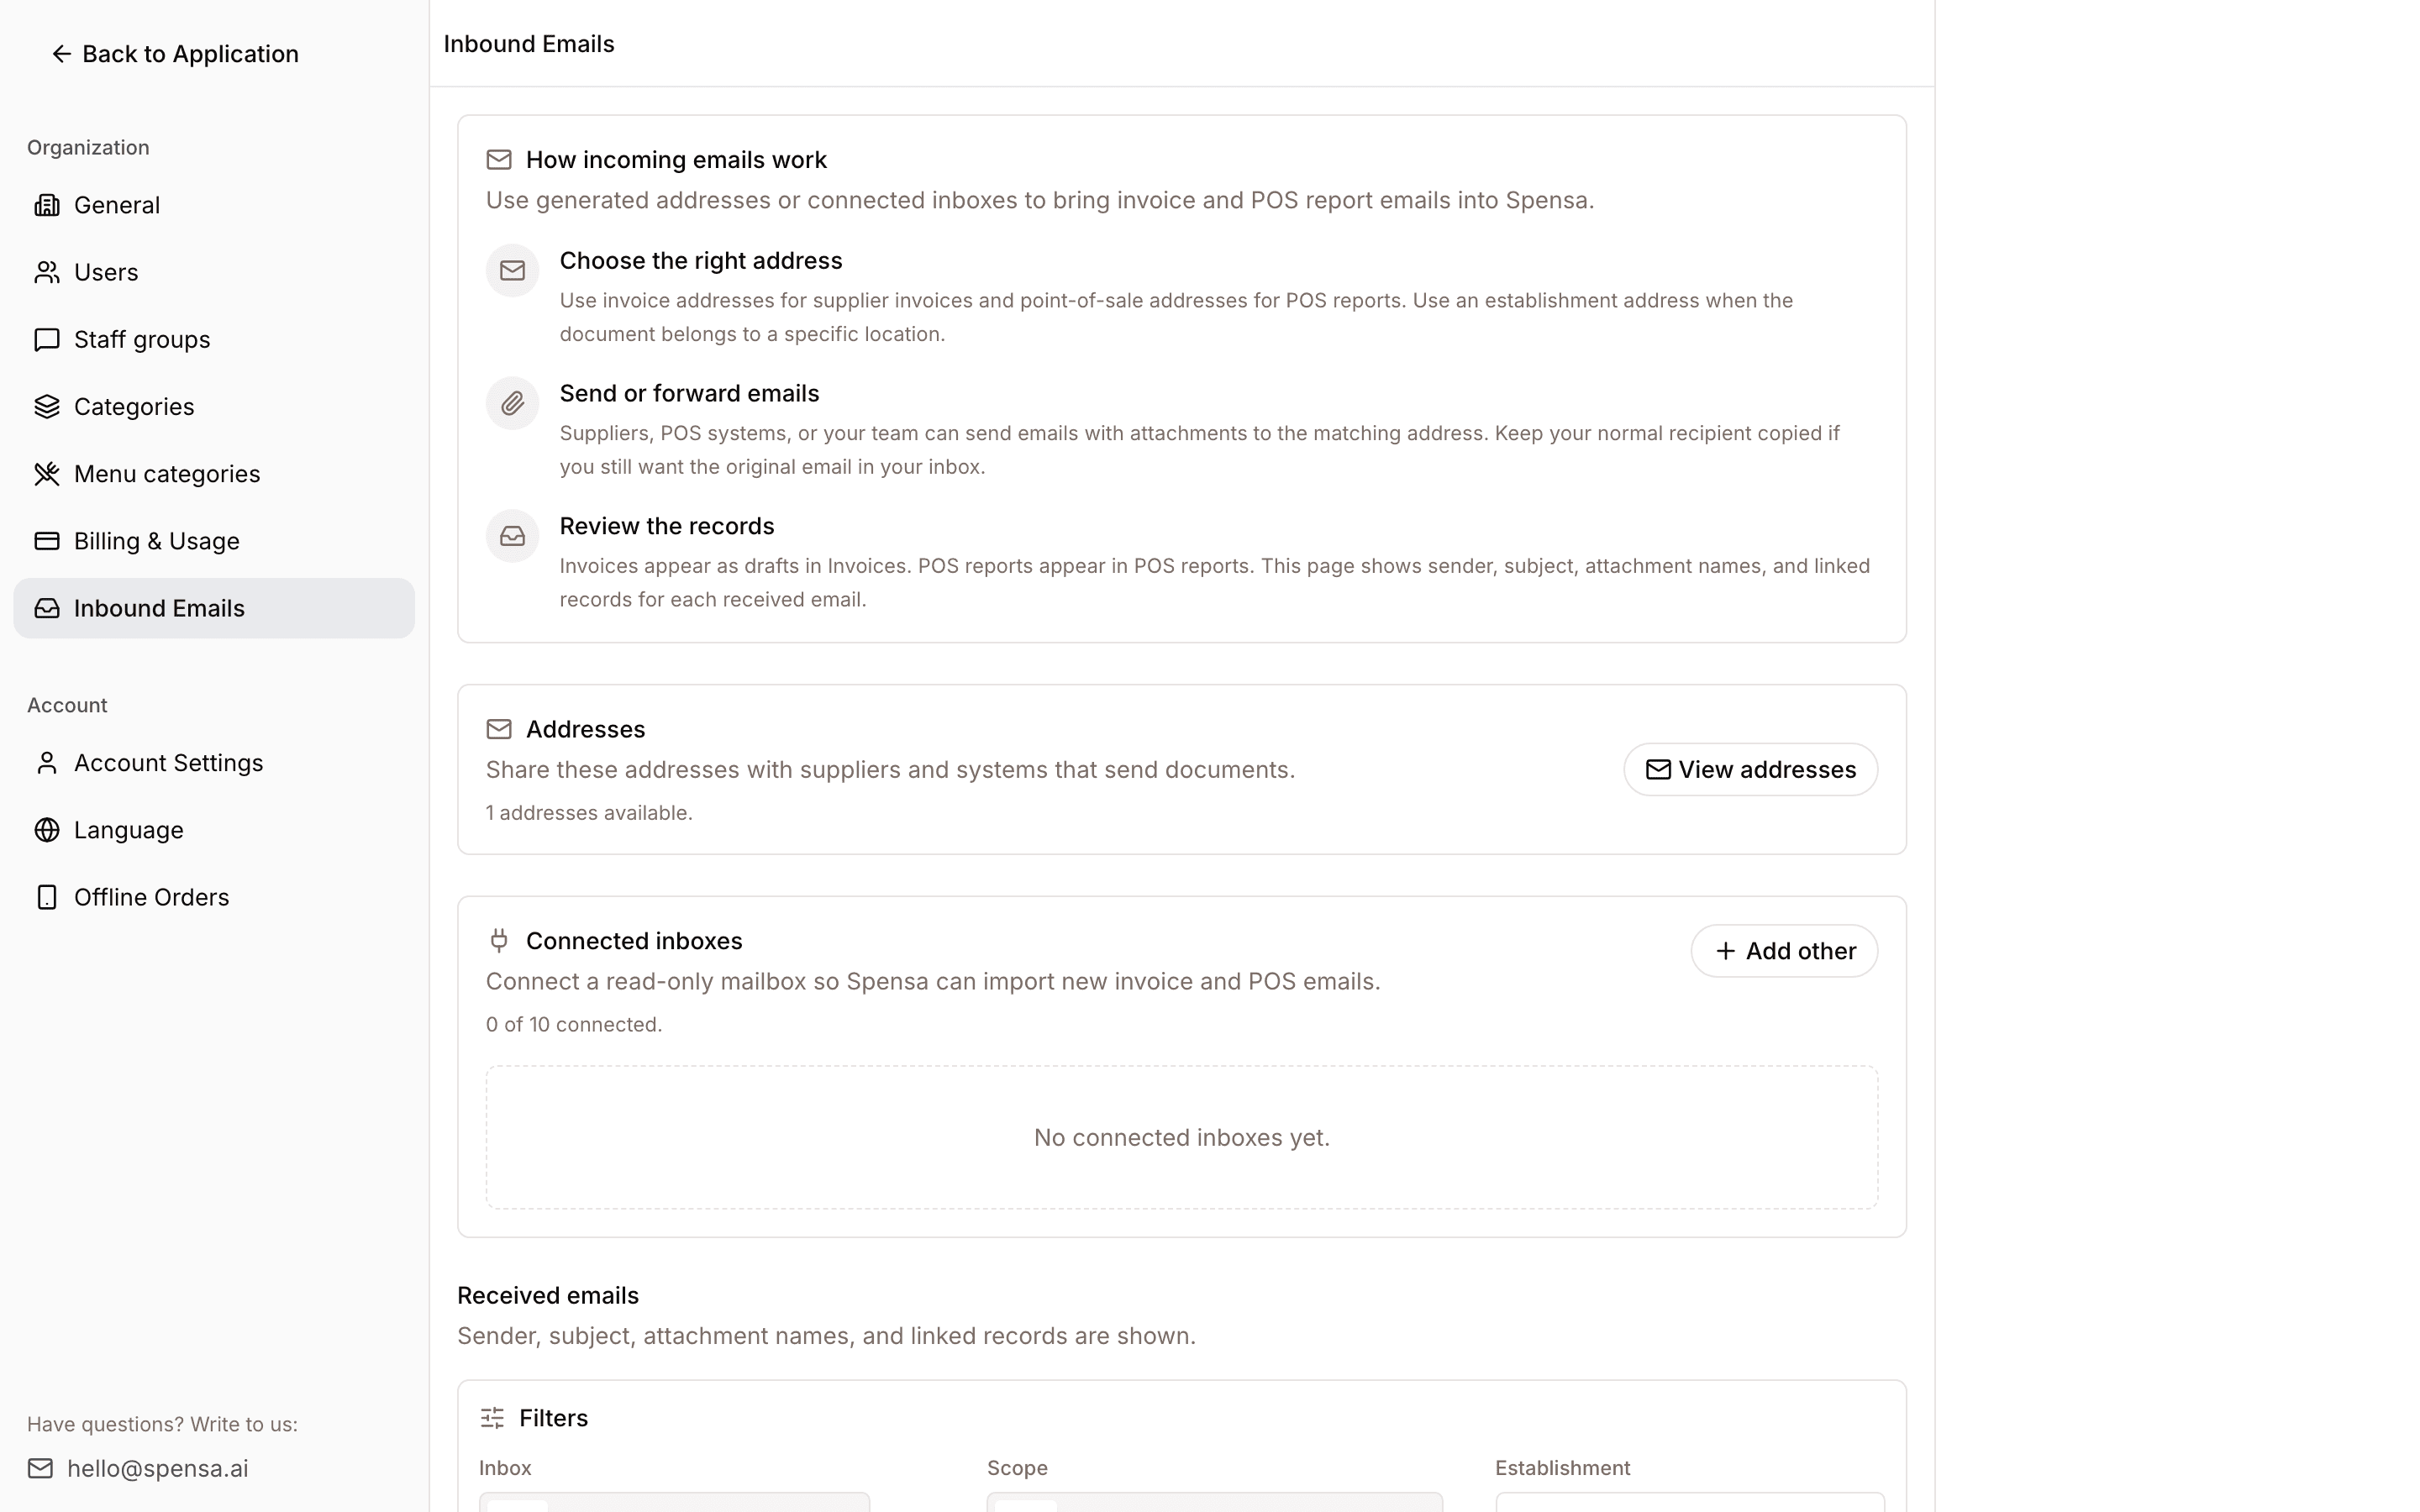
- Open your organization settings and go to Inbound Emails.
- In the Addresses card, click View addresses. Choose the invoice inbox in the address dialog.
- Copy your address. It looks like
yourcompany.invoices@documents.spensa.ai. Each location also gets its own address, likeyourcompany.mainstreet.invoices@documents.spensa.ai. - Share the address with your suppliers, or forward invoice emails to it yourself.
When an invoice email arrives:
- Spensa takes the attachments and reads them like a normal upload. If the invoice is written in the email itself rather than attached, Spensa can read that too.
- The invoice list only shows No invoice warnings when no invoice was extracted from the email body or any attachment. A body or attachment without an invoice does not cause a warning if another part of the email supplied one.
- If the sender address belongs to one of your suppliers or has been allowed for your organization, invoices can be approved automatically when everything is complete and no review checks remain. Allowing a sender does not assign its invoices to a particular supplier. Invoices from unknown senders wait in To Review.
- Emails sent to a location's address are pinned to that location. Emails to the organization address let Spensa work out the location from the document.
- Spensa compares the invoices found in one email before approving them, using the invoice number, date, total and supplier. When an attached invoice, receipt and email summary have the same invoice number and nothing contradicts it, Spensa keeps one invoice and retains the original sources. Separate bills remain separate.
- If two invoices from one email might be the same bill but Spensa cannot be sure, for example because one has no invoice number or the totals differ, both stay in To Review. The card of each affected invoice shows Is this invoice here twice? with the look-alike invoice below it. Click the look-alike to compare. If they are the same, click Delete this invoice on one of them and approve the other. If they are different, click Keep both (or Keep all when several invoices look alike) and approve them as usual. Correcting a wrong invoice number also removes the notice. A failed attachment can still leave a usable invoice from the email body.
- The same email or previously processed identical file is skipped. Different documents received in separate emails are not automatically compared.
A failed attachment does not prevent successfully read invoices from the same email from being approved automatically. Those invoices still need complete information and must pass their own review and duplicate checks.
Allow an invoice sender on the web
You need permission to manage invoices. When an upload from an unknown sender contains a draft invoice, its page offers a sender prompt, even if invoice details or items still need review.
- Open Invoices > To Review and open the upload.
- Check the email address in the prompt above the invoice details.
- Click Allow to permit future invoices from that exact address to be approved automatically in this organization. Supplier ordering addresses stay unchanged. The prompt disappears after the choice is saved, including after a reload.
- Review the current draft and click Finalize when ready. Allowing a sender does not approve existing drafts.
Use the close button, Dismiss sender prompt, to hide the prompt for this upload without allowing the sender. Incomplete invoices, outstanding review checks, or uncertain duplicate comparisons still need review even for allowed senders.
A few email rules: attachments can be PDFs or photos up to 25 MB each, and up to 10 attachments per email are taken. Tiny images like logos and email signatures are ignored. If you forward emails yourself and want to keep the original in your inbox, keep your normal recipient copied.
Email history
The Received emails section on the same page lists every email that arrived, whether it was processed or not. Each entry shows the sender, the subject, the attachment names, what happened to each attachment, and links to the invoices that came out of it. You can filter by inbox (Invoices or Point of Sale), by scope, and by location.
The history shows processing outcomes and links to resulting documents. Original attachments can be downloaded where offered. Use it to distinguish a received email from a successfully processed invoice.
The same addresses and history also handle sales report emails for your till. That is described in POS.
Connect your own mailbox
If suppliers already email invoices to your own inbox, you can connect that inbox. Spensa then checks it about every hour and imports new invoice emails on its own. This is part of the same email feature, so it is also available on the Business plan.
- Open your organization settings and go to Inbound Emails.
- Under Connected inboxes, click Add other.
- Pick the Outlook tab for an Outlook mailbox. The server settings are already filled in, and a short guide shows you how to allow the connection and create an app password. An app password is a special extra password that your email provider creates just for connections like this; your normal password stays private.
- For any other provider, pick the Other tab and enter your provider's incoming mail server settings (often called IMAP or POP3), your email address, and the app password. The connection is always encrypted.
- Click Test to check the connection, then Add inbox.
You can connect up to 10 inboxes. Spensa only reads: it never sends, changes, or deletes anything in your mailbox. It looks at new emails, imports the ones that contain invoices or till reports, and leaves everything else alone.
Each connected inbox shows its status (Active, Paused, Reconnect, or Needs attention), when it was last checked, and how many emails it has imported so far. For each inbox you can:
- Click Check now to check the mailbox immediately.
- Click Pause to stop checking, and Resume to start again.
- Click Disconnect to remove the inbox. The saved login details are deleted; already imported emails stay in the history.
If the status says Reconnect, the mailbox login expired. Disconnect the inbox and add it again with a fresh app password.
Delivery notes
Delivery notes record what arrived against supplier orders. They have their own Delivery notes page and can also be uploaded from a sent order or the phone's Scan screen. Spensa reads delivered positions and compares them with the linked orders. Uploading alone does not guarantee that an order is complete.
Follow Receive and review a delivery to check quantities, missing pages, substitutions, and order links. Delivery notes do not replace invoice approval or update invoice prices.
How this connects to other parts of Spensa
- Suppliers: create suppliers before uploading or as you review; clear matches can then be assigned across the backlog.
- Products: approving an invoice creates new products or updates existing ones, including their latest price.
- Menu: dish costs and margins are calculated from invoice prices and update as soon as an invoice is approved.
- Analytics and Home: spend and price analytics are built from approved invoices. Drafts do not count.
- Orders: delivery notes attach to orders, and products created from invoices come with order defaults so you can order them right away.
- POS: the same email addresses and mailbox connections also bring in sales report emails.
- Assistant: the assistant can upload invoices from chat, fix invoice lines, approve invoices after you confirm, and answer questions about your invoices.
- Settings and billing: the monthly reading allowance and the email feature depend on your plan.
- Mobile app: use Scan to upload invoices, POS reports, and delivery notes; the assistant can also accept invoice attachments.
Good to know
- Supported file types are PDF, PNG, JPG, and BMP.
- You can upload up to 500 files at once, each up to 50 MB. Email attachments can be up to 25 MB.
- An invoice can hold up to 1000 lines, 20 invoice discounts, 20 discounts per line, and 100 other cost lines.
- Bulk approve and bulk delete work on up to 100 invoices at a time. Moving lines between invoices works on up to 500 lines at a time.
- Uploads that are still being read show at the top of the list for up to a day.
- Deleting an invoice does not delete the uploaded file or the other invoices from the same upload.
- Every invoice gets its own Spensa number, like #12, next to the supplier's invoice number. You can search by either.
- Spensa reads invoices to keep your products, prices, and costs current. It does not do accounting, statements, or taxes; keep your bookkeeper.