Team and permissions
On this page
Spensa has two kinds of people: company members who sign in with an email address, and staff members who sign in with a username. Use this guide to decide which kind of account to create, give each person the right role, and keep staff access limited to the locations where they work.
What this is for
- Invite company members by email.
- Create staff accounts with usernames and passwords.
- Assign company roles and location roles.
- Use custom permissions where your plan allows them.
- Edit names, roles, permissions, and location access.
- Reset a staff member's password.
- Remove company members, archive staff members, and bring former people back.
- Permanently delete staff accounts that were created by mistake or for testing.
- Cancel invitations.
- Put people into teams, like Kitchen or Service, with their positions.
Where to open it
On the web, click Users in the left sidebar. This is the one page for your company members, staff accounts, invitations, roles, and permissions. Teams have their own page: Settings > Teams in the company area, or Teams in a location's sidebar.
Account and role management is web only.
Access and permissions
Admins can do everything here, including inviting company members and changing roles. Managers can create and manage staff members, but they cannot invite company members or change company member roles.
These team management rights cannot be handed out through custom roles; they stay with admins and managers.
The two kinds of people in Spensa
Company members sign in with their email address. They work at the company level and can see every location, depending on their role. Use email accounts for owners, office staff, accountants, and managers - anyone who needs invoices, costs, billing, or company-wide oversight.
Staff members sign in with a username. The app calls them "employees". They belong to specific locations and mainly use the phone app for daily work: placing orders, counting inventory, checking their schedule, reading recipes. Use username accounts for cooks, waiters, and warehouse staff. You create these accounts yourself and hand the person their username and password; no email address is needed. The app may also call a location an "establishment"; both words mean the same thing.
Both kinds count together toward your plan's team size (see Good to know).
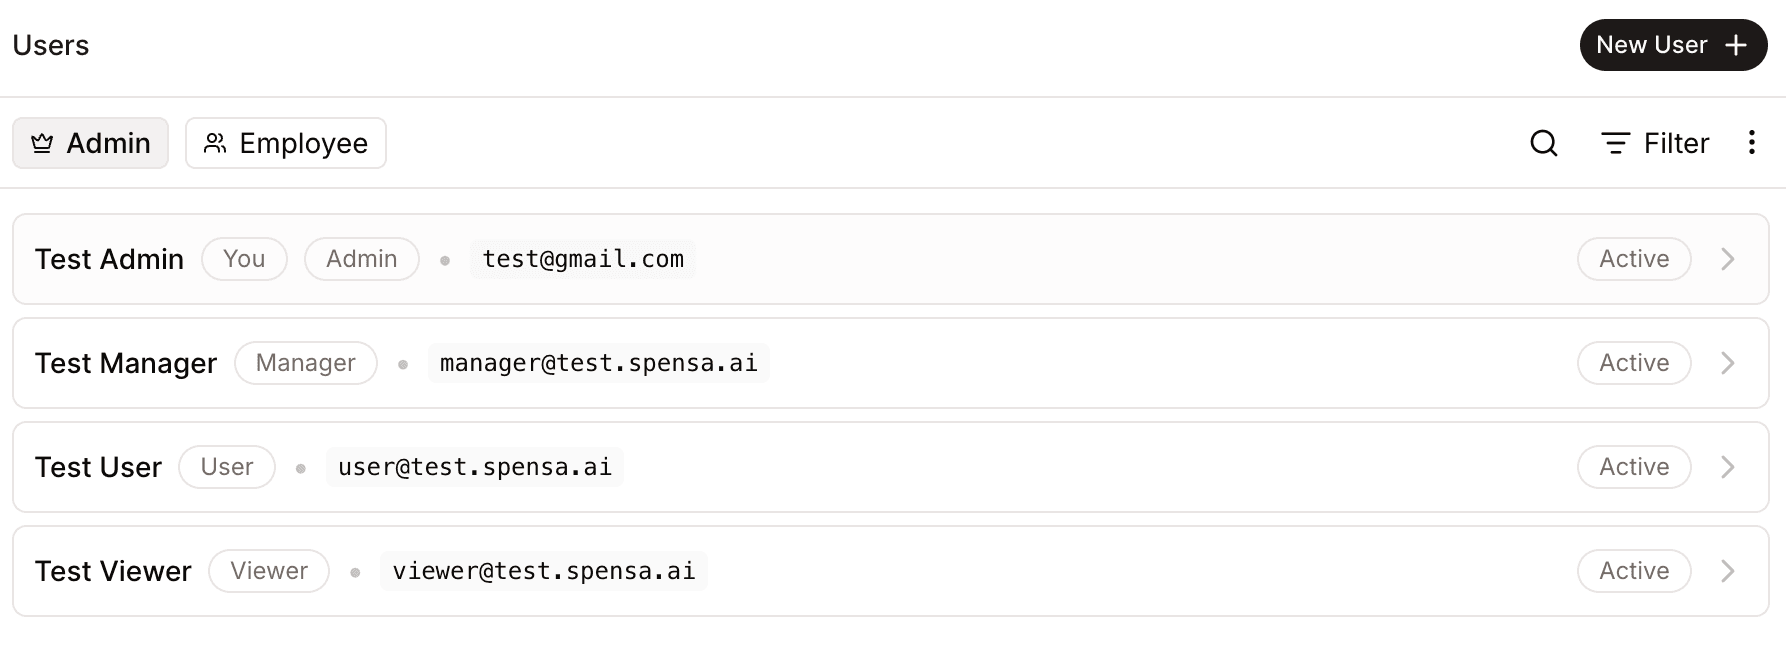
The Users page
The Users page has two tabs:
- Admin - your company members, plus any open invitations. You can show everything, only members, or only invitations, filter by role, and search by name or email.
- Employee - your staff accounts. You can filter by location and search.
The New User button opens a chooser:
- Admin - "Someone who can manage almost everything in the organization, create suppliers, products, establishments, see invoices and costs."
- Employee - "Only certain privileges like order food for certain establishments. Cooks, Waiters, warehouse workers, etc..."
You can also switch the page into a bulk mode, select up to 50 people or invitations, and remove company members, archive staff members, or cancel invitations in one go. You confirm in a short dialog.
To see people who no longer work with you, open Filter and tick Former, or pick the Status: Former suggestion. The Admin tab then lists former company members and the Employee tab lists former staff members. Remove the Status: Former chip to go back to current people.
Invite a company member
Company members join by invitation, so they control their own account and password.
- On the Users page, click New User and choose Admin.
- Enter the person's email address.
- Optionally enter a display name. This is how they appear in this company.
- Pick a role. The page shows you exactly what that role will be able to do.
- Send the invitation.
The person receives an email with a link. The invitation is valid for 7 days. They must sign up or sign in with exactly the email address you invited; if they are signed in with a different address, the page tells them the invitation was sent to another one. When they accept, they join with the role and name you set.
Open invitations appear on the Admin tab. You can Resend one, which restarts the 7 days, or Cancel it. You can have up to 50 open invitations at a time. Your plan's team size is checked when you invite and again when the person accepts.
Team roles
Every company member has one role in your company:
- Admin - full access to everything, including billing, company settings, team management, and deleting the company. Every company needs at least one.
- Manager - the day-to-day management role. Managers can run locations, staff accounts, products, suppliers, orders, invoices, and everything operational. They cannot delete the company, change company settings, manage company members, or touch billing.
- User - a working role. Users can view data across the company (invoices, menu costs, analytics, inventory, schedules, staff communications), create orders and send orders from templates, manage tasks, record delivery notes, and record waste and stock outflows.
- Viewer - look only. Viewers can read data everywhere but change nothing.
- Custom - you pick permissions one by one. This is available on the Business plan; on other plans you see an upgrade note.
Custom roles
When you choose Custom, you get a list of permissions grouped by area: organization management, structure, data, orders, inventory, scheduling, tasks, and staff communications. Tick what the person needs. If a permission needs another one to work, Spensa ticks that one automatically and marks it "Granted by another permission", so a custom role always works as expected.
A few permissions are reserved for admins and can never be part of a custom role: deleting the company, changing company settings, managing company members, and managing locations and staff accounts.
For the ready-made roles, the same permission list is shown read-only, so you can always see exactly what a role grants before you assign it.
Edit or remove a company member
- On the Admin tab, click the person.
- Change their display name, their role, or, for a custom role, their individual permissions.
- Save.
A few rules protect you from locking yourself out:
- You cannot change your own role.
- There must always be at least one admin. You cannot remove the last one, and the last admin cannot leave the company.
- You cannot remove yourself here. To leave a company, use the general settings page instead (see Getting started).
- If you take away someone's right to send orders, Spensa also removes them as an order reviewer and as the default reviewer on order templates, and clears their open review requests.
Display names belong to the company, so the same person can appear under different names in different companies.
Remove a company member
- On the Admin tab, click the person.
- Click Remove from company.
- Confirm with Remove.
The person loses access to the company right away, and they leave its teams and team chats. Everything they did stays with your company and keeps their name: orders, inventory counts, waste, tasks, messages, and time records. Spensa also:
- removes them as reviewer of orders that are still waiting for review and as default reviewer on order templates,
- removes them from order reminder contacts,
- disconnects any assistant connection they set up for your company,
- unassigns their open tasks, so you can hand them to someone else, and removes them from checklist assignments,
- deletes their shifts from today on, also in published weeks. Past shifts keep their name. The success message says how many upcoming shifts were removed.
Their account stays theirs. If they belong to other companies, nothing changes there.
Invite a former company member again
- On the Users page, open Filter and tick Former.
- On the Admin tab, find the person. The list shows when they left and whether they left themselves or were removed.
- Click Invite again. The invitation form opens with their email address and name filled in.
- Choose a role and send the invitation.
When they accept, they are back with the role you chose, and their earlier work is still under their name. People who deleted their Spensa account cannot be invited again from this list; invite their new email address as usual.
Create a staff account
Staff accounts are for the people working at your locations. You create the account and give the person their sign-in details.
- On the Users page, click New User and choose Employee.
- Enter a display name.
- Choose a username. It is used for signing in and must be unique among all Spensa users. It can be 3 to 50 characters long and use letters, numbers, underscores, and hyphens.
- Set a password (at least 8 characters) and confirm it.
- Assign locations: pick one or more locations and choose a role at each one. One staff member can work at up to 64 locations.
- Save, then hand the person their username and password.
Staff accounts use a username rather than an email address for sign-in. A personal contact email in their employee file does not enable email password resets; a manager resets forgotten passwords.
Location roles for staff
At each assigned location, a staff member has one of these roles:
- Establishment Manager - runs the location's daily operation. Can create, edit, and delete order templates and orders, send orders, handle delivery notes, manage inventory including storages and corrections to finalized counts, record waste, manage schedules, manage tasks, and manage staff communications.
- Employee - the everyday working role. Can view templates, create orders and send them for review, handle delivery notes, count inventory, record waste, see their schedule, manage tasks, and read staff communications.
- Viewer - look only: can see schedules, tasks, and staff communications.
- Custom - pick permissions per location, grouped by order templates, orders, inventory, recipes, scheduling, tasks, and staff communications. Custom roles are available on the Business plan.
Recipe access for staff is only possible through a custom role: you can allow viewing recipes, and separately viewing recipe ingredients. Recipe screens for staff never show prices, costs, or suppliers - staff see how to make the dish, not what it costs.
What staff members see
The phone app is made for staff. Open More to see the sections available to each staff member. These can include Orders (with a badge when an order waits for their review), Tasks, News and Chat, Schedule for their own shifts and time off, Inventory, Recipes, and Settings. Their permissions determine what they can do in each section. Staff do not see the assistant. The phone uses More and favorite bottom tabs for navigation; Orders is the starting point for daily ordering.
Staff members can also sign in on the web. They get a reduced view with Orders, Tasks, Communication, Conversations, My Schedule, Inventory, and Recipes, plus a location switcher if they work at several locations.
In both places, staff members only ever see their own locations and the data belonging to them.
Reset a staff member's password
If a staff member forgets their password, you set a new one.
- Open Users > Employee and click the person.
- In their login settings, enter the new password and its confirmation.
- Click Update Password.
- Give them the new password and have them sign in again.
The moment you save, the staff member is signed out everywhere and needs the new password to get back in. Staff members who still know their current password can also change it themselves in the phone app's Settings.
Edit or archive staff accounts
To edit, open the person on the Employee tab. You can rename them, change their username (Spensa checks it is still free), and change their locations, roles, and custom permissions.
When you take a location away from a staff member, they lose access to it right away. Their role and permissions for that location are kept: if you add the location back later, they come back with it. Their shifts there from today on are deleted, also in published weeks, and their open tasks there become unassigned. Past shifts keep their name. The success message says how many upcoming shifts were removed.
Archive a staff member
When someone stops working for you, archive their account:
- On the Users page, open the Employee tab and click Edit to switch to bulk mode.
- Select the people who are leaving (up to 50).
- Click Archive employees and confirm.
What happens:
- They are signed out everywhere and can no longer sign in. Their username becomes free, so you can give it to someone else.
- Their shifts from today on are deleted, also in published weeks, so plan someone else for them. Past shifts keep their name. The success message says how many upcoming shifts were removed.
- They leave all teams and team chats, their open tasks become unassigned, and they are removed from checklist assignments.
- Everything they did stays and keeps their name: inventory counts, waste, orders, messages, time records, time off, and their employee file and documents.
- They no longer count towards your plan's user limit.
Restore a former staff member
- On the Users page, open Filter and tick Former, then open the Employee tab.
- Click Restore next to the person and confirm.
- They come back with the locations, roles, and employee file they had. Locations they had already left before being archived stay removed.
- To let them sign in again, open their profile and turn on login with a new username and password.
If your plan's user limit is reached, Spensa shows an upgrade note instead of restoring.
Delete a former staff member permanently
Use this for staff accounts that were created by mistake or for testing. You need permission to manage employees, and the person must be archived first.
- On the Users page, open Filter and tick Former, then open the Employee tab.
- Click Delete next to the person.
- Read the note and click Delete permanently. This cannot be undone.
Spensa only deletes staff members who have no work history yet. If the person already has shifts, time records, time off requests, employee file documents, tasks, checklists, orders, deliveries, inventory counts, or messages, the dialog explains that they stay archived and nothing is deleted. This keeps your records complete.
Employee file and documents
The staff edit page also contains Employee file and Documents for permitted staff managers. These are separate from the employee's login details. A personal contact email here does not turn a username account into a company-member account.
Open Users > Employee, select the person, and update the relevant contact, employment, or emergency-contact fields. Use Documents for their ID copies, contracts, and certificates. Review who has staff-management access before uploading personnel records.
Teams
A team is a group of people at one location, for example Kitchen, Service, or Drivers. Teams are used everywhere people belong together:
- The staff schedule has a section for each team that is on the schedule.
- News can be sent to a team, or to everyone with one of its positions.
- A team can have its own team chat.
Each team can have positions, like Cook or Dishwasher. Positions describe what someone works in the team, and the schedule uses them to plan shifts. Members can be staff members and company members such as owners and managers. Every member can hold positions and be planned in shifts. A company member without a position stays off the schedule and only receives the team's news and takes part in its chat.
You need permission to manage teams. Company admins and managers have it for every location, location managers for their own location. You can also grant it with a custom role.
Being in a team does not give anyone extra rights. To let someone plan shifts, correct working times, or manage tasks, give them a role or custom role with that permission.
Company members can also ask the assistant to create teams and assign people, with company-level team-management access. People can be added to several teams while keeping their existing memberships.
Create a team on the web
- In the company area, open Settings > Teams. As a location manager, click Teams in your location's sidebar.
- Click New team.
- Enter a Name, up to 80 characters, for example "Kitchen". Names must be unique within a location.
- In the company area, choose the Location. A team always belongs to one location.
- Add a Note if you like, up to 500 characters.
- Decide whether to Show on schedule: the team then gets its own section in the staff schedule. Turn it off for teams like "Drivers" that are only for news and chat.
- Decide whether to turn on Team chat. It is off unless you turn it on.
- Under Members, choose the people of this location who belong to the team. You can also add them later.
- Click Create team. The team's page opens.
Manage a team on the web
Open Teams and click a team.
- Details: change the name, note, Show on schedule, and Team chat, then click Save changes. Turning the team chat off hides it for everyone and keeps its messages; turning it on again brings it back.
- Positions: type a name and click Add position. Use the pencil on a position to rename it or pick its color, and the cross to remove it. A position that still has shifts today or later cannot be removed. A team can have up to 30 positions.
- Members: choose people and click Add. For each member, pick the positions they work in this team. For a member with several positions, the same picker has Primary role to choose the position whose group they appear in on the schedule. Click the remove icon to take someone out of the team; their positions in this team are removed too.
- Delete team: click Delete team and confirm. This deletes the team's positions and its team chat with all messages. News that was sent to the team stays visible with the team's name. A team that still has shifts today or later cannot be deleted.
On the Teams list, drag a team by its handle to change its order. The schedule shows teams in this order.
Manage teams on the phone
- Open More > Teams.
- Tap New team to create one: enter the Name, optionally a Note, choose the Location if you manage several, set Show on schedule and Team chat, then tap Create.
- Tap a team to open it. There you can:
- tap Edit name and note,
- switch Show on schedule and Team chat,
- tap Add position, or tap a position to rename or delete it,
- tap Add people, choose people, and tap Add,
- tap a member to choose their positions in this team and, with several, the one they are listed under in the schedule, then tap Save,
- tap the remove icon next to a member and confirm to take them out of the team,
- tap Delete team and confirm.
When someone stops working at a location or is archived, they also leave that location's teams, their positions there, and the team chats. Company members stay in their teams because they belong to every location.
How this connects to other parts of Spensa
- Getting started - how everyone signs in, and the difference between company and location level.
- Settings and billing - your plan decides your team size and whether custom roles are included.
- Orders - order reviewers come from your team; removing someone's sending rights, or removing them from the company, removes them as reviewer of orders that still wait for review.
- Communication - teams and positions are audiences for news, and teams can have a team chat.
- Scheduling - staff see and manage their own shifts.
- Recipes - staff recipe access is granted per location through custom roles, always without prices.
- Inventory - counting and waste permissions differ per role.
- Tasks - task permissions differ per role.
- Mobile app - the app your staff members use every day.
Good to know
- User limits by plan: Free allows 5 people, Basic allows 10, Business is unlimited. Company members and staff members count together. When the limit is reached, you see an upgrade note.
- Custom roles are a Business plan feature. If your company later moves to a plan without them, everyone with a custom role becomes a Viewer until you assign a new role.
- Invitations expire after 7 days; resending restarts the clock. Up to 50 invitations can be open at once.
- Usernames must be unique across all of Spensa, not just your company.
- One staff member can be assigned to up to 64 locations.
- Bulk actions handle up to 50 people or invitations at a time.
- A team belongs to exactly one location and has up to 200 members and up to 30 positions. A location can have up to 100 teams. Teams and positions are not limited by your plan.
- Staff members cannot delete their own account; the phone app tells them to contact their administrator.
- Company members never need location assignments; their company role covers every location.