Orders
On this page
Orders are how you order goods from your suppliers through Spensa. You put together a list of items, set a delivery date, and Spensa emails the order to the supplier in a clean, professional format. From there you can track the order until the goods arrive, keep the delivery note with it, and read the supplier's replies right next to the order.
What this is for
- Create an order for a supplier, from scratch or from an order template.
- Leave the supplier open and add products from several suppliers to one order. Spensa sends one order to each supplier.
- Save unfinished orders as drafts and continue later.
- Add items from your product catalogue, from a template, or as one-off custom lines.
- Add a note for the supplier.
- Send the order to the supplier by email, or send it to a colleague for review first.
- Approve, deny, or change orders that are waiting for review.
- Change or cancel a sent order. Spensa emails the supplier for you.
- Mark orders as arrived and upload delivery notes.
- Filter, sort, and search through your orders.
- Delete drafts, one by one or several at once.
- Order on the phone app, even without an internet connection.
Where to open it
On the web, open the left sidebar and click Orders. The page exists in the organization view, showing orders from all locations, and in each location view, showing only that location's orders. The app sometimes calls a location an "establishment".
On the phone app, open Orders, then All orders for the list. Creating orders works there even offline; opening an existing order's details needs an internet connection.
Access and permissions
Everyone in your organization can see orders. Staff members only see the orders of their own location.
- Admins and managers, including location managers, can do everything: create, send, complete, and delete orders.
- Other company members and staff members can create orders and save drafts. They can send an order themselves when it was started from a template. If that template has reviewers, only one of the reviewers may send it. For everything else, they use Send for review and a manager approves.
- On orders from a template, only admins and managers can add items beyond what the template contains.
- Everyone except viewers can upload delivery notes.
- Viewers can only look.
You can fine-tune all of this with custom roles. Read more in Team and permissions.
Order statuses
Every order has a status that tells you where it stands:
- Draft - you are still working on it. Nothing has been sent.
- In Review - the order was submitted for approval. Reviewers have been notified.
- Sent - the order was emailed to the supplier.
- Completed - the goods arrived and the order is closed.
- Cancelled - the order was called off after sending, and the supplier was emailed to not deliver it.
- Denied - a reviewer decided the order should not be sent.
This is how an order moves:
- A new order starts as a draft.
- From the review page you either send it straight to the supplier, or send it for review.
- An order in review is approved by sending it. Approving and sending are one step, so the approver is also the sender.
- A reviewer can instead deny the order, or make changes to it.
- Once sent, the order stays Sent until you mark it as arrived. Then it becomes Completed. You can switch it back if you marked it too early.
Sent, completed, cancelled, and denied orders can no longer be edited or deleted like a draft. A sent order that has not arrived yet can still be changed or cancelled by email to the supplier; see Changing or cancelling a sent order.
Stale drafts
Drafts older than 14 days are marked Stale. They disappear from the normal list views and gather under their own Stale filter, so old half-finished orders do not clutter your day. A stale draft still works like any draft: open it, finish it, and send it.
Before you send your first order
Three things must be in place before Spensa can send an order. It is worth checking them once:
- The supplier needs an order email address. You add it on the supplier's page. See Suppliers.
- Your location needs an email address and a complete address: official name, company name, street, postal code, city, and country. Spensa prints this as the delivery address in the order email.
- The order needs at least one item with a quantity above zero.
If something is missing, Spensa tells you before the order goes out.
Creating an order on the web
- Open Orders and click New order.
- The "New Order" window opens. Choose the location. In a location view this is already set.
- Choose the supplier, or leave Supplier (optional) empty to order from several suppliers at once. Choosing a supplier limits the search to that supplier's products. If the supplier has no order email yet, a warning appears: "You need to add an email for this supplier in order to send an order." Click Add supplier email to fix it first. Without an email you cannot create the order.
- Choose an order template if you want one. This is optional; "No template (blank order)" is always available. Without a supplier, the list shows templates of every supplier, and templates without a supplier are marked "All suppliers". Picking a template that belongs to one supplier limits the order to that supplier. If you have no templates yet and are allowed to create them, a Create Template link appears. A small "What is an Order Template?" dialog explains templates.
- Under "When should it arrive?" keep ASAP or pick Other and choose a date from the calendar. Past dates cannot be chosen.
- Click Create Order (with a template) or Create Blank Order.
You land on the order form:
- Template items are already listed, grouped in the template's sections. Each line starts at quantity zero, with the template's usual amount shown as a recommendation. Type the quantities you actually need.
- Click Add item to add more items.
- The save icon in the header saves the order as a draft. You see "Order saved as draft successfully".
- Finalize becomes available once at least one item has a quantity above zero. Clicking it saves the order as a draft and opens the review page.
- If you leave with unsaved changes, Spensa asks "Do you want to keep this order for later?" with the choices Save draft, Discard, and Cancel.
The form checks your input as you go: it asks for a location, a delivery choice, at least one item, item names, and at least one quantity above zero. On an order without a supplier, every custom item also needs a supplier.
Orders with products from several suppliers
An order without a supplier shows "All suppliers" above the items. Each line shows the supplier that will receive it. Search finds products of every active supplier, and each custom item asks which supplier receives it.
To see what you order where, use the controls above the items once the order contains products from two or more suppliers:
- The supplier filter (All suppliers) shows only the items of one supplier.
- Sort > Sort by supplier groups the items under a heading per supplier.
To lift the limit on an existing draft or an order in review, click Remove supplier above the items, then save. The items you already added stay on the order, and you can now add products from any supplier. Once the order has no supplier, it cannot be limited to one supplier again.
When you send, Spensa sends one order email to each supplier. The original order keeps the items of the supplier of its order schedule slot when it was started from the schedule, otherwise those of the first supplier (alphabetically). Each other supplier gets its own new order with its own order number, the same delivery date and reviewers. Each supplier's email contains the note for all suppliers followed by the note you wrote only for that supplier, so a supplier never reads instructions meant for another one. Lines with a quantity of zero are dropped for suppliers that receive nothing.
An order started from the schedule stays linked to its slot when you remove the supplier, so the slot still counts as ordered when the order is sent, even if every item went to other suppliers.
Cheaper at another supplier
When you buy the same article from several suppliers and have linked them as identical products, Spensa compares their current online shop prices while you order. If another supplier sells an item on your order at least 3% and at least €0.10 per article cheaper, the item shows a green pill such as "€4.20 cheaper at METRO". The amount is the saving for the quantity you entered; while the quantity is zero, the pill shows the percentage instead. Only shop prices received in the last 24 hours count, so items without a current price show no pill. Suppliers that cannot receive orders, because they are archived or have no order email, are never suggested.
To switch an item on the web:
- Open a draft, an order in review, or a new order.
- Click the green pill on the item. A popover shows each supplier's price per bottle, piece, litre, or kilogram, with the cheapest marked, and how the quantity changes, for example "2 Bottles → 1 Case".
- Check the warnings. One appears if the cheaper supplier does not deliver on the chosen delivery date. Another appears if the supplier has a minimum order value and this item would be the only one from that supplier, for example "Del Fabro has a minimum order value of €400.00. This would be your only item from Del Fabro (about €100.00)." If the supplier blocks orders below its minimum, you would not be able to send that supplier's part of the order.
- Click Switch supplier. The item keeps its place, section, and note, and now goes to the cheaper supplier. If the cheaper product is already on the order, the quantity is added to that line instead.
- If the order is limited to one supplier, Spensa first asks "Order from several suppliers?". Confirm to remove the limit; the order is split into one order per supplier when you send it.
- Save the order.
To see only the items that are cheaper elsewhere, click Cheaper elsewhere above the items. The number in brackets counts those items. Click it again to show all items.
The review page shows a card such as "Save about €23 by switching 5 items to cheaper suppliers." when items with a quantity can be switched. Click Review items to go back to the order with Cheaper elsewhere turned on, and switch the items you want with their pills. Switched items still count against each supplier's minimum order value and delivery days, which the review page checks as usual.
Switching an item never changes its order template. Colleagues who may only order template items can still switch a template item to the same article at another supplier.
Adding items from your catalogue
- Click Add item. The "Add Item" window opens.
- Type in "Search for items...". Spensa searches the items you buy from this supplier, or from every supplier when the order has none. Without a supplier, each result shows its supplier.
- Use the filter to narrow by category (in the organization view) or by time: "All items", "Last 30 days", "Last 60 days", or "Last 90 days". The time filter shows items you ordered in that period.
- Results are grouped into "New Items", "Recently Used", and the rest.
- Click every item you want. The button counts your selection, for example "3 items selected".
- Click Add items.
Items already on the order are greyed out, so you cannot add the same item twice.
Items from a template
On an order created from a template, you normally order only what the template contains. The Add item button is shown only to people who can send any order, meaning admins and managers. Template items cannot be renamed.
Template items can carry a note written by whoever set up the template, for example "only order on Fridays". These notes are internal guidance for your team. They are never sent to the supplier. See Order templates.
Custom one-off items
Sometimes you need something that is not in your catalogue yet.
- In the "Add Item" window, click Add custom item.
- Enter the "Item name". Optionally enter the "Supplier product ID", the item code the supplier uses.
- If the order has no supplier, choose the Supplier that receives this item.
- Confirm. The line is added to your order.
One important thing: a custom item exists only on this one order. It is not added to your product catalogue. This is different from order templates, where adding a new item can also create a catalogue product. If you order something regularly, add it to the catalogue or to a template so Spensa can track its prices. See Products.
If a line with the same name is already on the order, Spensa tells you: "An item with this name already added."
Reviewing and sending
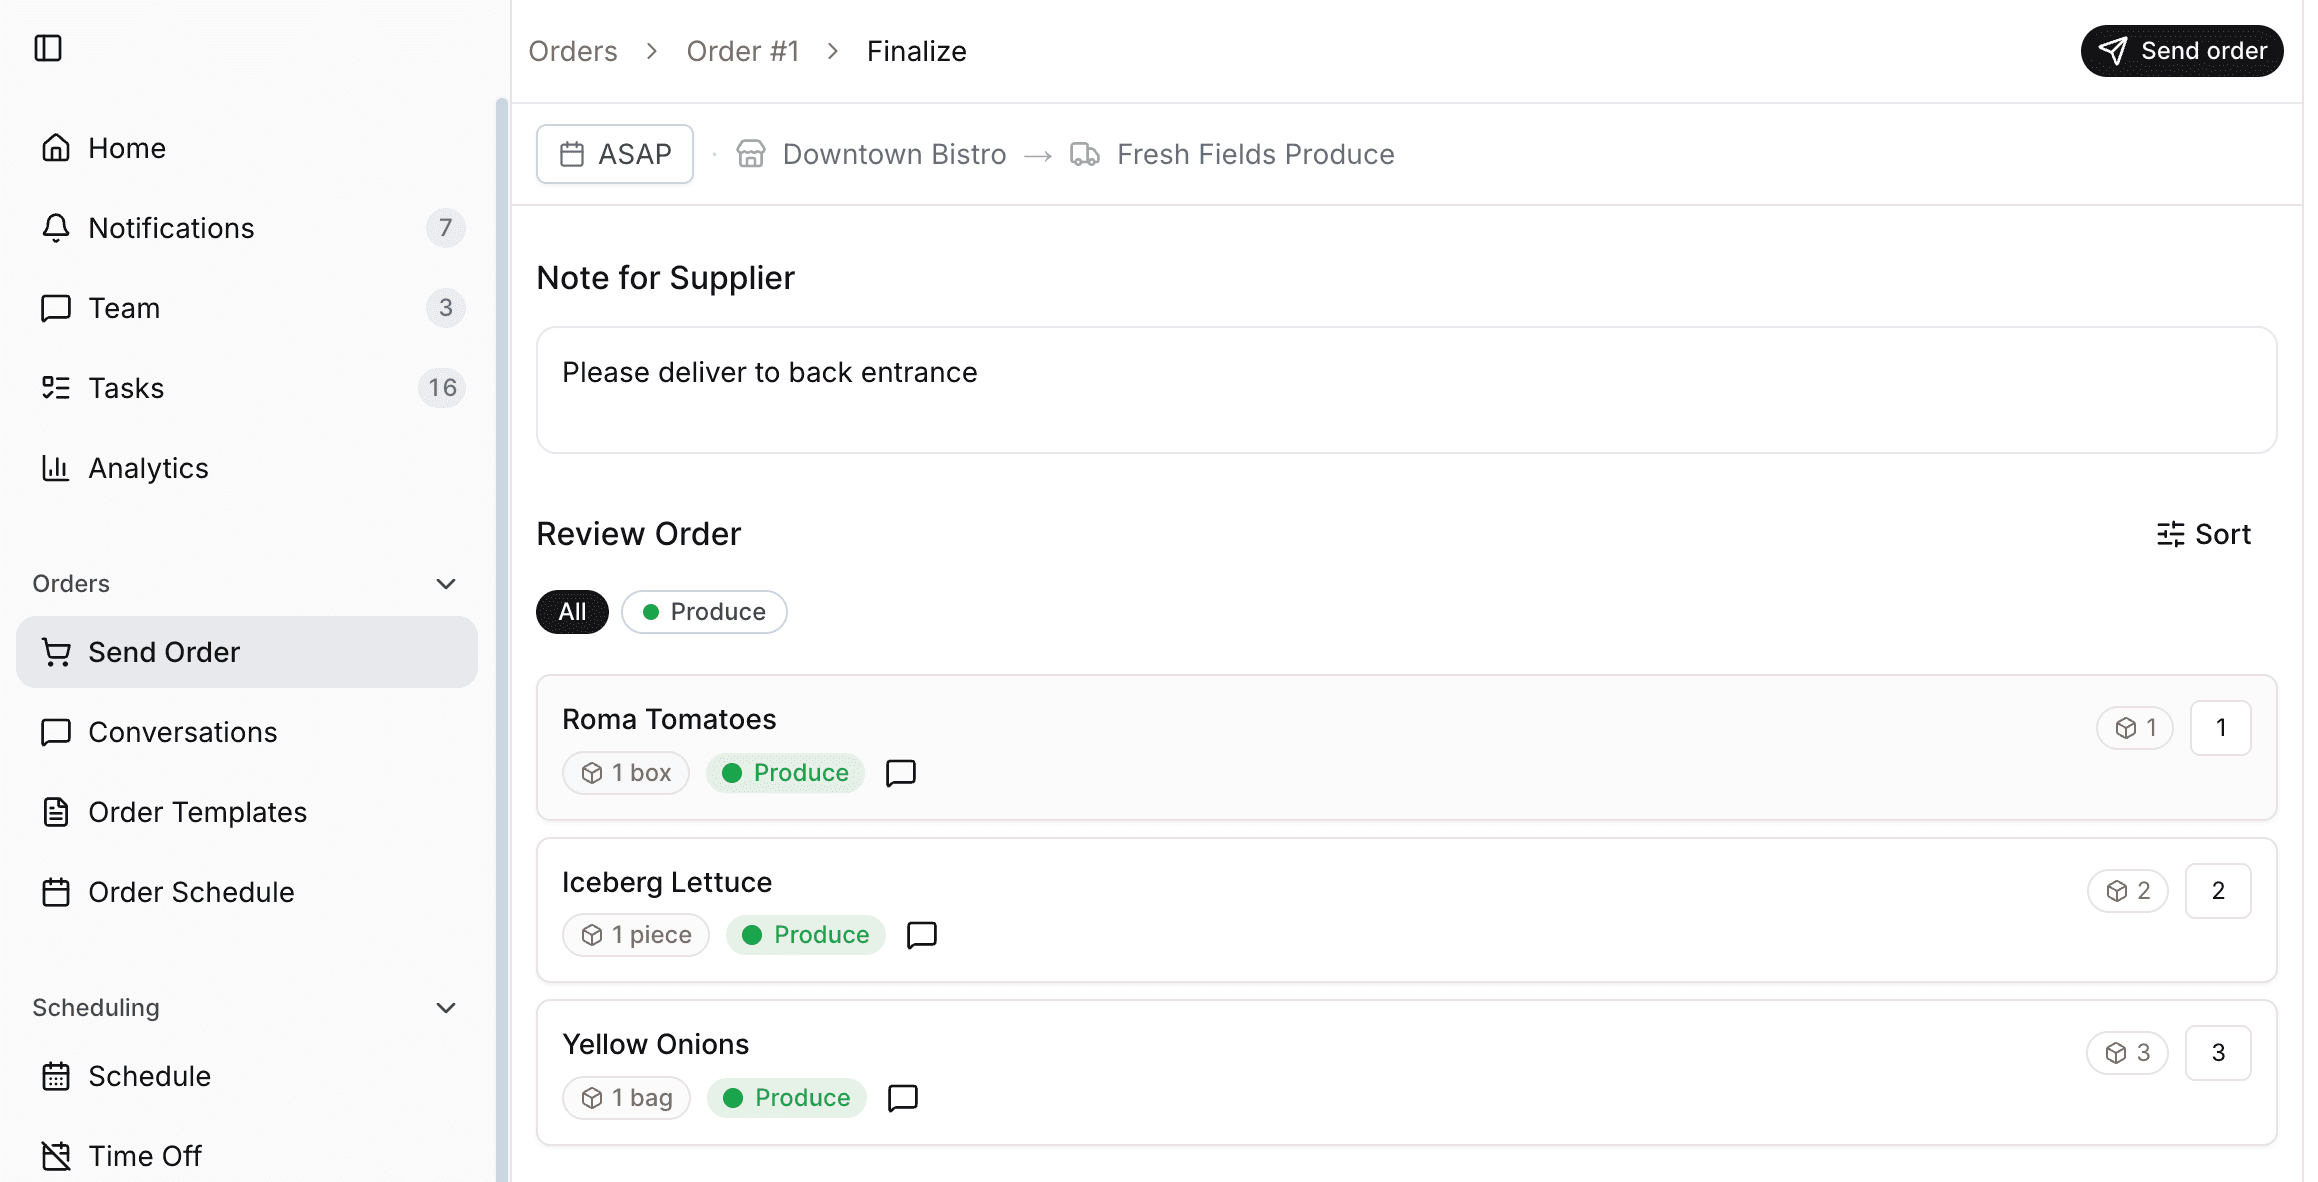
Clicking Finalize opens the "Review Order" page. This is the last stop before the order goes out.
Delivery date and note for the supplier
- The delivery pill shows "ASAP", the chosen date, or "Select date". Click it to change your choice: an "As soon as possible." button or a calendar. Past dates are rejected. For an order to several suppliers, the calendar only offers days on which all of them deliver; if they share no delivery day, send the order as soon as possible.
- "Note for Supplier" is a free-text note printed in the order email. There is one note per order, not per item. Use it for anything the supplier should read, for example "please deliver before 9am".
- On an order to several suppliers, this field is called "Note for all suppliers" and every supplier receives it. Each supplier's section further down has its own optional note field, "Note only for {supplier}". Use it for instructions that concern just that supplier, for example "if you don't have Belvedere, send Ciroc". That supplier's email shows the note for all suppliers first, then its own note.
Checking the items
The page shows a read-only recap of every item with a quantity above zero. Each line shows its packaging, its category, any internal note, and the recommended amount from the template as "Should have". You can sort the list: Sort A-Z, Sort Z-A, Sort by category, or Manual order, and filter it by category. Click Make changes if something needs editing.
On an order to several suppliers, the recap is split into one section per supplier, so you can check exactly what each supplier will receive. Each section shows the supplier's name, the number of items, the estimated value of that supplier's order (for example "About €312.40", or with the number of items that have no known price), that supplier's minimum order and delivery cutoff warnings, and its note field.
Reviewers
Reviewers are colleagues who should approve the order before it goes to the supplier.
- Click Add reviewer (or the "{count} reviewers" avatars if some are already set).
- Search and pick people. Only people who are allowed to approve orders appear. When everyone eligible is already added, the list says "All available users are already reviewers".
Orders from a template can bring default reviewers with them. They are tagged "(default)" and cannot be removed from the order. You can add up to 20 reviewers per order. A small info dialog on the page explains how reviews work.
Sending
The main button depends on what you are allowed to do:
- If you can send directly, you see Send order on a draft, or Approve & Send on an order in review. After sending, you see "Order sent successfully to supplier." The supplier receives the order email, and the order becomes Sent. For an order to several suppliers, you see "Sent {count} orders, one per supplier." and each supplier order appears separately in the list.
- Before splitting an order to several suppliers, Spensa checks every supplier. If one of them cannot receive the order yet, nothing is sent and you see "This order cannot be sent to every supplier yet." with the reason per supplier, for example a missing order email, a passed next-day delivery cutoff, a date the supplier does not deliver on, or a blocked minimum order value. Fix the reason and send again.
- If an email fails after the order was split, you see how many supplier orders were sent. The others stay as separate orders in the list; open and send them again.
- If you cannot send directly, you see Send for review. The order becomes In Review and the reviewers are notified. You see "Order submitted for review successfully".
Minimum order value
Some suppliers have a minimum order value. You set the amount and the behavior on the supplier. See Suppliers. On the review page, Spensa estimates the order's value from the latest prices it knows. Items without a known price do not count toward the estimate. On an order to several suppliers, Spensa checks each supplier's share separately and shows the banner in that supplier's section.
- If the supplier is set to warn: a "Supplier minimum order value warning" banner appears with the estimated value and the minimum, for example "Estimated order value: about €120.00. Supplier minimum: €400.00." When you send, a dialog asks "Send this order anyway?" and names the suppliers below their minimum. You can still click Send anyway, but the supplier may reject the order.
- If the supplier is set to block: the banner reads "Supplier minimum order value not met" and sending is disabled until you add more.
- If no item's price is known, the banner reads "Order value could not be estimated" and you can send normally.
Approving or denying an order
When an order is sent for review, every reviewer except the person who submitted it is notified three ways: a push notification on the phone, an email with the order's key facts and a link, and an in-app notification. See Notifications.
Orders waiting for your review are easy to find: the Review filter on the orders list, a review counter in the web sidebar, and a blue banner on the phone app's Orders tab reading "{count} orders awaiting your review".
On the web, use your reviewer account:
- Open Orders and select the Review filter.
- Open the order and check the supplier, delivery date, quantities, and supplier note on Review Order.
- Click Make changes if anything needs correcting, then return to review.
- Click Approve & Send when the order is ready. Check that its status becomes Sent. If sending is blocked, correct the displayed supplier or order requirement before retrying.
The available review actions differ by platform:
- On the web, you land on the "Review Order" page. You can Approve & Send, which sends the order to the supplier, or Make changes to edit it first. There is no deny button on the web.
- On the phone app, the order shows a "Review this order" panel with three choices. Approve & send asks "Approve and send order?" and then emails the supplier; you see "Order approved and sent". Deny asks "Deny this order?" and explains: it won't be sent to the supplier, and whoever created it will see that it was denied. Make changes opens the order for editing.
Colleagues who cannot approve see a "Waiting for review" panel on the phone, with the reviewers listed. On the web, they see the order in a read-only view.
A denied order is kept for the record under the Archive filter on the web.
What the supplier receives
Sending an order produces one email to the supplier's order address:
- It is written in the supplier's language, German by default or English, as set on the supplier.
- The subject is "New Order #12 from {your location}", with your order number.
- The sender name shows your location's name, so the supplier knows immediately who is ordering.
- The body contains a formal greeting, your location's delivery address, your invoice address if you have one configured, the delivery date or "as soon as possible", your customer number with this supplier if set, and your note.
- The items appear in a clear table: the supplier's item code, the unit or packaging (for example "2 crates"), the item name, and the quantity. Spensa uses the supplier's own item number whenever it knows it.
- The email asks the supplier to reply directly, and includes your location's phone number if one is set. Replies land in Spensa next to the order. See Order conversations.
- A footer explains that the email was generated on behalf of your location by Spensa and repeats the order number for inquiries.
When the delivery arrives
Marking the order as arrived
Open the order. On the web, a sent order shows an Arrived? toggle with No and Yes; switching to Yes marks the order Completed. There is also a Complete button, confirmed with "Order marked as complete". Switching the toggle back to No returns the order to Sent, for example when you completed it by mistake. On the phone app, the same toggle is called Delivered?.
Uploading delivery notes from an order
Use this when you know which sent or completed order the delivery belongs to. You need permission to manage delivery notes for that location.
- Open Orders, then the order that was delivered.
- Click Upload Lieferschein, or Add Lieferschein on a completed order. “Lieferschein” means delivery note.
- Click Choose files and select one PDF or photos of a single delivery note. This order dialog accepts up to 10 photos, each up to 20 MB. Do not mix PDFs with other files in one upload.
- Click Upload Lieferschein and wait for the upload to finish.
- When the extracted record appears in Lieferscheine, click View extracted positions. Check the delivery differences and the original document. A manager with company delivery-note access can correct the full review on the Delivery notes page.
Review a delivery note on the web
Use the company Delivery notes page when receiving a document separately or correcting the comparison. You need company-level permission to manage delivery notes; staff with location access can view the attachment and comparison for their order.
To find a delivery note, choose Without an order to show only unassigned documents, search by supplier, number, or file name, or click Filter and select one or more suppliers under Supplier or locations under Establishment. Remove a filter from the chips below the controls, or click Clear all filters.
- Click Delivery notes in the sidebar, then Add delivery note.
- Click Choose files and select one PDF or up to 20 photos, each up to 50 MB. The upload may contain several delivery notes. Click Upload delivery note. If a duplicate warning appears, choose Review files to check your selection or Upload anyway only when you intend another upload.
- Open the upload from the list. Wait for processing; if offered, click Process delivery note. The original pages appear beside the review.
- Review each delivery note separately. Its assigned orders are listed at the top, followed by one card per delivered item with its supplier item number, delivered quantity, and order. A warning icon marks an item that still needs attention; point at it to see why.
- Open a note's Details to correct its number, dates, supplier, or establishment. Remove its order assignments before changing the supplier or establishment: open Order actions beside each order and choose Remove order assignment. Click an order number to open the order.
- Click an item card to open it on its own page. Choose how the item relates to your catalogue, like on an invoice line:
- Link to Existing Product: search the supplier's catalogue and select the product. Its packaging is shown, and you choose the Delivered quantity unit from that packaging.
- Create New Product: check the Product Name, the Unit structure (how one unit breaks down into count, weight, or volume), the Ordering default, optional Categories, and the Supplier Product ID. Leave Try to match an existing product on if Spensa may still reuse a matching product instead of creating a new one.
- Under Orders, edit assigned quantities or search for another order under Assign to another order position, select its position, and click Assign remaining quantity. Assigned quantities cannot exceed the delivered amount. Choose Delivered without an order only for an intentional delivery outside an order. If the item belongs to another extracted note, use its Delivery note field to move it; this clears its old order assignments.
- Click Update Item. Spensa saves the item and returns to the review.
- Click Save review in the page header after changing note details or order assignments there. Check the refreshed warnings and linked order statuses. Reopen the upload to verify the saved items and quantities.
Items that will become new products show a dot after their name. A blue dot means Spensa first looks for a matching product in the supplier's catalogue; a green dot means it always creates a new product. New products are created only once the whole delivery note is resolved, meaning every item has a product choice and is assigned to an order or delivered without one. They then appear in the supplier's catalogue with their packaging, order default, and categories, and the item is linked to them.
Spensa can complete an order when the recorded deliveries fulfill its items and the comparison is sufficiently resolved. Shortages, missing pages, ambiguous matches, or units that cannot be compared can keep it open. Correcting a delivery can reopen an order that was completed automatically from delivery notes. The manual Arrived? control remains a separate way to record arrival; it does not prove that every item was delivered.
Once a delivery note is resolved, Spensa also adds the delivered items to the stock of its location. It appears as a Delivery entry in Inventory > Stock in & out. Changing the delivery note updates that entry, and deleting it or sending it back to review takes the delivery out of stock again. Read more in Inventory.
If saving fails, your edits remain on screen. Check the error before retrying. Reload offers to discard unsaved changes and load the current saved review. If someone else has saved a newer review, reload it before editing again.
On the phone, use Scan and upload a document, then Review delivery note from Uploaded when offered. Check the order's status after processing; a queued scan has not yet recorded a delivery in Spensa.
Review a delivery note on the phone
You need permission to manage delivery notes and an internet connection.
- Open the delivery note from Uploaded or from the order's delivery notes card, then tap Review delivery note.
- Tap a card under Delivered items. Items that will become new products show a dot after their name.
- Tap Link to existing product and search for the product, or tap Create new product and check the Product name, packaging, Order default, and Supplier item number.
- Check the Delivered quantity and its unit.
- Under Orders, assign the item to an order position with Assign remaining quantity, or tick Delivered without an order.
- Tap Save item. The review list shows the saved item.
- Tick All pages of this delivery note are present. when the upload is complete and tap Save review.
Delete a delivery note
Delete a delivery note that was uploaded twice, belongs to someone else, or should not be kept. You need company-level permission to manage delivery notes. Deleting removes the whole upload, including all of its pages, every delivery note found in it, and its reviewed positions. It cannot be undone.
- Click Delivery notes in the sidebar and find the upload.
- Click ⋯ (Delivery note actions) at the top right of its card and choose Delete. In an open review, use ⋯ in the page header and choose Delete delivery note.
- Check the message and click Delete. The list no longer shows the upload.
The delivery note is also removed from every order it was assigned to, and each order's history records the change. An order that was completed automatically from this delivery note reopens unless other delivery notes still cover all of its items. While a delivery note is being processed, wait until processing finishes before deleting it.
To keep the document but detach it from an order, remove the order assignment in the review instead.
Keeping track of your orders
The orders list is built for quick scanning.
Status filters
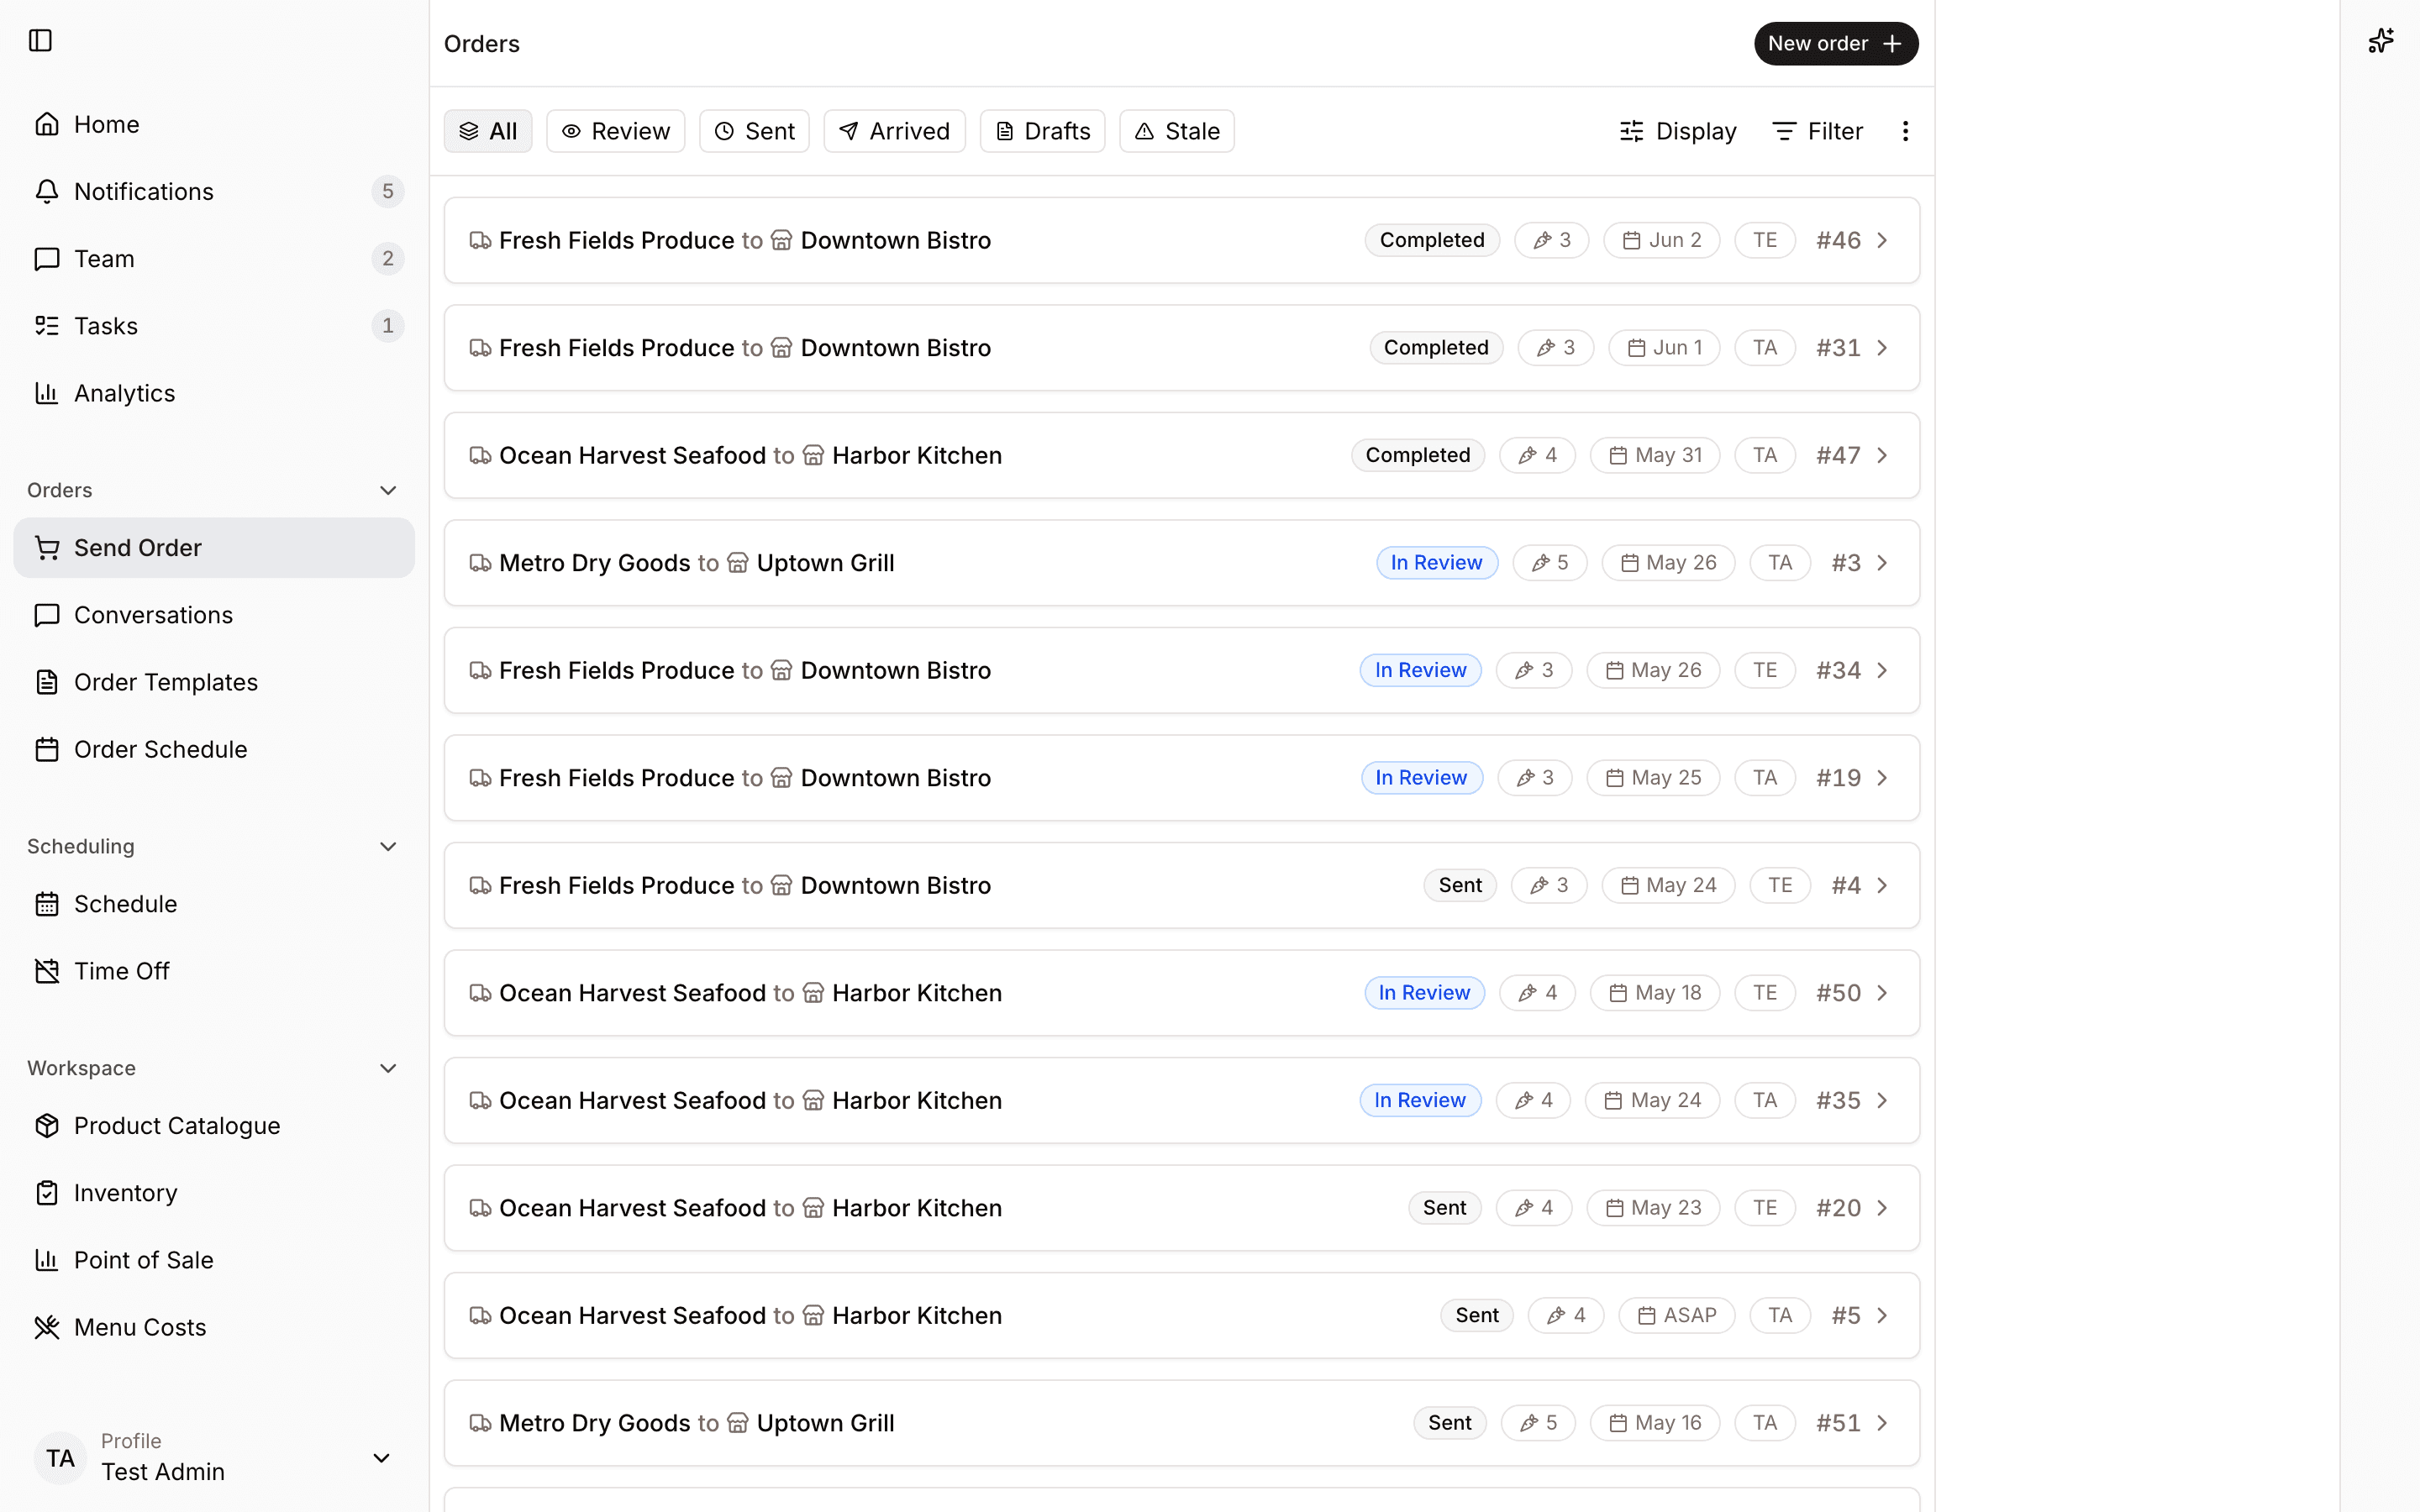
Pills at the top filter by status: All, Review, Sent, Arrived, Drafts, Stale, and Archive. "All" shows everything current, with stale drafts hidden. "Arrived" shows completed orders. "Archive" holds cancelled and denied orders. Staff members see only their own orders under Review.
On the phone app the pills are All, Review, Sent, Arrived, Draft, and Stale. One difference: on the phone, "Arrived" also includes cancelled and denied orders; there is no separate Archive.
Sorting and filtering
- The display menu sorts the list A-Z or Z-A, by "Created date" (newest first is the default), "Delivery date", "Supplier", "Establishment", or "Order number".
- The filter menu narrows the list by location (in the organization view) and by supplier; you can pick several of each. Active filters show as small chips, with a "Clear all filters" shortcut.
Each order card shows the supplier, the location it goes to (in the organization view), the status, the item count, the delivery pill ("ASAP" or the date), who created it, and the order number, like #123. If you can approve orders, clicking an order in review takes you straight to its review page.
Starting from an empty list
If you have no orders yet, the page guides you through what is missing, one step at a time: add a location first, then a supplier ("Add a supplier, then you can order."), then products ("Upload an invoice to build your catalogue."), and finally "Place your first order." Along the way, an "Upload invoice" button offers a shortcut: Spensa reads the invoice and can create products when you approve it. Create or select the supplier during review if it is not already known. Each step has a "See how it works" explainer. See Invoices.
The organization list also shows a banner about ordering offline with the phone app, with Download for iOS and Download for Android links and a Learn More page. You can dismiss it, and it stays dismissed.
Deleting orders
Only drafts and orders in review can be deleted. Sent, completed, cancelled, and denied orders stay in your order history, including when you archive the supplier. See Suppliers.
On the web, open Orders in your company or location. To delete several at once from the list:
- Open the three-dot menu beside Filter and click Edit. Checkboxes appear on the order cards.
- Tick the drafts or orders in review you want to remove. Sent and finalized orders cannot be selected, including by admins and managers.
- Click Delete and confirm in the "Delete Order(s)" dialog.
- Check that the deleted orders disappear from the list. The other orders remain in your history.
Anyone who can create orders can delete drafts. Deleting an order that is in review needs a manager. Deleting an order also removes its review requests from your colleagues' notifications.
Ordering on the phone app
Use the following phone instructions; navigation and review controls differ from the web. See also Mobile app.
The Orders hub and list
Open Orders for All orders, Supplier Messages, Order Templates, Order Schedule, and scheduled ordering. Open All orders to use the order list. The list has a location picker ("All Establishments"; staff members do not see it), a supplier picker ("All Suppliers"), and the status pills. A red banner appears if orders failed to send (see below), a blue one when orders await your review. Order cards show the supplier, the location, the order number, the status, the item count, the delivery date or "As soon as possible", and a blue dot when the supplier wrote something you have not read.
Creating an order
- Tap New Order. The screen has one row per choice, and a Clear button in the header if you want to start over.
- Pick the location. Locations without a complete delivery address are greyed out with "Missing delivery address". If you already added items, changing the location warns you first and clears them.
- Optionally pick the supplier under Supplier (optional). Keep All suppliers to add products from several suppliers to one order. Suppliers without an order email are greyed out with "Missing order email".
- Pick the delivery date: a big "As soon as possible" button, or a calendar below it. Past dates are disabled.
- Once the location is set, a template row appears. Pick a template, or choose "Start from scratch". Without a supplier, templates of every supplier are listed with their supplier; picking one that belongs to a supplier limits the order to it. Changing the template later warns you and clears the items.
- Tap Create.
Adding items on the phone
The items screen works like the web form: template items start at zero with the recommended amount shown, quantities use the number keypad, and you swipe a line to delete it. Items stay grouped in their sections. Tap Add Item to search the supplier's items, or the items of every supplier when the order has none, with the same time and category filters (offline, only "All items" and "Last 30 days" are available). Without a supplier, each result and each order line shows its supplier. Select several and tap Add. Add Custom Item asks for "Item Name" and "Quantity", and for a Supplier when the order has none; as on the web, custom items are not added to your catalogue. Tap Continue once at least one quantity is above zero.
To lift the supplier limit, tap the supplier row at the top of the items screen, or of a draft you opened, and choose All suppliers. Items already on the order stay. On a new order, picking a specific supplier again asks before removing items of other suppliers.
Items that are cheaper at another supplier show the same green pill as on the web, for example "€4.20 cheaper at METRO". Tap it to see each supplier's price and how the quantity changes, then tap Switch to and the supplier name. On an order limited to one supplier, the app first asks "Order from several suppliers?". The review screen shows the same savings card; tap Review items to go back to the items and switch them. The pills also work offline, because the app keeps the current shop prices with your items and hides prices older than 24 hours.
Reviewing and sending on the phone
The review screen shows the delivery date (tap it to change), the item summary with the total count, a reviewers card (Add Reviewers or Manage Reviewers; template default reviewers are locked with a "Template" badge, and you cannot pick yourself), the "Note for Supplier" field, and any minimum order value alert. Then one of these:
- Send Order if you can send directly. A dialog confirms "Send Order to Supplier?", or "Send Order Below Supplier Minimum?" when the estimate is below the supplier's minimum.
- Submit for Review if a reviewer needs to approve first.
- Save as Draft is always available as a second button.
If the location's address is incomplete or the supplier's email is missing, the app tells you before anything goes out. An order to several suppliers is split into one order per supplier when it is sent, exactly as on the web; minimum order and cutoff alerts name the supplier they apply to.
Opening an order on the phone
Order details need an internet connection; offline, the app says so. Drafts open straight into editing, with Finish leading to the review screen. Sent orders show the status, a ⋯ menu with Change order and Cancel order, an inbox card for supplier messages, the Delivered? toggle, the order details, the delivery notes card, the items, the note, and a timeline of who created, sent, approved, and last edited the order.
Ordering without internet
The phone app is made for cellars and walk-in fridges. You create and submit orders as usual, and Spensa sends them out once you are back online.
- The app keeps everything needed for ordering on your phone: locations, suppliers, templates, items, categories, and reviewers. It refreshes this every 15 minutes and whenever you open the app.
- If you are offline and the saved data is more than 4 hours old, the app shows "Your offline data is outdated" with the time of the last update. Connect briefly to refresh, then carry on.
- Finish an order while offline and the phone keeps it, showing "Order queued for sending", "Order submitted for review", or "Draft saved", each with "Will sync when online."
- The Orders tab shows "You're offline. Showing queued orders." Waiting orders carry a badge: "Pending sync", "Syncing…", or "Failed".
- Back online, the app sends everything by itself. You see the progress and then "orders synced successfully", or a note that some failed.
- Orders waiting on the phone expire after 4 hours if they could not be sent. Expired orders appear on the Failed Orders screen.
Failed orders
If something could not be sent, a red banner appears on the Orders tab: "orders failed to sync - Tap to review and retry". Tapping it opens the "Failed Orders" screen. Each card shows what went wrong, how often the app tried, and when. You can Retry (needs internet), Edit to reopen the order, Delete it for good, or use Retry All for everything at once.
One special case: if Spensa saved the order but could not email it because of a rule, for example the order is below the supplier's minimum or the supplier's email is missing, the order leaves the phone's waiting list with an explanation. It exists in Spensa as a normal order; open it there to finish sending.
Changing or cancelling a sent order
If something changes after an order went out, change or cancel it in Spensa instead of writing to the supplier yourself. Spensa emails the supplier in the same email thread as the order, so their reply arrives in the order's conversation.
You can do this while the order is Sent and nothing has arrived yet. It is not possible once the order is marked as arrived, once a delivery note is attached, once the delivery date has passed, or for "as soon as possible" orders sent more than 7 days ago. Anyone who may send the order may also change or cancel it; no review is needed. Both need an internet connection.
Changing a sent order
- Open the order and choose ⋯ > Change order.
- Change quantities, tap the bin icon to remove an item (it shows as Not needed), or use Add products to add items from the supplier's catalogue or as custom items. Items from the template that were not ordered are listed under Not in this order. Use the undo arrow to take back a change.
- Choose Review changes. You see every change with its old and new quantity, can add a note for the supplier, and on the web you can preview the email.
- Choose Send to supplier.
The supplier gets an email titled "Change to order #123", listing only the changed items with their old and new quantities, followed by the complete order as it is now. The order in Spensa is updated right away: changed items show "Changed on ..." with the previous quantity, and new items show "Added on ...". Removed items disappear from the order. People who may only send template orders can change quantities but can only add items from the template.
If someone else changed the same order in the meantime, Spensa tells you and shows the current quantities so you can check them and send again.
Cancelling a sent order
- Open the order and choose ⋯ > Cancel order.
- Optionally write a note for the supplier, such as "The order was sent twice."
- Confirm with Cancel order.
The supplier gets an email titled "Cancellation: Order #123" asking them not to deliver. The order becomes Cancelled right away, no longer counts as an incoming delivery in inventory, and moves to the Archive filter.
If the delivery is due today or the supplier's cutoff has passed, Spensa warns you that the supplier may already be preparing it. Keep an eye on their reply: if they write that the goods are already on the way, the reply is flagged as needing your attention. You can then choose Undo cancellation on the order. This makes the order Sent again without emailing the supplier, so let them know yourself if they should deliver after all.
How this connects to other parts of Spensa
- Order templates - start orders from a template with suggested amounts, sections, internal item notes, and default reviewers. Unlike orders, editing a template can add new products to your catalogue.
- Order schedule - ordering-day reminders start orders for the right supplier, and the schedule shows when today's order went out and which deliveries arrive today.
- Order conversations - every sent order gets an email thread where supplier replies arrive and you can answer.
- Products - the item search draws on your product catalogue, known prices power the minimum order value estimate, and product item codes appear in the order email.
- Price comparison - Price comparison in the Orders section of the sidebar shows which supplier's online shop sells an article cheapest right now. Linked identical products also make orders point out cheaper suppliers.
- Suppliers - the supplier record holds the order email, the email language, the minimum order value, and your customer numbers.
- Invoices - approved invoice lines build your product catalogue; create or select the supplier separately.
- Notifications - review requests and supplier replies reach you in the app, by push, and by email.
- The assistant - can create, edit, and send orders, mark orders as arrived, and copy an existing order for you. Changing or cancelling a sent order is done on the order itself.
- Team and permissions - controls who may create, send, review, and delete orders.
- Settings and billing - your location's address and email, both needed for sending, live in the location settings.
- Mobile app - ordering works offline on the phone; details are in this chapter above.
Good to know
- An order can hold up to 400 items. Item names can be up to 250 characters.
- Up to 20 reviewers per order. Orders from a template can have up to 50 sections.
- The order upload dialog accepts one PDF or up to 10 photos at 20 MB each. The separate Delivery notes upload accepts one PDF or up to 20 photos at 50 MB each.
- Quantities of zero are fine in a draft. When the order is sent, those lines are simply left out. An order where every quantity is zero cannot be sent.
- Every order gets a number, like #123, counted across all your locations together.
- No delivery date means "as soon as possible", and that is what the supplier reads.
- Once sent, an order cannot be deleted or sent again by accident. Changes and cancellations go to the supplier as separate emails.
- Marking an order completed or undoing a cancellation never emails the supplier.
- The supplier's order email must be the supplier's own address. Spensa addresses cannot receive orders.
- There is no duplicate button on the order page. Ask the assistant to copy an existing order instead.
- Drafts older than 14 days move to the Stale filter so your list stays clean.