Order templates
On this page
An order template is a reusable order list for one location and, optionally, one supplier. A template without a supplier can hold products from several suppliers; orders created from it are split into one order per supplier when they are sent. It holds the items you order again and again, so nobody has to build the same order from scratch every week. Templates make ordering faster, keep orders consistent, and let you decide who must approve an order before it goes out.
What this is for
- Create a template for a location and a supplier, or for a location only to mix products from several suppliers, by hand or from a file.
- Fill it with items from your product catalogue, or create new items on the spot.
- Add a note to any item that your team sees but the supplier never does.
- Group items into sections and put them in the order your team walks the storage.
- Set suggested quantities, so staff know how much stock you want to have.
- Choose reviewers who must approve every order made from the template.
- Save the template as a draft, and publish it when it is ready for ordering.
- Search, filter, and sort your templates, and delete the ones you no longer need.
Where to open it
On the web app, open Order Templates in the left sidebar, in the Orders group. The app may say "establishment" in some places; that means a location.
On the phone, open Orders > Order Templates. People with template-management access can create and edit templates there as well as select published templates for ordering.
Access and permissions
Everyone in your organization can see templates. Location staff can see the templates for their own location.
Creating, editing, publishing, and deleting templates needs permission to manage order templates. Owners, admins, and managers have this by default. You can give it to others with a custom role.
Creating a brand-new product from inside a template needs permission to manage products.
Drafts and published templates
Every template is either a draft or published.
- A draft is only visible on the templates page. Nobody can order from it yet.
- A published template shows up wherever orders are created: on the web, on the phone, and in the order schedule.
New templates always start as drafts. Build the template first, then publish it when it is ready.
Create a template
- Open Order Templates.
- Click New template.
- Stay on the Create Manually tab.
- Enter a name, for example "Weekly Produce Order".
- Choose the location. Choosing a supplier is optional: with a supplier, only that supplier's products can be added; without one, products from any supplier can be added.
- Click Create Template.
Spensa creates an empty draft and opens it so you can add items. The location is fixed. If you need the same list for another location, create a separate template.
Remove the supplier from a template
You can lift a template's supplier limit later, for example to add products from a second supplier.
- Open the template.
- Next to the supplier name below the template name, click the Remove supplier button (an X).
- Confirm with Remove supplier in the "Remove supplier?" dialog.
The template now shows "All suppliers" and keeps all its items. Templates without a supplier cannot hold custom items, because Spensa would not know which supplier receives them: remove custom items first, or Spensa asks you to. A template cannot be limited to one supplier again afterwards.
The templates list
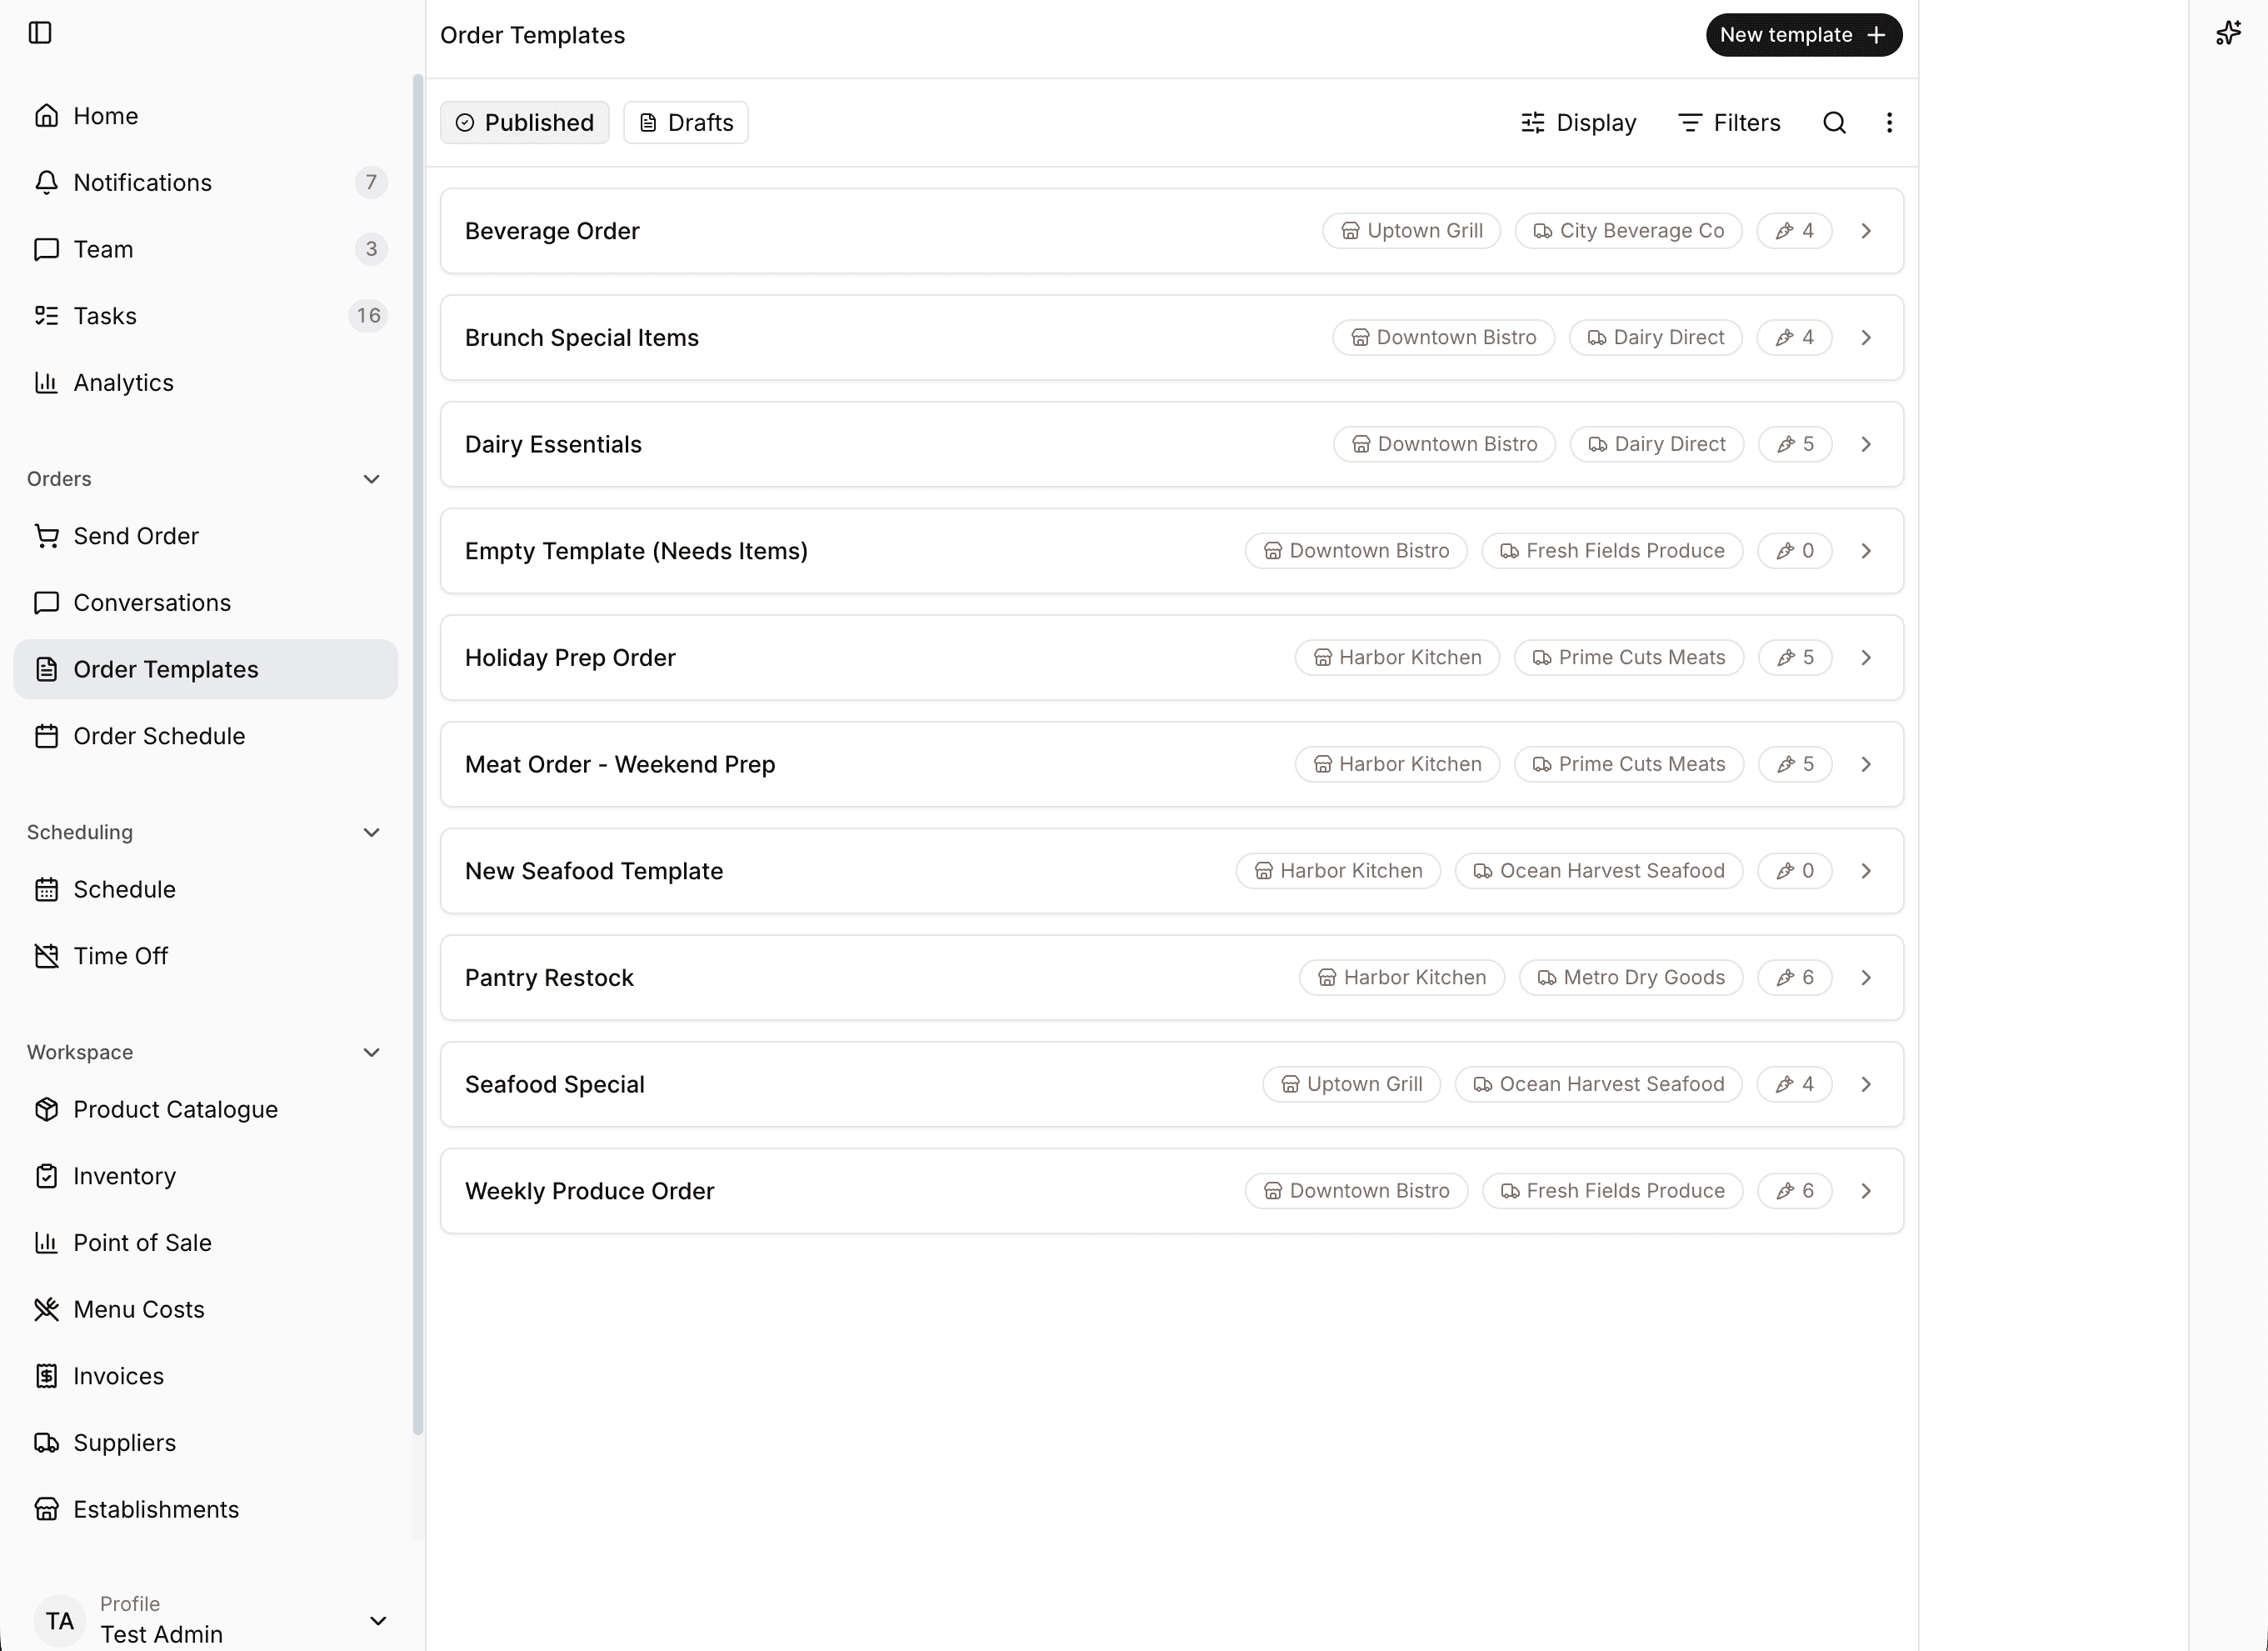
The templates page shows one card per template, with its name, location, supplier ("All suppliers" for templates without one), and how many items it holds.
- Two pills at the top switch between Published and Drafts.
- The search box finds templates by name. It still works if you mistype a letter or two.
- The filter menu narrows the list by location and supplier. Active filters show as small chips you can clear one by one, or all at once with Clear all filters.
- The Display menu changes sorting: by template name, supplier, or location, in either direction.
- The list loads more templates as you scroll.
Delete templates
You delete templates from the list page.
- Open the filter menu and turn on Edit.
- Tick the templates you want to remove. You can pick several at once.
- Choose to delete the selected templates.
- Confirm in the Delete Template dialog.
Deleting a template does not touch orders that were already created from it. If an order schedule slot pointed to the template, the slot keeps working without a template.
Add items to a template
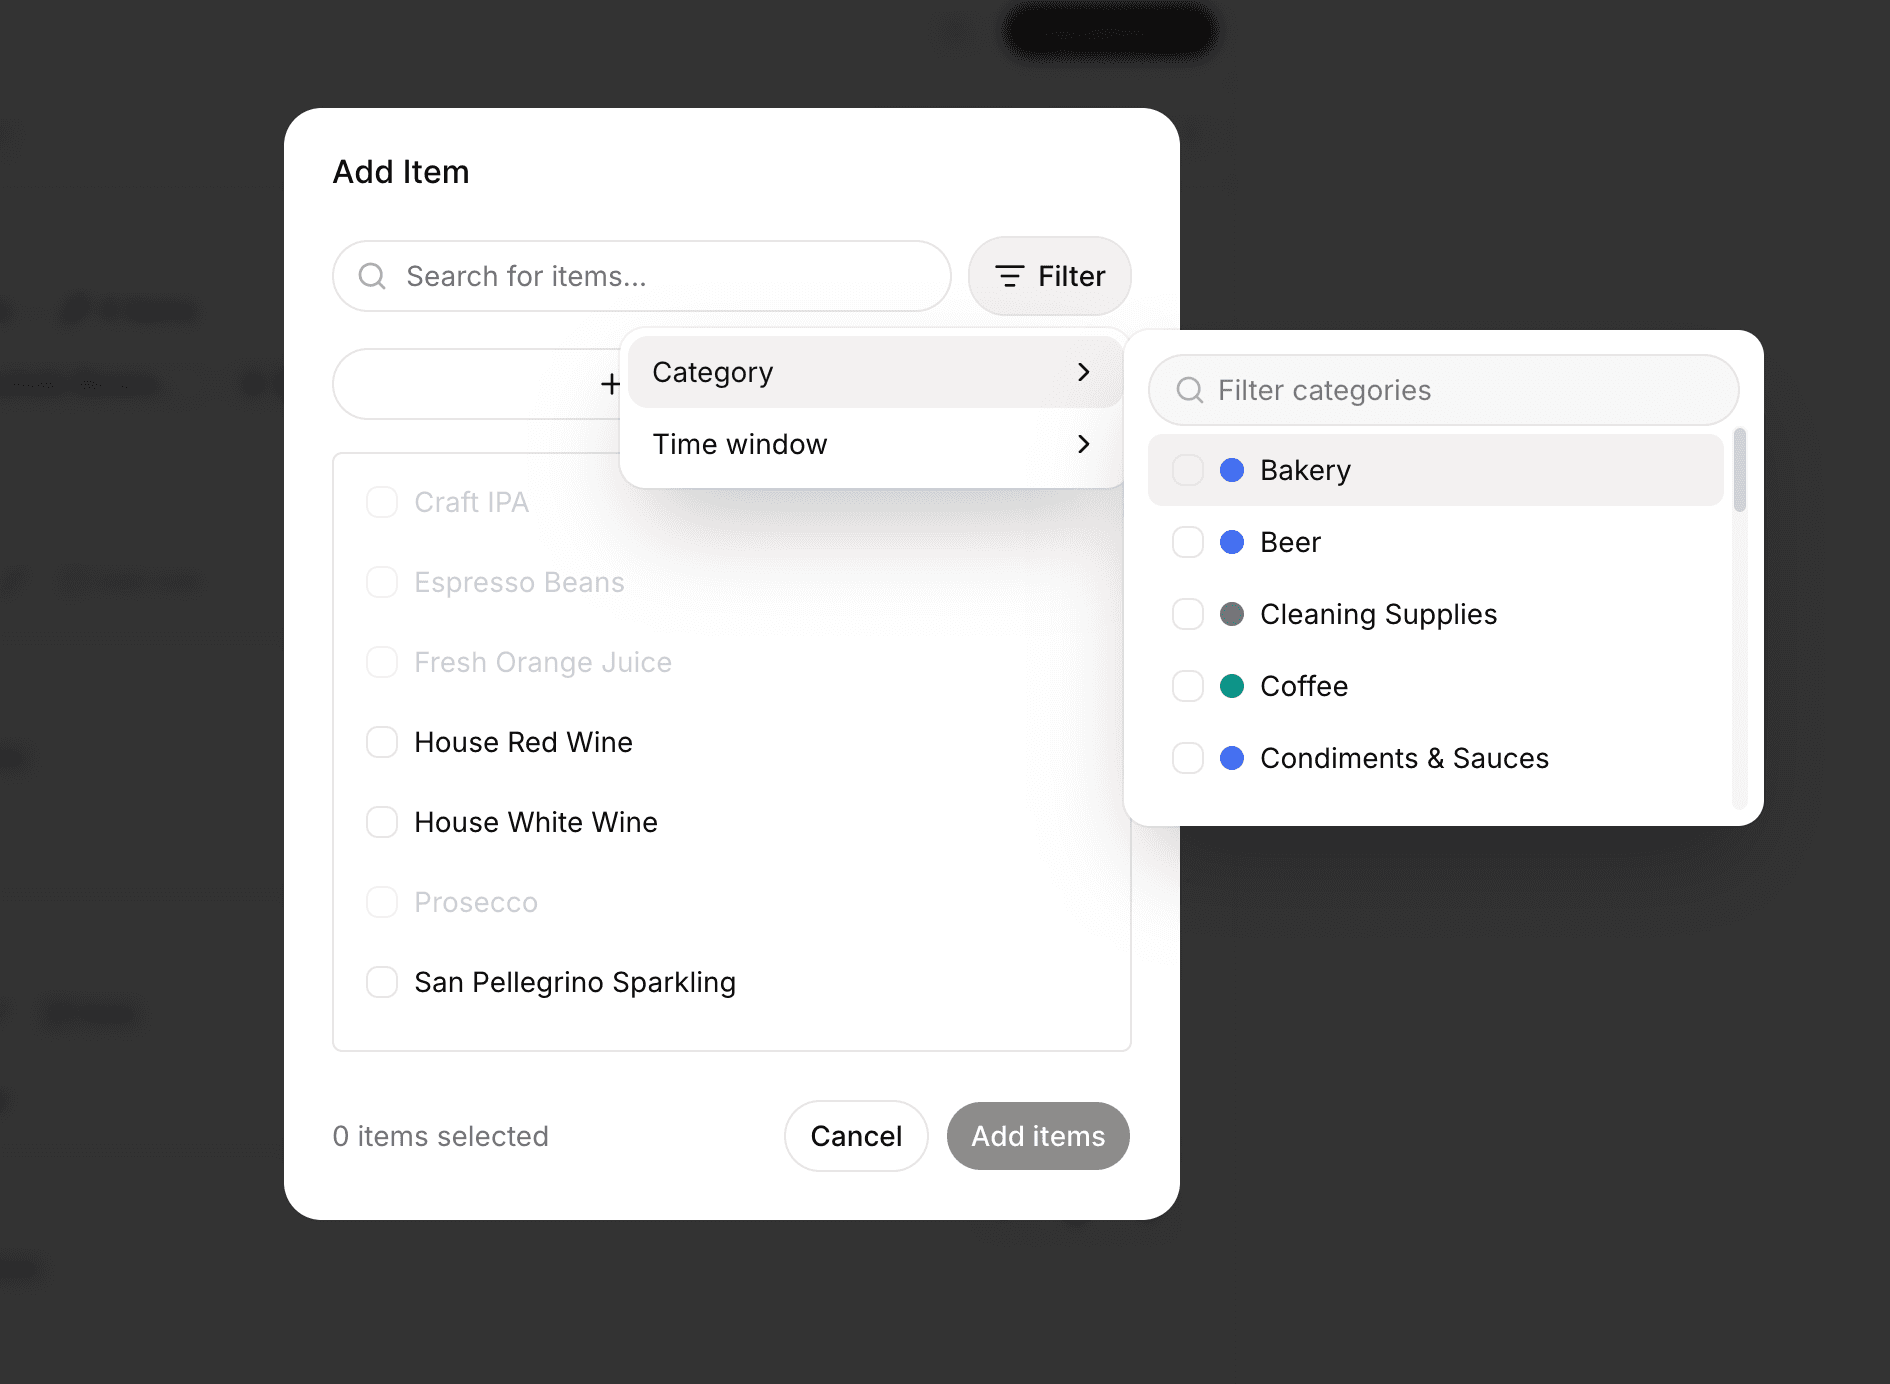
Open a template and click Add Item. A dialog opens where you pick items from this supplier, or from every supplier when the template has none. Creating a new product from this dialog then asks for its supplier.
- Type in the search box to find items by name.
- Before you search, the dialog shows a Recently Used section with items you have put in other templates for this supplier and location.
- The filter menu narrows the list by category, or by when you last ordered an item: All items, Last 30 days, Last 60 days, or Last 90 days.
- Tick the catalogue items you want, then click Add items to review them. Choose Add as new item or Replace existing item, then click Save changes. The confirmed batch is saved immediately.
Items that are already on the template are greyed out, so you cannot add the same item twice.
Replace a product while adding another
This is available on web and mobile to people who can manage order templates. Both products must belong to the template's supplier. Replacing an item changes this template and future orders; it does not delete catalogue products or change existing orders.
Web
- Open Order Templates, choose the template, and click Add Item. If you already edited the template, save or discard those edits first, or cancel to keep editing.
- Select the new catalogue products and click Add items. From a product's Order Templates card, you can instead choose Add to order template, select a template, click Review in template, and then Review changes on the proposed item.
- In Add or replace products, leave Add as new item selected to keep the existing products. To exchange one, choose Replace existing item and select the old item. Suggested replacements appear first when available; you can also search all existing template items.
- Check Replaces: for each new product. Each old item can be selected only once. Review the packaging shown for both products.
- Click Save changes. Check that the new product appears in the template. Replacement preserves the section, position, and internal note, but resets quantity to zero. Set a new suggested quantity afterward if needed.
Mobile
- Open Orders > Order Templates, choose a template, and tap Add Items.
- Select catalogue products and tap Review with the selected count.
- Choose Add as new item, or Replace existing item and select the old item. Suggestions need an internet connection; manual selection works offline with downloaded products.
- Review the old and new products and tap Save changes. The change is saved on the phone immediately and synchronizes when online. Replacements retain the section, position, and internal note, and start at quantity zero.
- If synchronization reports a conflict, open the template conflict review and choose which version to keep. Pending local changes are retained until resolved.
A full template can still replace products. Additions must leave the final template within its 400-item limit. If the template changes while you review it on web, review your choices again before saving. You can always select a replacement manually when suggestions are unavailable.
Create a brand-new item
If the item does not exist yet, click Create New Item in the dialog. This creates a real product in your product catalogue right away and selects it in the item picker. Click Add items, review whether to add it or replace an existing item, then click Save changes to update the template.
This is different from orders. When you add a custom item to a single order, it stays a one-off for that order only. When you create an item in a template, it becomes a proper product you can reuse everywhere in Spensa.
Internal notes for your staff
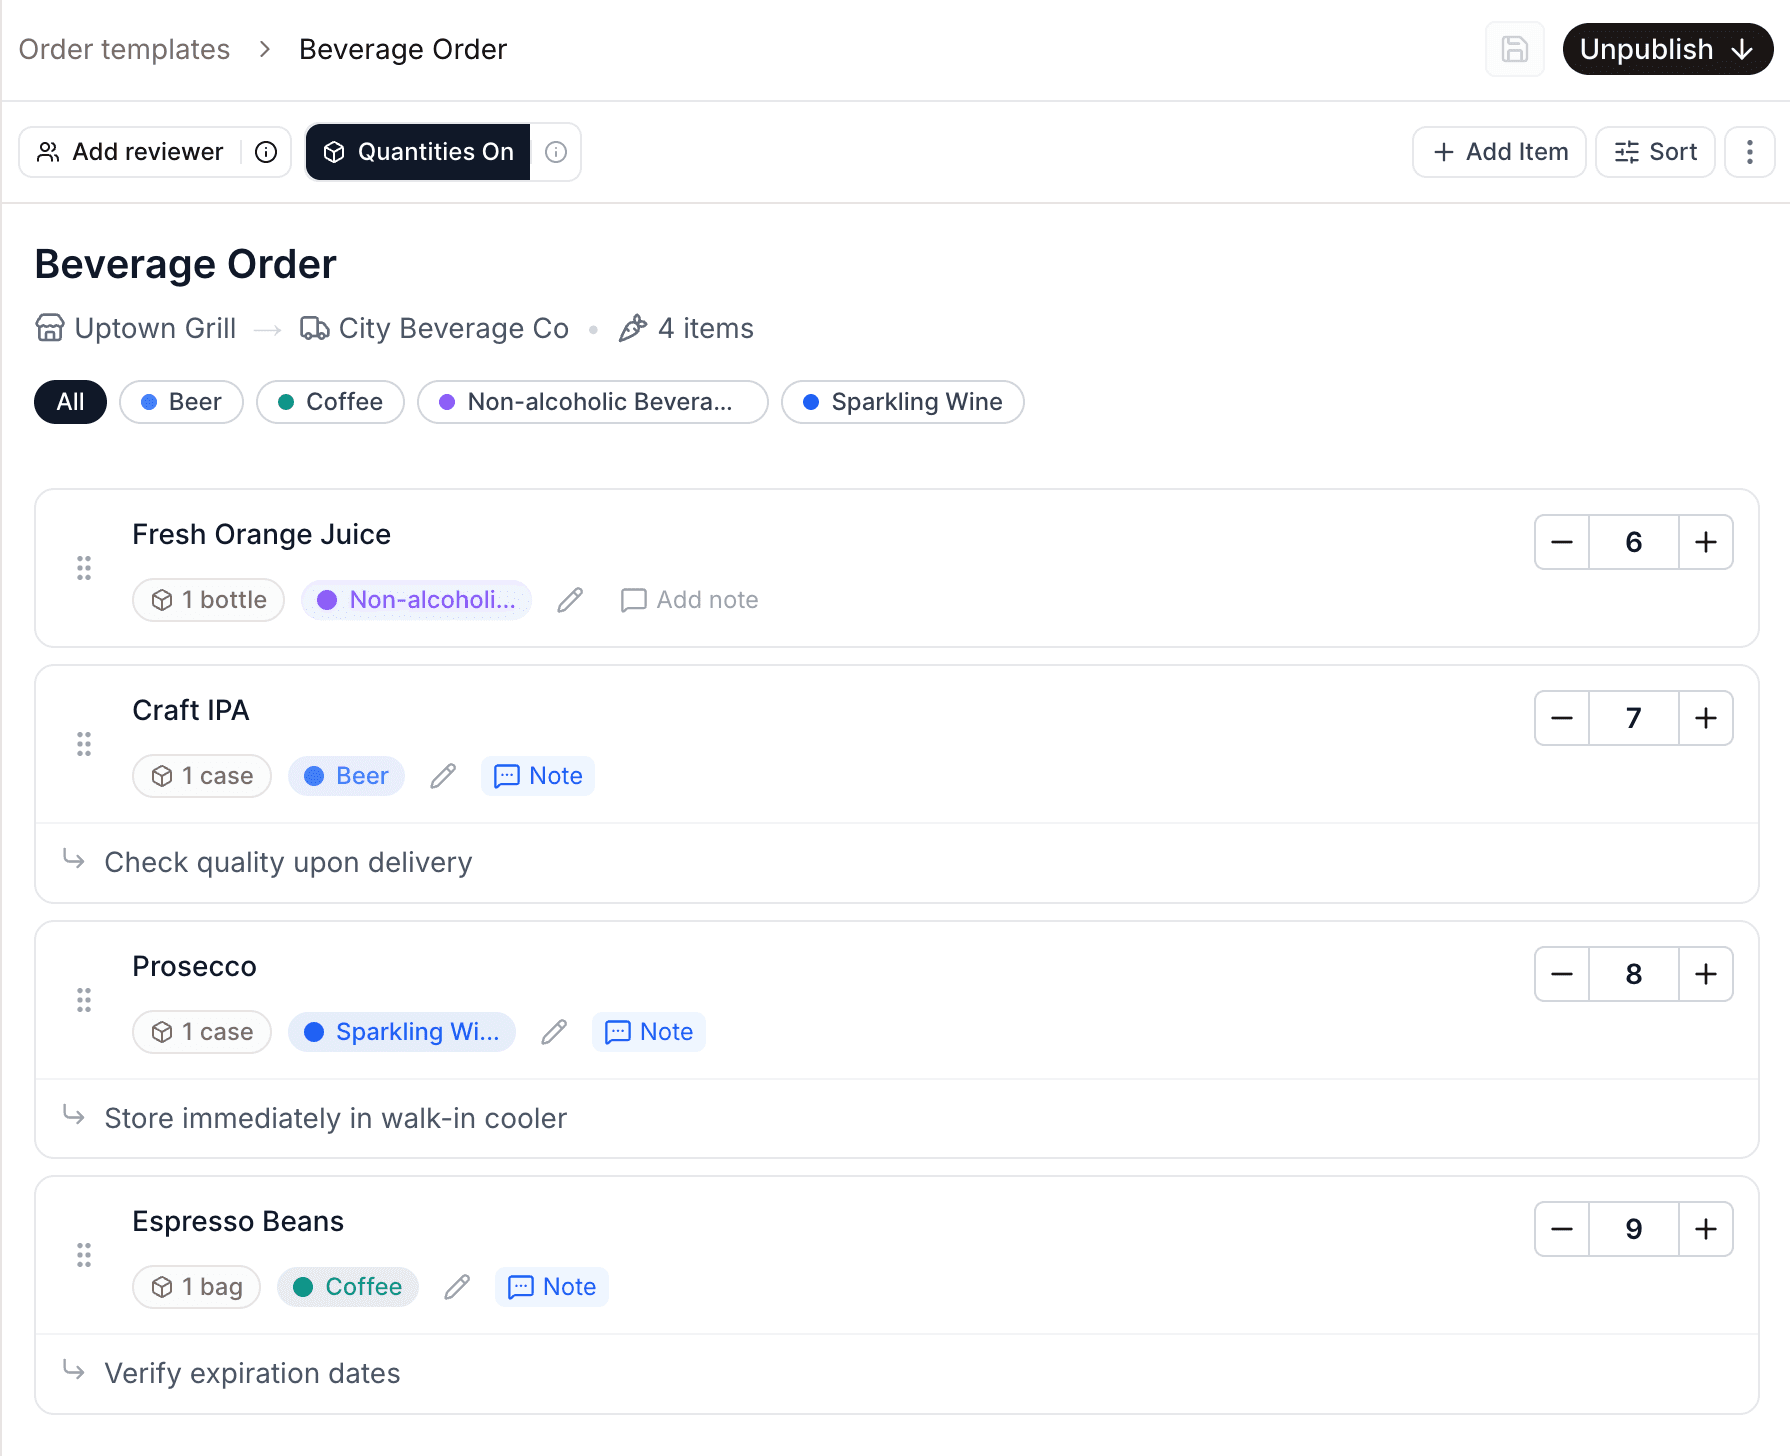
Each item can carry a short internal note, for example "Only order if the terrace is open" or "Check the cold room first".
- Click Add internal note on the item row.
- Type the internal note.
Your team sees the note whenever they create an order from this template. The supplier never sees it. For instructions about the whole order, use Internal Order Note on the template. This is also staff guidance, not the supplier message.
Edit a linked product
Item rows show the item's packaging and category. If you have permission to manage products, a pencil on the row opens the product page in a new tab, so you can fix product details without leaving the template.
Organize the template
A good template follows the way your team works, for example the route through the storage.
Sections
Sections group items under headings like "Cold room" or "Dry storage". You can have up to 50 sections per template, and section names can be up to 64 characters.
- Move the mouse between two rows. An Add section pill appears.
- Click it. A new section named "New section" appears, ready to rename.
- Type the name and press Enter.
An item belongs to the section heading above it. To rename a section, click its name. Leaving the name empty removes the section. You can also remove it from the section's row menu with Delete section. Removing a section keeps its items.
Sections are for your team only. They carry over to orders made from the template, but the supplier never sees them.
Sort and reorder
The sort menu offers Sort A-Z, Sort Z-A, Category, and Manual order. The first three only change your current view. Manual order is the order that is saved with the template and shown to everyone.
While in Manual order with no category or section filter active, you can drag items and section headings up and down to reorder them.
When items have categories, filter pills appear so you can view one category at a time. When the template has sections, a sections filter lets you view one section, or only items without a section.
Remove items
- Open the row menu (the three dots) and choose Edit.
- Tick the items to remove.
- Click Remove.
- Confirm in the Delete Selected Items dialog.
Suggested quantities
A suggested quantity is the ideal stock amount you want to have of an item, not the amount to order. It helps your team decide how much to order without asking you.
Here is how it works when someone orders from the template:
- Every item starts at quantity zero.
- Next to each item with a suggestion, the order shows Should have: 5 (on the phone it says Recommended: 5).
- The person counts what is actually there. If they see 2 cartons of milk and the suggestion says 5, they order 3.
- Items they leave at zero are simply not ordered.
To set suggestions, make sure the Quantities On pill at the top of the template is on. Each item row then shows a stepper where you enter the ideal stock amount. You do not have to set one for every item. Items left at zero show no suggestion when ordering.
To hide suggestions completely, switch the pill to Quantities Off. When you then save the template, all suggested quantities are cleared to zero. If you turn quantities back on later, you enter them again.
Reviewers
Reviewers are company members who must approve orders before they are sent to the supplier. Use this when you want a manager to check every order from a template.
- Open the template and click the reviewers pill near the top.
- Add one or more company members.
- Save the template.
From then on, orders created from this template by company members who cannot send orders freely wait for one of these reviewers to approve them before they go to the supplier. Admins and managers can still send directly. For example, if you add Sarah as a reviewer, a staff member's order from this template waits for Sarah's approval first.
Reviewers must be company members of your organization. If a reviewer's role later changes so they can no longer approve orders, Spensa removes them from the template automatically.
Save, rename, publish
- Save: click the save icon at the top. It is only active when you have unsaved changes. If you try to leave with unsaved changes, Spensa asks whether to save and leave, leave without saving, or stay.
- Rename: click the template name (a pencil appears when you point at it), type the new name, and press Enter. The name cannot be empty.
- Publish: click Publish and confirm. Publishing saves any open changes and makes the template available to everyone with access to that location and supplier. You are taken back to the templates list.
- Unpublish: click Unpublish and confirm. The template becomes a draft again, and your colleagues can no longer create orders from it until you publish it once more. The list opens on the Drafts pill so you can find it.
Import a template from a file
If you already have an order list on paper or in a spreadsheet, you do not need to type it in. Spensa reads the file and builds the template for you.
- Click New template.
- Open the Import from Document tab.
- Enter the template name and choose the location and supplier.
- Drop in your files: PDFs, photos (PNG, JPEG, BMP), CSV or TSV files, and Excel spreadsheets. You can upload up to 10 files at once, each up to 20 MB. All files are combined into one template.
- Click Upload & Process.
Spensa reads the files, pulls out the items, removes duplicates, and matches each row against the supplier's products in your catalogue. One import can hold up to 500 rows.
You can leave the page at any time. Processing continues in the background.
The upload status card
While an import runs, a card appears above the templates list. It shows each upload with its status: still processing, ready for review, done, or failed. Click a row to jump to the right place: the progress page while it runs, the review step when Spensa needs your input, or the finished template when it is done. If an upload failed, the card shows the reason. Click the small X to dismiss an entry you no longer need.
Review the extracted items
If Spensa is confident about every row, it creates the template straight away. Otherwise it asks you to check the rows first.
The review screen shows your original document on one side and the extracted rows on the other. Each document can be downloaded again with Download. Rows that will create a new product are marked with a colored dot.
Open a row to decide what it becomes:
- Link to Existing Product: pick a product that is already in this supplier's catalogue, and choose the unit.
- Create New Product: Spensa creates a new supplier product when you confirm. You can adjust the name, how one unit breaks down, the category, and the supplier's item code. Leave Try to match an existing product on if you want Spensa to reuse a very close existing product instead of creating a duplicate.
Spensa also shows up to 4 suggested matches per row, marked with how confident it is. Clicking a suggestion links the row to that product.
You can set the suggested quantity and unit for each row, and remove rows you do not want. Removed rows stay visible, greyed out, and can be restored until you confirm. Use Select Items to remove or restore several rows at once.
Confirm the import
When every row is complete, click Confirm. Spensa then:
- Creates the new products in your product catalogue.
- Builds the template with all rows linked to products.
The result is always a draft. Check it, adjust quantities and sections if you like, and publish it yourself.
The import is available on certain plans and uses your plan's monthly allowance for reading documents. If the allowance is used up, or your plan's template limit is reached, you will see an upgrade note.
Manage templates on the phone
You need template-management access for the location. Synchronize before going offline so products and templates are available.
- Open Orders > Order Templates and tap New Template.
- Enter Template Name, choose Establishment, and optionally a Supplier (optional). Keep All suppliers to add products from several suppliers. Tap Create Template.
- Tap Add Items and select the products or custom items needed. Templates without a supplier offer products of every supplier and no custom items; New Product then asks for the product's Supplier.
- Check quantities, internal notes, Internal Order Note, and Reviewers. Use Layout to organize the list.
- Tap Save Template, then Publish when the list is ready for ordering.
- Check the Published list. If the app reports template changes that need attention, open that notice and resolve them before relying on another device having the new version.
Local changes made offline still need synchronization. Publishing a locally saved template is not proof that all staff already received it.
To lift the supplier limit on the phone, open the template, tap Remove supplier next to the supplier name, confirm, and tap Save Template.
Ordering with a template
Only published templates can be used for ordering.
On the web
- On the Orders page, click New Order.
- Choose the location. Choose the supplier to see only its templates, or leave it empty to see templates of every supplier.
- Pick a template from the template list, or choose No template (blank order). A template that belongs to a supplier limits the order to that supplier.
- Choose the delivery: ASAP or a date.
- Click Create Order for a template, or Create Blank Order for a blank order.
The order opens with every template item at quantity zero, the "Should have" suggestions, the internal item notes, the sections, and the template's reviewers already in place. Enter the quantities you need. Items you leave at zero are not sent to the supplier.
On the phone
- Start a new order and pick the location, and optionally the supplier.
- Tap Select template.
- Choose a template from the list, or tap Start from scratch.
Template selection works even without an internet connection. If you switch templates while you already have items in your order, the app warns you that your current items will be cleared.
Adding items beyond the template
Anyone with full ordering rights can add extra items to a template order. Staff who are limited to sending template orders cannot: they can only order the items defined in the template, and when the template has reviewers, only a reviewer can send the order. This makes templates a safe way to let staff order without giving them free rein. See Team and permissions.
How this connects to other parts of Spensa
- Orders - templates pre-fill new orders with items, suggestions, notes, sections, and reviewers.
- Order Schedule - a schedule slot can point to a published template, so the weekly order starts pre-filled.
- Products - creating an item in a template adds a product to your catalogue, and each product page lists the templates it appears in.
- Suppliers - a template belongs to one supplier or to all suppliers, and each supplier needs an email address before orders can be sent.
- Team and permissions - managing templates, reviewers, and the limited "send template orders" role are all set up here.
- The assistant - the assistant can create, edit, and publish templates, import files, and start orders from a template for you.
- Settings and billing - your plan sets how many templates each location can have.
- Mobile app - templates are ready on the phone for ordering, even offline.
Good to know
- On the Free plan, each location can have up to 3 templates. Paid plans have no limit. If you reach the limit, you will see an upgrade note.
- There is no way to copy a template yet. To reuse a list for another location or supplier, create a new template.
- Template names do not have to be unique, so you can name templates the same across locations if that helps you.
- A template can have up to 50 sections, and section names can be up to 64 characters.
- File imports take up to 10 files at once, each up to 20 MB, and up to 500 items per import. Each import creates its own new template.
- Internal item notes are never sent to the supplier. Neither are sections.
- If you delete a product from your catalogue, it disappears from every template that used it.
- Editing or deleting a template does not change orders that were already created from it.
- On each product's page, an "Order Templates" card shows every template that contains the product.